Logic Pro Reverb 1 - ChromaVerb
Posted by Esteban Miranda on
As music producers, it's important to keep yourself refreshed on the basics, to make sure that things don't become habits. We end up doing things without thinking about what we're doing, because we are so used to doing it.
But that can be a problem; it can limit our creativity, and mean that we aren't getting the most out of our tools.
So which is the reason I'm covering some of the essentials this month.
I'm rediscovering Logic Pro after not having access to it for a while, and I'm using that opportunity to go over some of its stock plugins - because they're a really good collection - to refresh my memory, but to also cover things for those of you who are perhaps new to Logic, or who - like me - want to refresh their memory to mix things up a bit.
It's a really good to constantly remind yourself of the core concepts and principles around the basics of music production. Be a lifelong learner!
If you think you know everything you can do with a plugin, it's more likely that you're just used to using it in the way you know how, and chances are there are some new and exciting ways of working with it hiding just outside of your awareness.
So, with that in mind, here's today's topic.
We are going to be covering Reverb in Logic Pro.
Logic has some great options for reverb, so we'll cover how the flagship reverb plugins work and how you can get the most of them.

Reverb Reminder
This section is for all you beginners out there, or if you just want a reminder of the principles behind reverb as an effect before we move on.
If you're confident in your knowledge of reverb, skip ahead to where we start talking about Logic's built in Reverbs.
What is Reverb?
Reverb is a natural sonic phenomenon involving sound waves and the way they interact with their environments. We are used to hearing it in our everyday lives, and it existed long before electronic music production - or music in general - did.
Which is a cool thing to think about. Dinosaurs heard reverb!
It is caused when sound reflects from surfaces, often in different and complex ways.
There is an intial reflection, which is key for our ability to perceive the spatial characteristics of the space, and then further reflections which eventually become inaudible.
The more unique surfaces there are, the longer the reverb can last and this is why huge buildings like Cathedrals or massive spaces like Caves often have long and beautiful sounding reverbs.

It’s worth noting though, that it’s not just huge spaces that create reverb, every natural environment contains some. After all, it’s when sound reflects off of surfaces, so this can even be sound reflected off the ground around you.
Even open fields or deserts have some natural reverb, which is another interesting thing to consider.
However, it’s not enough to know what Reverb is. In order to truly utilise Reverb and create proper ambience in your music you need to have a fundamental understanding of how it works; what’s happening behind the curtain.
This is a key point in building your music production prowess. Amateur producers can use effects, but professionals have that core understanding of the concepts which allows them to take their work to the next level.
Why do we need reverb?
This is an important point to consider.
When you’re recording in a studio environment, typically the source sound will be placed in a very controlled, dry sounding environment.
Consider a vocal booth; there’s all sorts of acoustic treatment and sound dampening to ensure the recorded audio is as free of anything other than its true sound.
This is to ensure that we have as much room to add processing to the sound in the mix. Producers often say; a perfect recording won’t need any EQ or Compression, try and get as good a performance or recording as you possibly can, and you’ll not need to do much to it.
Having said that though, we do need to think about the spatial aspect of our music. If you record something with natural room reverb, you’re stuck with it, but if you record it dry, you can add whatever type of reverb you like in post.
So, when creating music and recording, we go through all of this effort to remove any natural reverb, but we aren't used to hearing sounds without reverb.
Our brains can detect when a sound seems unnatural.
So this is why we need to add artificial reverb back into the mix to give the music a sense of real space and dimension.
Of course, there are times when music without Reverb sounds fine, but that’s all part of the learning curve; knowing when and when not to use it.
How can we use reverb?
Reverb can serve as a great way to add ambience to your music; gelling the various parts of your tunes together or putting them in the same sonic ‘space’.
But you can take even further and make really lush sounding ambient drones, or create some weird and otherworldly sounds by adding ridiculously long reverb tails.
The reasons that the human ear tends to prefer music with reverb can be argued both for and against, and it can even be argued that it’s because in the Western world we have a culture of music performed in indoor spaces.
Historically music would have been performed in churches, and then moving forward concert halls and venues, so music naturally sounds better - to a western ear - with reverb.
Perhaps some world cultures with an outdoor music tradition where there isn’t the ingrained reverb may think reverb sounds odd?
Either way, Reverb has been inducted into the music producer’s hall of fame as one of the most important effects you can use in your production.
Early recording engineers used echo chambers, where a dry signal would be played through a speaker which was placed in a specifically designed room with lots of hard surfaces and with a microphone in the other end recording the signal with the room’s reverb.
Luckily, we now have some digital options.
So, I realise that that was a rather academic sounding discussion about the core concepts, but these are fundamental, and you need to know them in order to get the most out of your reverb.
And now that we've got that covered, let's look at what Logic Pro offers in the world of Reverb.
Reverb in Logic Pro
In the world of Digital Audio Workstations, we see many different iterations of digitally recreated natural effects.
Reverb is no different.
Digital Reverbs are exactly that - a digital recreation of the reverb effect, made up of thousands of delays of varying lengths and intensities. T
he time difference between the original sound signal and the arrival of the early reflections can be adjusted using a parameter called Predelay.
Predelay is a control you'll find on all digital reverbs.
Density is another control you'll find. This determines the average number of reflections in a given period of time.
Diffusion is also a control on digital reverbs. This dictates the regularity or irregularity of the density.
In Logic Pro, there are EnVerb and ChromaVerb digital reverb plugins.
But Digital Reverbs aren't the only types of reverb available, there are also Convolution Reverbs.
One of the cool things you can do is sample and analyse the reverb characteristics of real spaces. This then creates what's called an Impulse Response.
You can record an Impulse Response of any real life environment, capturing the reverb characteristics of that space, and then a Convolution Reverb convolves (combines) an audio signal with the impulse response to artificially inject your sound into the real world space the impulse response represents.
Logic offers Space Designer - a really good Convolution Reverb plugin.
Both of the above methods are ways to add reverb digitally to a sound, but they work in fundamentally different ways.
So let's look at the Digital Reverb options first.
ChromaVerb
ChromaVerb is another example of the absolutely beautiful UI on some of Logic Pro's stock plugins. To say that this plugin costs nothing extra, even the UI alone is enough to make me want to use it.
But obviously, UI is only so useful when we're working with audio.
So let's get into it.
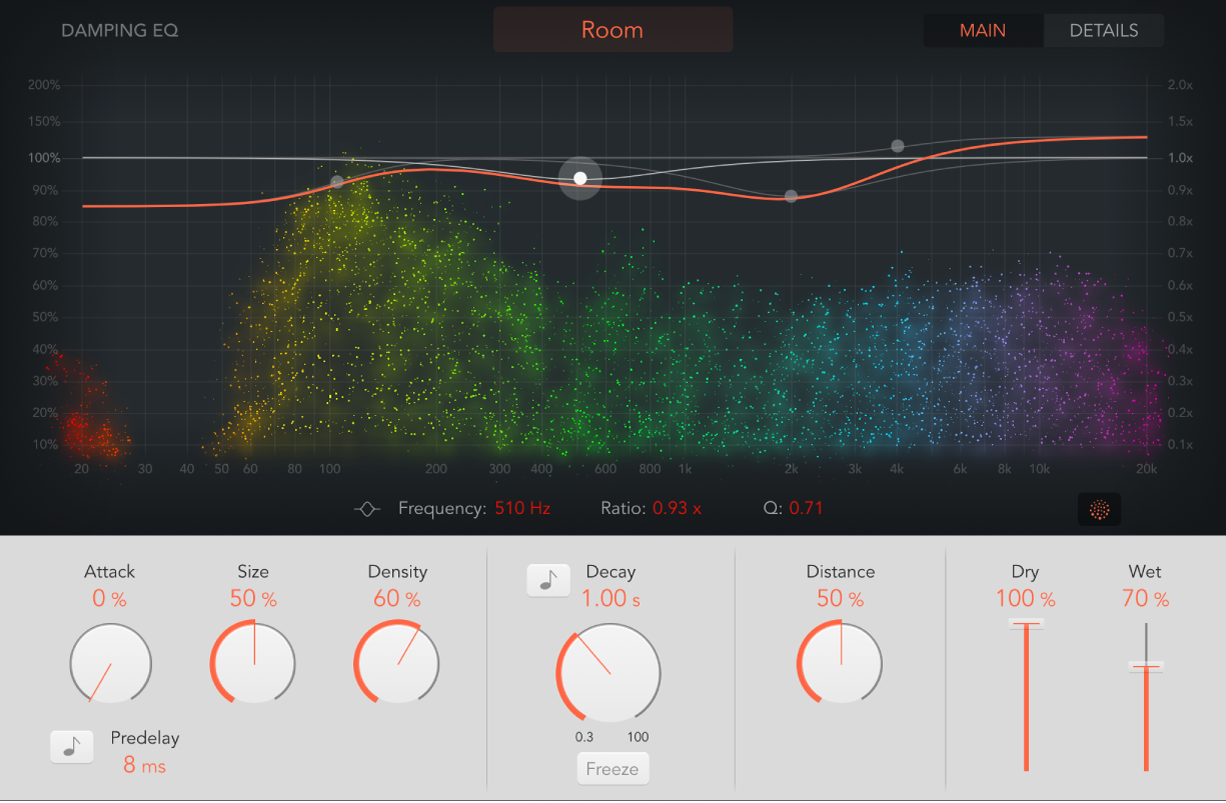
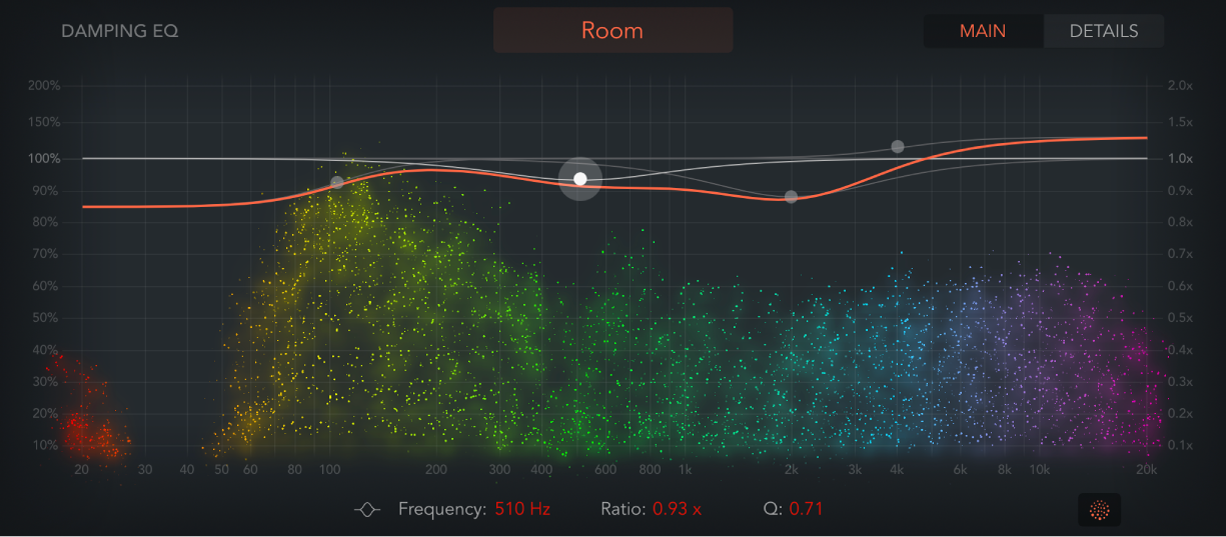
The main focal point in the UI is undoubtedly the graphic display - the place with that stunning visualisation of the reverb characteristics. This is contextual based on whether you have the Main or Details window selected.
There are two different views for ChromaVerb, as we just alluded to. The first is the Main window, and the second is the Details window.
-
Main window: Shows the parameters you'd usually see in a reverb, such as Attack, Size, Density, Distance, and Decay. A visualization of the reverb output is shown in the graphic display, which allows you to directly edit damping factors, thus changing decay frequencies and dependencies.
-
Details window: Provides access to advanced reverb parameters, such as Width, Quality, and Modulation. The graphic display shows an editable Output EQ hat you can use to shape the ChromaVerb output signal.
Let's look at the Main window first.
 The above image shows a Damping equaliser in the graphic display.
The parameters for ChromaVerb's main window display and Damping EQ are :
-
Room Type pop-up menu: Choose the type of reverb space you want to recreate. We will cover these shortly.
-
Main/Details button: Switch between the Main window and the Details window.
-
Graphic display: Shows a real time visualization of changes to parameter values and the incoming signal. A Damping EQ curve is overlaid on the display. You can change the Damping EQ curve in the display or with the fields below it.
The Damping EQ adjusts the frequencies of the decay signal. It is divided into four bands, with independent high and low shelving EQ bands, and two parametric EQ bands.
-
Low shelving EQ dot: Drag horizontally to adjust the frequency and drag vertically to adjust the ratio of the low shelving band in the Damping EQ. Option-click to reset to default values. Hold Option-Command then drag vertically to change the Q value.
-
Low parametric EQ dot: Drag horizontally to adjust the frequency and drag vertically to adjust the ratio of the low parametric band in the Damping EQ. Option-click to reset to default values. Hold Option-Command then drag vertically to change the Q value.
-
High parametric EQ dot: Drag horizontally to adjust the frequency and drag vertically to adjust the ratio of the high parametric band in the Damping EQ. Option-click to reset to default values. Hold Option-Command then drag vertically to change the Q value.
-
High shelving EQ dot: Drag horizontally to adjust the frequency and drag vertically to adjust the ratio of the high shelving band in the Damping EQ. Option-click to reset to default values. Hold Option-Command then drag vertically to change the Q value.
The following parameters apply to each Damping EQ band when it's selected:
-
Frequency field: Set the Damping EQ band center frequency.
-
Ratio field: Set the Decay parameter timing ratio of the Damping EQ band.
-
Q field: Set the band width surrounding the center frequency of the Damping EQ band.
-
-
Visualization on/off button: Enable or disable the real time visualization in the graphic display.
So, the first point was Room Types.
This brings up a sub menu which allows you to select the room emulation of ChromaVerb.
 This section is another example of beautiful UI elements in this plugin.
| Room |
Natural-sounding room with a rapid build-up of dense refelctions.
|
| Chamber |
A punchy reverb that emulates a small to medium room. It has a fast attack and high echo density with low coloration.
|
| Concert Hall |
A large space with long delays in the initial sound, a slow build, minimal high end response, and a moderate diffusion build.
|
| Theater |
A medium to large dry room with medium reflection density.
|
| Synth Hall |
Wider than the Room model with the sparsest refllections of all room types.
|
| Digital |
A medium room with midrange reflection density. It has a slower attack than the Room model. The decay is brighter and creates a lush-sounding chorus-like reverb. It has a dense reverb tail, with extended high and low response.
|
|
Dark Room |
A small to medium sized, dark sounding, less dense room reverb.
|
|
Dense Room |
A small room with a desne reflection pattern that vuilds very quickly.
|
|
Smooth Space |
Smooth sounding reverb that emulates a medium sized space.
|
|
Vocal Hall |
A medium to large, smooth vocal hall with a midrange number of reflections.
|
|
Reflective Hall |
A medium to large, highly reflective hall reverb with a low reflections density.
|
|
Airy |
A large space with sparse reflections.
|
|
FX - Strange Room |
A medium space with midrange reflection density and a distinct colour.
|
|
FX - Bloomy |
A large space reverb with moderate reflection density that creates booming decays.
|
As we mentioned earlier, the bottom row of controls on the Main window are all typical to reverb controls, so we won't cover them here.
Let's move on to the Details window.
The Details window contains some advanced parameters for controlling the overall tone of the sound.
You can see these pictured below.
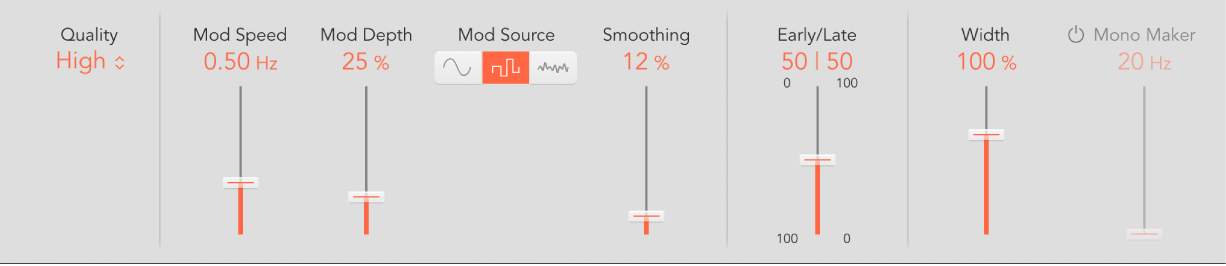
These controls allow greater fine tuning of various facets of the sound of your reverb, so let's cover what these do.
-
Quality pop-up menu: This control allows you to choose a quality level. Low produces a grainy reverb with noisy modulation. High sounds clean and precise. Ultra delivers a smooth, expensive-sounding reverb.
-
Mod Speed slider and field: Sets the speed of the built in LFO.
-
Mod Depth slider and field: Sets the depth of LFO modulation. The range is determined by the chosen room type.
-
Mod Source buttons: Choose a sine, random, or noise waveform for the LFO.
-
Smoothing slider and field: Change the shape of the LFO waveform. The random waveform is smoothed and the sine and noise waveforms are saturated.
-
Early/Late Mix slider and field: Set the level of early and late reflections. These vary depending on the Distance parameter value. See main window controls.
-
Width slider and field: Set the stereo width of the reverb.
-
Mono Maker on/off button: Turn on to remove stereo information below the frequency set with the corresponding slider.
-
Mono Maker slider and field: Set a frequency below which stereo information is removed. This compensates for perceived level losses in the overall low frequency range.
So as you can see, ChromaVerb allows some really detailed fine-tuning of the overall sound, and you can get as precise as you want using these advanced controls.
The other part of the Details window to focus on is the Output EQ which is pictured below.
This applies equalisation to the overall sound of your incoming audio signal and ChromaVerb. So once your signal has come in, been processed by your reverb parameters, it then comes through the Output EQ.
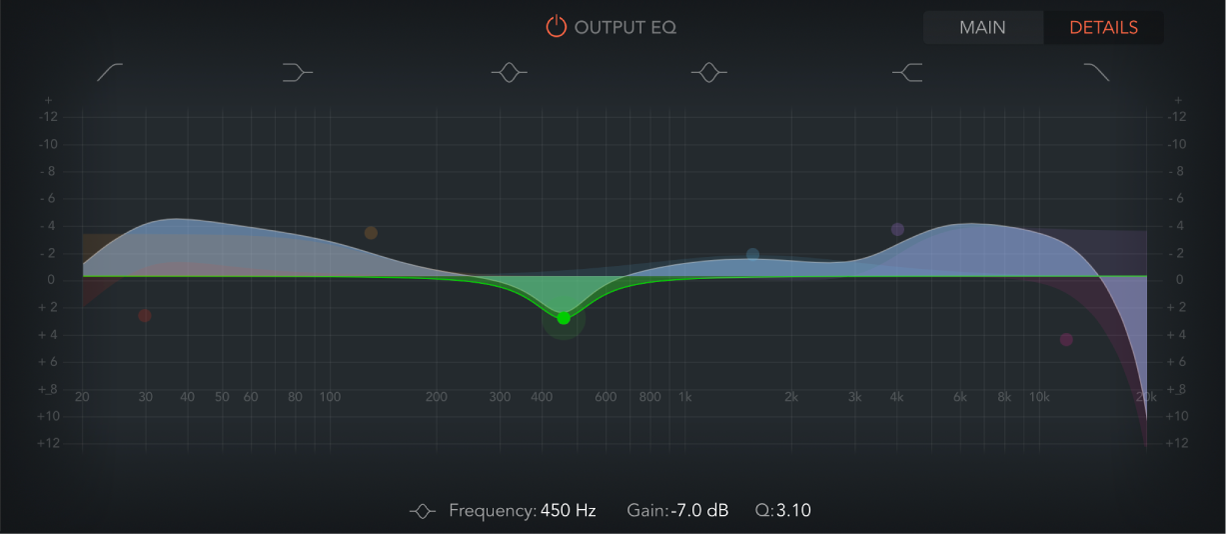
The controls are as follows:
- Output EQ on/off - this (surprisingly) turns the EQ on or off.
- Band 1 on/off - this band offers a highpass filter, and you can change the parameters of this directly in the graphic display once it's activated.
- Band 2 on/off - this is a low shelving filter, adjusting the low frequencies with minimal effect on any frequency above the Cutoff.
- Bands 3/4 on/off - these are both parametric filters, each with three controls - Frequency, Q and Gain.
- Band 5 on/off - this adds a high shelving filter. Which works like Band 2, but in reverse!
- Band 6 on/off - this is a lowpass filter, so it allows low frequencies to pass and reduces the level of higher ones near the cutoff.
- Frequency field: Set the frequency of the selected EQ band.
- Gain field: Set the level of the selected EQ band (bands 2 to 5).
- Order field: Set the order (filter slope) for band 1 or band 6.
- Q field: Set the band width surrounding the frequency of the selected EQ band.
If you've read our recent post about EQ in Logic Pro, you'll be familiar with a lot of these controls. It's essentially the same Logic Pro EQ systems, running in the reverb.
So as we've seen, ChromaVerb is a versatile reverb effect which offers a ton of controls and functionality, housed in a really intuitive and beautiful UI.
Get experimenting with the different Room types, and see what kind of effects you can get out of this plugin.
Check out the next post in this series, where we will look at EnVerb.