Logic Pro - Alchemy
Posted by Esteban Miranda on
I've recently been inspired to jump back into Logic Pro. One of the funny things about being a music producer is how easy it is to get set in your ways. With so many options for music making out there, it's surprising how many of us fall into habits, and end up using one DAW over all the others. Sometimes it can be even more specific, we can end up using one plugin, or one synth, all the while ignoring the vast selection of other possibilities out there.
So, in this vain I've challenged myself to step out of my Ableton Live-centric production habits and remind myself why I used to love Logic Pro so much. It's a powerhouse of a DAW, capable of some fantastic feats, and it's had some seriously big updates since I was last using it regularly. These include general quality of life improvements, but also the addition of some really cool new synths and plugins.
So, I'm going to be exploring some of these this month; diving into what they are, how they work, and what you can do with them. So why don't you join me?
In today's article, we will be looking at Alchemy. A powerful and aptly named synth which has gained a tonne of acclaim and popularity since being added into Logic Pro.
We are going to cover:
- An overview of Alchemy
- Highlight some of its best features
- Give you some tips and tricks to try out
- and more!
So, let's get into it.
Alchemy
Alchemy is a super powerful yet easy-to-use manipulation synthesiser. It comes packed with a selection of real-time performance controls as well as an extensive preset library.
Featuring additive, spectral, granular synthesis (& resynthesis) as well as sampling and virtual analog engines.
If that doesn't give you an idea straight out the gate as to how many features are lurking in the depths of this synth, then read on!
Alchemy lets you work with samples, allowing you to analyse and manipulate them using one or more of the aforementioned synthesis methods. You can easily create sounds containing hundreds of samples and layers, thanks to Alchemy's extensive sample mapping, looping and grouping facilities.
But you're not just limited to samples, you can create purely synthetic sounds, and whether it's additive, spectral or virtual analog synthesis, these engines are full featured, packing in so much power, even more so than many standalone instruments!
This all sounds a bit confusing doesn't it, so let's begin to break it down.
Patches
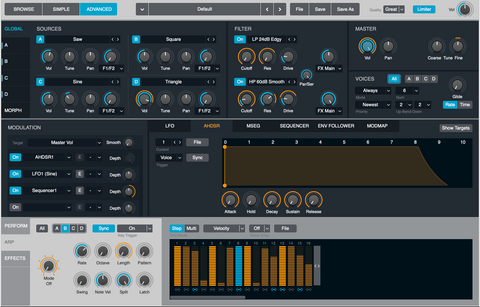
Like with all synths, Alchemy runs patches. Each patch in Alchemy incorporates four independent sound sources. You can see this workflow demonstrated in the diagram below. Each of the four sound sources can include multiple elements from the various categories of sound production, which we mentioned earlier.
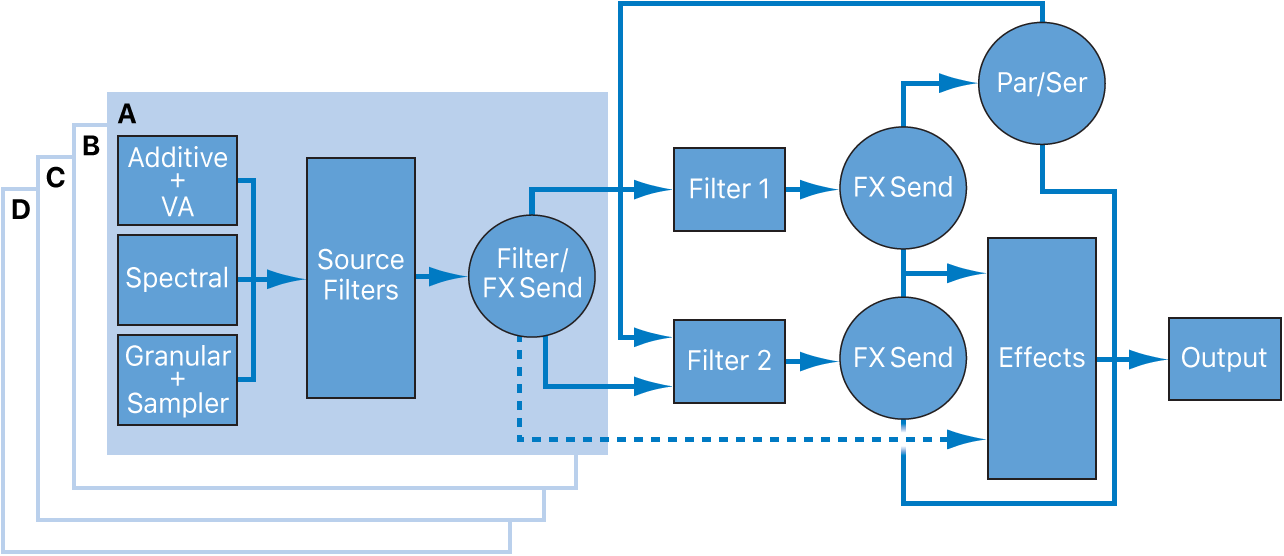
As you can see above, each sound source has its own filter and modulation parameters, there are a wide range of global filters and effects as well.
It's handy to break this down into three stages:
-
So as we mentioned, each sound can contain up to four sources: A, B, C, and D. Each source consists of additive, spectral, granular, sampler, and virtual analog elements. Multiple elements can be active in each source. Each source has three independent filters that can operate in parallel or in series. These sources are used to create and shape the basic tone of the sound. All modulation in this section applies per voice.
-
There are two main filters that can operate in parallel or in series. The main filters are used to shape or otherwise alter the combined sound from the four sources. All modulation in this section applies per voice.
-
After the individual voices are mixed together and filtered, they pass through the effects stage. Any modulation of the Effects section is applied to the entire audio signal sent from the main filter section. You can also directly route sources (post source filters, if used) to the Effects section, bypassing the main filters altogether.

As you can see in the image above, the four sound sources are shown on the left. Bear in mind, you need to have the Advanced tab toggled in the top of Alchemy in order to view this panel.
Each of the four sound sources A - D can be selected from a multitude of possible options. You can import audio to use as a sample, as well as selecting various types of synthesis, from the basic waveforms to more complex variations.
A cool feature about these sound sources is how you can drag and drop audio into them. Simply locate a compatible audio file, and drag and drop it into the sound source area. You can move the sound around and choose whether you want it to work more like a regular sampler, or by using your sound as a granular sound source.
What's more, is that you can even drop an EXS sampled instrument that you'd usually launch in EXS24, and have it running in Alchemy with all the synth routing possibilties.
If this seems a bit too daunting, that's where the array of presets comes in handy. You can take a number of different approaches to sound design within Alchemy.
If you prefer to load up a preset and tweak existing settings, you can do. In this case it may be better to use features that affect the entire instrument, such as by using the performance controls in the Transform Pad (we'll come back to this shortly).
However, if you prefer to do your sound design from scratch, you can do that too! You can create your four different sound sources, and go parameter by parameter through Alchemy, tweaking as you go.
There's also advanced morphing capabilities which facilitate cross-synthesis to create new sounds!
It's safe to say that whatever approach you're using, you'll be creating some new and interesting sounds with this synth. As I always say; experiment with this synth to familiarise yourself with how it works, because there are a tonne of different approaches to Alchemy.
One of the cool features about it though, is the Performance Control section, so let's have a look at this in a bit more detail.
Performance Controls

Alchemy has a neat subpage of controls grouped under the Performance label, which are shown when Simple View is active, or when you've selected the Perform button in the Perform/Arp/Effects section.
Within this section there are:
- 8 knobs
- 2 XY pads
- a set of ADSR envelope controls
These together give a total of 16 controls, which can be assigned to modulate parameters in the same way as other modulation sources.
As well as those listed above, the Performance section has its own gain stage with a dedicated Snapshot Volume control.
This section (incase the name didn't give you any clues) is clearly designed around performance, and getting the most out of your sounds by performing with them. This -to me at least- evokes ideas musicality, it seems to reference the creativity and human qualities to musical performance, which can so often be lost in electronic music creation, as I often say.
This is clearly demonstrated by the ability to capture morphable snapshots of performance control settings, and all controls are available as automation targets. What this means in practice is that you can capture changes you make while playing them in, but if you're more likely to want to draw in and program in your own automation, you can do that too.
We will go into the different performance controls sections in more detail, but first, let's discuss briefly a few pointers on how they're used most effectively.
Getting the most out of Performance Controls
In essence, Performance Controls in Alchemy are a custom set of controls which modify the values of key sound parameters. What's important to note here is the assigning of which parameters are key.
Using the Auto Assign feature, Alchemy generally finds the most relevant parameters of the current preset to map to performance controls. Since there's a lot to get your head around in Alchemy, starting with presets is a good idea. In this same vain, there are presets for Performance Controls using Auto Assign which provides you with a good starting point for assignments.
However, you can get some really cool results if you assign these parameter controls yourselves.
It's worth noting that many presets within Alchemy have a similar layout in terms of the parameters mapped to the Performance Controls. As always, there are some odd-ones-out which have special and different controls, but in general, the following guidelines work well for most.
-
Control knobs: These provide quick access to a sound’s main characteristics. If you're familiar with creating Instrument Racks within Ableton Live, this concept may be familiar to you. You can assign knobs to other parameters in advanced view.
-
Knobs 1 and 5: Often used for Delay (1) and Reverb (5) level. If other effects are used, other effect parameters can be substituted here. Control of effects mix levels should take priority over other parameters, assigned to Knob 1.
-
Knobs 2 and 6: Often used for filter cutoff and resonance. If your preset doesn’t use a filter, you might consider adding one in a fully open state in the Effects section.
-
Knobs 3 and 7: Often used to control rhythm or movement in a preset with LFO or arpeggiator parameter assignments.
-
Knobs 4 and 8: Often used for timbre, pitch, or other source parameters.
-
-
XY pad 1: Generally used for morphing among sources. If more than one source is used, this XY control is the place to assign control of morphing or crossfading.
-
XY pad 2: Can be used for control over additional morphing or effects parameters or for features unique to a particular preset.
-
Envelope knobs: Normally control the corresponding parameters in AHDSR 1. You can reassign to other parameters in advanced view.
-
Mod wheel: Typically linked with the most playable performance control and should always be functional for the first snapshot. Take care with modwheel assignments to make sure settings of 50% or lower don’t cause undesirable results, such as a dropout of the sound (from a very low minimum lowpass cutoff setting, for example). This is particularly important if your MIDI controller has a spring-loaded joystick.
-
Octave: Turn off if you want to play your sound across the entire keyboard range.
-
Aftertouch: Should always be assigned to something useful for the preset.
You may have noticed, in particular in the notes on the XY pads, that Morphing is a key term when we are talking about Alchemy. And this should come as no surprise; whether it's considering the four sound sources we mentioned earlier, and the blending of these sources, or the various effects parameters within the synth, or even the name Alchemy itself, the concept of Morphing fits really well. I feel like it's another great example of when Apple really melds the performance and the aesthetic feel of their products to create something that is both intuitive and powerful in the hands of the user.
And nowhere is Morphing more present than in the Transform Pad section, so let's explore it!
Getting weird with the Transform Pad
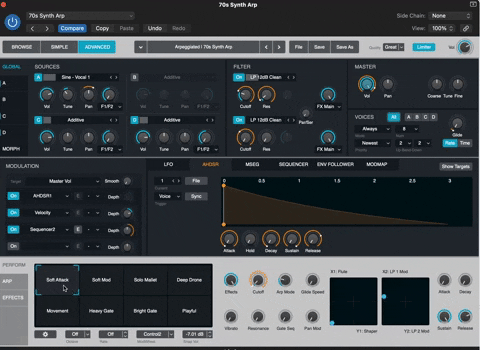
The Transform Pad is the section of 8 pads on the left of the Performance Controls section. The information in here is context specific, so the presets will change with each patch you load in, or with the changes you make to your own patches. Each of the 8 pads contains a different preset of parameters, these are called Performance Snapshots.
These Performance Snapshots are selected by moving the Framing Box.
Below, you can see two different screen grabs of the Transform Pad in use on a patch I'm running. There are a few cool things I want to point out here before we dive into what all of the controls do. (Note that I've included the entire section of Performance Controls to demonstrate the relationship between the Transform Pads and the wider Performance Control section.)

First, in the image above, you can see the 8 Transform Pads, each of which contains a Performance Snapshot.
At first glance, it seems as though you have 8 options to choose from; simply click a pad, and the changes are made. However, the reality is much more exciting. You can see the blue corners of the Framing Box which highlight a pad, but they are hovering precariously over a total of four of the different pads. This means that the sonic changes are morphing between four of these Performance Snapshots.

In this second image, you can see I've moved the Framing Box more or less over the Bright Gate setting, bit it's not quite perfect.
Now, notice how the 8 knobs, XY pads and ADSR all change depending on how you select the a Performance Snapshot within the Transform Pad.
This is a really dynamic section, allowing a huge range of possibilities for your sound. It's almost like taking your synth patch (whether it's a preset or one you've created), and then within that synth patch there are another range of presets to change how the sound works. Just check out the GIF below, which is a screen recording of me adjusting the Transform Pad, and see how it changes all of the parameters within Alchemy.
So let's, explore what the controls all do.
-
Transform pad: Drag the framing box to different positions to morph between performance snapshots in real time. As we've seen, the performance control knobs update, modulating the associated parameters.
-
Action menu button: This is the small button with the Cog icon. It opens a pop-up menu with a number of snapshot-related commands. These are listed below.
-
Copy Snapshot: Stores all performance control settings of the selected snapshot in a buffer.
-
Paste Snapshot: Paste all performance control settings from the buffer to the selected snapshot.
-
Copy 1 To All: Copy all performance control settings of snapshot 1 into snapshots 2 to 8.
-
Clear: Capture the current performance control values and apply them directly to target parameters, preserving the current sound. Following use of the command, all performance control and Transform pad assignments are cleared, all controls are reset to zero, and the knob and pad name fields are wiped.
-
Randomize Snapshots: Create random performance control values for all snapshots except the currently active snapshot.
-
Auto Assign All: Automatically assign all performance controls to appropriate parameters in the current preset. This command also generates a random set of snapshots that are derived from the settings in snapshot 1. This is the quickest way to start with the performance controls.
-
Auto Assign Empty: Automatically assign all unused performance controls to appropriate parameters in the current preset. Existing performance control assignments are not affected, and no snapshot settings are created.
-
Snapshot Update: Enable to immediately write changes of performance control values to the nearest Transform pad snapshot. This prevents the performance knob from reverting to its previous position when you move a performance knob and then move the Transform pad framing box slightly.
Tip: This parameter is on by default, but you can enable or disable it as preferred and then save the default preset in the plug-in header to recall this behavior in new presets.
-
-
Octave pop-up menu: Define an octave range used to switch between Transform pad positions when you play notes within the specified range.
-
Rate field: Drag vertically or use the arrows to set the speed of movement (interpolation) between snapshots when switching from a MIDI keyboard.
-
ModWheel pop-up menu: Assign your keyboard modulation wheel to a performance control. This can be any knob, the x- or y-axis of pads, or the envelope controls. Set to None to disable modwheel control of performance controls. A setting of None is remembered between presets.
Each modwheel target offers an inverted option. This is useful when using a spring-loaded modulation wheel as it stops the target performance control from closing when the modulation wheel is released.
-
Snap Vol field: Set the intensity of change from one snapshot to the next. In essence, this sets an initial level between snapshots.
This section of Alchemy is really unique, and frankly, I love it.
It gives a deep level of customisation within your sounds, and I am huge fan of how it's geared around performance.
Considering the Transform Pad and how different performance snapshots can be assigned, you can really get creative with your sound design. You can have sounds that evolve over the course of your tracks, with easy switching between different Performance Snapshots for different sections.
Alchemy
Alchemy was a medieval science / philosophy in which people tried to turn base metals into gold, discover universal cures for disease, and create everlasting life.
Now, I'm not sure about the last two parts of that statement, but I certainly believe that Apple have struck gold with this synth.
The level of customisation in Alchemy -whether it's the blending of your different styles of synthesis, sound sources etc, or the Performance Controls- gives an unrivalled scope of possibilities for sound design.
It's a rich and detailed piece of software, giving back as much as you're willing to put in. I had so much fun playing around with Alchemy, and I feel as though I barely scratched the surface in terms of its capabilities.
It's clear that there is some hidden power in this synth, so be sure to experiment as much as you can, and who knows?! - maybe you will find everlasting life, or the cure to a disease. (You won't, but it felt like a nice metaphor!)
AS always, thanks for checking in with us here at Logicxx.com, and while you're here, be sure to have a look at the various deals we have available on our Logic Project Templates. For those of you unfamiliar, these are a great way to learn how a professional level track is created. Our international team of producers work tirelessly to create faithful and professional level remakes of some chart topping hits from across the dance music world, and they're an invaluable resource for you to learn the tricks and tips that professional producers use in their music.
Share this post
- Tags: Alchemy, Logic Pro DAW, Logic Pro X