The Benefits of using Logic Pro for Audio Recording
Posted by Esteban Miranda on
It's easy to think that all DAWs are basically the same program. While this is true to an extent, after all, they all allow us to create music on a computer, it isn't exactly accurate.
Different DAWs have totally different designs and workflow options, meaning certain people prefer one over the other. Some DAWs have a specialty, one thing they do really well that perhaps other DAWs can't do quite as well. Because while all of the big names in the DAW game can do it all; audio recording, MIDI editing, mixing etc, some excel in certain areas.
Ableton Live's area of excellence is perhaps its dance music focused, loop based Session View. (Which Logic definitely took heavy influence from for its Live Loops mode)
FL Studio's is maybe its customizability, but probably the Channel Rack the place where you can quickly sketch out ideas in a step sequencer-like section.
Now we come to Logic Pro's area of expertise, which I think may well just be how it handles audio and audio recording.
So, in this guide we are going to cover:
- The benefits of recording audio in Logic Pro
- How you can record audio in Logic Pro
- Some tips and tricks for getting the most out of your recording session
- and more!
Let's dive right in.
Preparing to record in Logic Pro
It's possible to be a music producer in this day and age and not doing any actual recording of audio. I know I've made tracks where it's all been "in the box" and I haven't needed to actually record anything. All your audio might be pre-recorded samples or loops, and so the task of setting up a microphone and getting some audio recording done could be alien to you.

However, it's a skill all producers should be familiar with, so if you're not, maybe this guide will give you some inspiration to go out and practice.
With Logic Pro at your fingertips, you can record guitar, vocals, a trumpet, the sound of birds, yourself clapping and so much more. This is what's truly great about having a DAW, the ability to record any sound. It's amazing, and can lead to some super fun creative experiments!
What makes it such a beautiful creative process is the ability to record any audio you want to, and then throw it through an effects chain to create something totally alien to the original sound source!
The possibilities when it comes to making sounds with recorded audio are basically limitless, and what's great about Logic Pro is how easy it is to get recording!
Both the design and workflow makes recording in Logic about as hard as checking completed tasks off a to do list.
So let's have a look at what makes audio recording in Logic so great.
Setting your Preferences
The first thing you're going to want to double check before doing any recording, is that your Audio Preferences are set correctly.
You can find these settings by heading to Logic Pro > Preferences > Audio.

When you're recording Audio from external sources into your computer, you'll need an audio interface. This will be shown in the two dropdown menus that say Input Device and Output Device. You can see in the image above the input and output are just using the built in MacBook Pro's speakers and microphone, but if you have an audio interface connected, this is where you're going to ensure it's selected for your Input Device.
The Input Device is whatever piece of gear you have connected to your Mac, which will be recording audio into Logic. The Output Device can be the same device, but not necessarily. This is where your audio is coming back out of Logic.
The beauty of Logic Pro is that you can set your Input and Output devices independently, so you can have your audio interface bringing in audio, but your MacBook's speakers or headphone jack sending it back out to you.
Once you've got this sorted, you need to ensure your Buffer Size is set accordingly.
As we know, computers are performing hundreds of tasks every second, so we need something to manage these, and to prioritize the most important ones while postponing the less important ones.
This is the purpose of the Buffer.
When you're actively recording audio, Logic needs to be your Mac's number one priority, but when you're mixing, it can take less of prioritized position.
You choose the I/O Buffer Size and you control how much of a priority Logic is.
The options are:
- 32 samples
- 64 samples
- 128 samples
- 256 samples
- 512 samples
- 1024 samples
At face value, the smaller the number, the higher priority Logic is given. But you don't always want this to be the case.
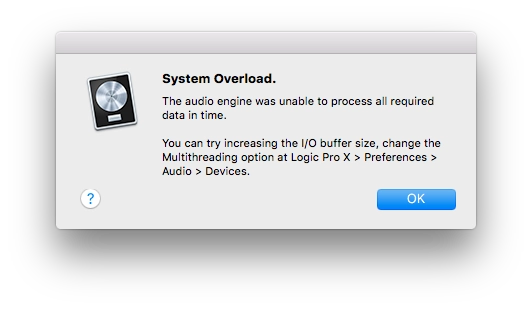
If you set your value too small, at 32 samples, you could run into a System Overload, which means your Mac can't keep up with all of the processing requirements being asked of it.
But on the other end of the spectrum, you don't want to choose 1024 samples when you're recording audio because this could cause latency, which is where you hear audible delays in playback or processing.
So, the aim here is the set an I/O Buffer Size that sits comfortably between giving you enough processing power, and enough time to handle it.
Generally speaking, 128 samples for recording, and 1024 samples for mixing work great.
Once you've sorted things in the Preferences section, you need to ensure that your track is ready to go.
You'll need to Record Arm it, which is the little R button on the audio channel near the Mute and Solo controls.
You'll also need to ensure your Input is assigned correctly on your audio channel.
Each channel has a dedicated Input control, which shows you a menu of all available inputs when you click it. Make sure you select the one you need, and then you're good to go!
The Benefits of Logic Pro for Audio Recording
When it comes to recording audio, Logic is my favorite DAW. My main DAW is Ableton Live, it's where I get all of my musical ideas down, but if I ever need to record audio, I use Logic.
There are several reasons for this.
As we've seen so far in this guide, the process of setting up Logic Pro for recording is simple and straightforward, and it's a relatively painless task getting things ready to go.
When it comes to actually recording in Logic Pro, there are several reasons I like it.
Take Folders
An industry standard technique, especially for recording vocals, is to record multiple takes of a performance, and then use a process called comping to splice together a combination of the best parts from each individual take.
Logic Pro's Take Folders setting allows you to do this easily. In order to enable this, you need to head over to Logic Pro > Settings> Recording and then choose Create Take Folder from the Overlapping Track Recordings > Audio > Cycle On pop up menu.

This means that once you set the cycle area, and hit record, you'll start recording automatically.
Then, when you get to the end of the cycle, it will record again but onto a new take in the folder.
You can do this over and over again, recording as many takes as you like into the one folder, for you to choose certain clips from to make the ultimate performance.
When recording stops, you simply hit the disclosure triangle in the top of the take folder to reveal all of the takes, and you can scrub through them to find different sections you want to use.
This is one of the huge benefits to using Logic Pro to record audio. The process is simple, streamlined and makes for really intuitive editing when it comes down to it.
It's one of the reasons I keep going back to Logic for my audio recording needs!
Comprehensive Plugin Suite
Some DAWs like Ableton or FL Studio come in several different editions, with pricing tiers reflecting this. You can get a basic, stripped down version for the lower price, with a full, feature rich version at the top tier, but at a higher price point.
Logic Pro is different because for one price, you get everything.
And included in 'everything' is a frankly amazing collection of audio processing plugins to help with your recording and mixing needs.
Logic's Compressor is great, offering a selection of different modes modelled on real world analog gear, giving the warmth and character found on old equipment to your audio.
There is also a wide range of Delay plugins, as well as various Dynamics processors, Reverbs, Imaging & Metering tools and more!
You are getting a comprehensive suite of plugins with Logic Pro, tailored to the professional producer and capable of creating industry standard results.
A really great example is the Amps & Pedalboard section of plugins, which emulate various real world amplifiers and effects pedals for Guitars and Basses.

While these are all great for teasing some awesome sounds out of a guitar, you don't have to use them on guitars. These effects and plugins are available to use on whatever sound source you want.
It's this type of creative freedom that often brings the best results, and I think Logic encourages this housing a whole host of audio effects and plugins which are best used by throwing them on an audio channel and listening to the results!
Flex & the Audio Track Editor
My favorite reason for using Logic Pro for my audio recording is by far the Audio Track Editor.
There are some truly great options for working with audio here, and by far the best one is Flex.
Flex offers two different functions in Logic Pro - Flex Time & Flex Pitch.
- Flex Time is similar to "elastic audio" in other applications. It allows super simple editing of the timing of notes and beats in audio regions, meaning you can move individual hits or transients around without the need for trimming, moving, nudging or crossfading. You can add in flex markers and use these to drastically change the timing and sound of the audio. There are a number of Flex algorithms Logic uses to analyze the audio for transients. This is a great way to play with rhythms and timing of audio you're working with.
- Flex Pitch allows you to quantize and edit the pitch of audio material, and is amazing for creating artificial harmonies, re-pitching different bits of audio, or just messing around to see what kind of results you can come up with! There are different Flex Pitch algorithms, which determine the way the audio is processed and edited, and you can also extract the MIDI data from any flex pitch material.

The two different modes of Flex Editing give some seriously creative power to you as a music producer.
As I mentioned above, using Flex Pitch is not only great for creating artificial vocal harmonies, but you can actually extract the MIDI data from any flex pitch data. This can be great for singing in a melody and then converting it to MIDI to use in your music.
There is much more to Logic's Audio Track Editor than just Flex, so be sure to check it out to see exactly what it offers in terms of functionality and processes to help you with your music.
An Audio Workstation
Logic Pro handles audio and audio recording really well. It's my favourite DAW for it, and hopefully these reasons listed above gave you some idea about its capability for handling audio.
There is a fully integrated suite of tools to help you in your music making, from the initial recording stages, right through to creative processing, mixing and even mastering.
There is really only one limit to what you can do with Logic Pro, and that is whether or not you know how to do it.
Thanks for checking in with us here at logicxx.com. Hopefully this guide helped you out in some way, and you managed to find out something about Logic Pro you didn't know before! If you're interested in learning more about Logic Pro, check out our deals on Logic Project Remakes!
We have a dedicated team of producers working to bring industry standard, professional quality recreations of famous tracks in Logic Pro to you. There are regularly deals available for these, so be sure to check this out! You can download a Project Remake and really dig into all of the juicy detail of a fully finished Logic Project. See all of the tricks and techniques that go into making industry standard music.
Thanks again, and be sure to check in with us soon!