How to Integrate External Instruments and Effects in Logic Pro
Posted by Esteban Miranda on
There has been a dramatic uptick in recent years of music being made with hardware. It isn't the first instance of something "new" coming along and being the next best thing, replacing the previous one before a core group of people return to using the old stuff.
The music industry in general is a fun one for this kind of thing; when CDs were first introduced as a consumer product, people talked about the "death of vinyl", and then when streaming came along, that was a further death - of the CD. But over the last 5 to 10 years, you can see that Vinyl has been increasing in its sales year after year.
I think this just goes to show that music doesn't always suit being a service, as it is with streaming platforms, sometimes people need a physical something to hold onto, which is why Vinyl has become so popular once again in recent years.
And this trend of favouring older things, and particularly needing something physical and tangible to connect them to the artform, is mirrored in the music production world, too.
When DAWs and "laptop production" became a thing, people started abandoning external gear and creating music entirely "in the box" - which means using only software instruments and effects, all inside your computer.
But just like Vinyl, making music on hardware never really went away, and it's becoming ever more popular once again.
However, even those hardware gear lovers who make all their music on outboard synths and drum machines can benefit from how easy it can be to record the results into a DAW!
So, in this guide today we are going to discuss how you can integrate external instruments and hardware into Logic Pro.
We'll cover:
- Some of the circumstances in which you'd want to do this.
- The types of things you can do with external instruments
- Some general tips and tricks
- and more!
So let's jump right into it, shall we?
External vs Internal
Before we dive into the specifics, it's worth talking about why you'd want to use external instruments, when Logic Pro has so many fantastic software synths.
It's true, the catalog of native plugins in Logic Pro is superb, featuring heavyweights like Alchemy, Retro Synth, Scultpure and more. And that's not to mention the absolute endless lists of third party plugins and instruments available to us as computer-based music producers!
But there is an entire world of hardware synthesisers too, each of which have their own unique sounds, workflows or ways of processing things.
Some people may prefer the entire workflow of making music on a physical synth, sampler or groovebox, and may then just need a DAW as a convenient and simple way to record the results.
Others may make music using both a DAW and external gear, sending MIDI information back and forth.
Let's be clear here to avoid any confusion; when we talk about external gear we aren't talking about MIDI Controllers or Drum Pads. We are talking about fully independent synths and drum machines, which can make sounds on their own. After all, the only thing a MIDI controller actually does is controls your DAW from the hardware.
So, there is a growing number of music producers out there who are using external synths and grooveboxes to make their music, so I want to talk about how you can integrate these with Logic Pro to get the best out of both worlds!
Now, what's even more interesting about working with external instruments in Logic Pro, is that you'll not only be recording the audio that they put out, but you'll be either sending or receiving MIDI information. Perhaps even both!
Luckily, there's a handy plugin built right into Logic Pro to help us do this, called External Instrument.

It's a pretty simple interface, but that's all it needs to be. You'll be focusing the most on your external gear.
But before we explore it, let's list the things you'll need:
- An external instrument
- An audio interface
- A MIDI interface (or an audio interface that has MIDI In and Out ports)
- A 1/4″ audio cable(s)
- Two (2) MIDI cables
What you’ll need to do is:
- Connect the audio outputs of your external instrument to the inputs of your audio interface
- Connect the MIDI Output of your instrument to the MIDI input of your interface
- Connect the MIDI Input of your instrument to the MIDI output of your interface
This seems pretty tricky when it's written down on, but it's a super simple process.
Let's have a look at what you can do with this in more detail.
Connecting using External Instrument
You can use External Instrument to route the signal from your hardware MIDI sound generators through the Mixer in Logic Pro. This means you'll then be able to process your sound through Logic's plugins and effects.
What's fun about External Instrument is that it supports MIDI communication through the instrument channel strip, meaning you can control both MIDI and Audio routing of an external sound module with a single plugin.
The track routed to an instrument channel strip that is being used for an external MIDI sound module behaves just like a standard software instrument track. This enables you to record and play back MIDI regions on it, with the following benefits:
-
You can use the sounds and synthesis engine of your MIDI module with no overhead on the computer CPU—apart from effects used in the channel strip (or destination channels).
-
You can use insert and send effects. To use send effects, route the instrument channel strip to aux channel strips.
-
You can bounce external MIDI instrument parts, with or without effects, to an audio file in real time (bouncing cannot happen faster because MIDI hardware is involved). This makes the creation of a mix, including all internal and external devices and tracks, a one-step process.
So, let's look at the parameters for External Instrument so you know exactly what you're working with.
External Instrument parameters
-
MIDI Destination pop-up menu: Choose the target MIDI port. If you're working with several MIDI destinations, you'll need to make sure you've selected the correct one.
-
MIDI Channel pop-up menu: Choose the target MIDI channel.
-
Input pop-up menu: Choose the inputs of your audio hardware that the MIDI sound generator is connected to.
-
Input Volume slider and field: Set the incoming signal level.
-
Auto-Compensate Latency checkbox: Turn on to automatically compensate for small timing differences between MIDI and audio playback. We will talk a bit more about Latency later on in this guide.
-
Send Program Change checkbox: When selected, this sends the MIDI program change (and bank select, if applicable) message, and sends these messages when the project, patch, or preset is loaded.
Note: Program/bank change messages are stored when you save a plug-in setting and are automatically sent when you load the setting.
-
Program pop-up menu: Choose a MIDI program change number.
-
Bank pop-up menu: Choose a MIDI bank select number.
In Practice
So, the technical stuff can be quite daunting, but it's necessary to get a handle on not only what we're doing, but how we're doing it.
However, now let's have a look at a hypothetical situation in which you'd be using External Instrument to hook up a piece of outboard gear to make music in Logic Pro.
As we mentioned at the beginning, many producers these days are adding some really nice pieces of outboard gear to their music setups. If this is you, then you'll no doubt have chosen the synth of your dreams to be part of your set up.
In this case, we're going to pick a random synth out of the proverbial hat, and we've chosen.....
Moog Sirin
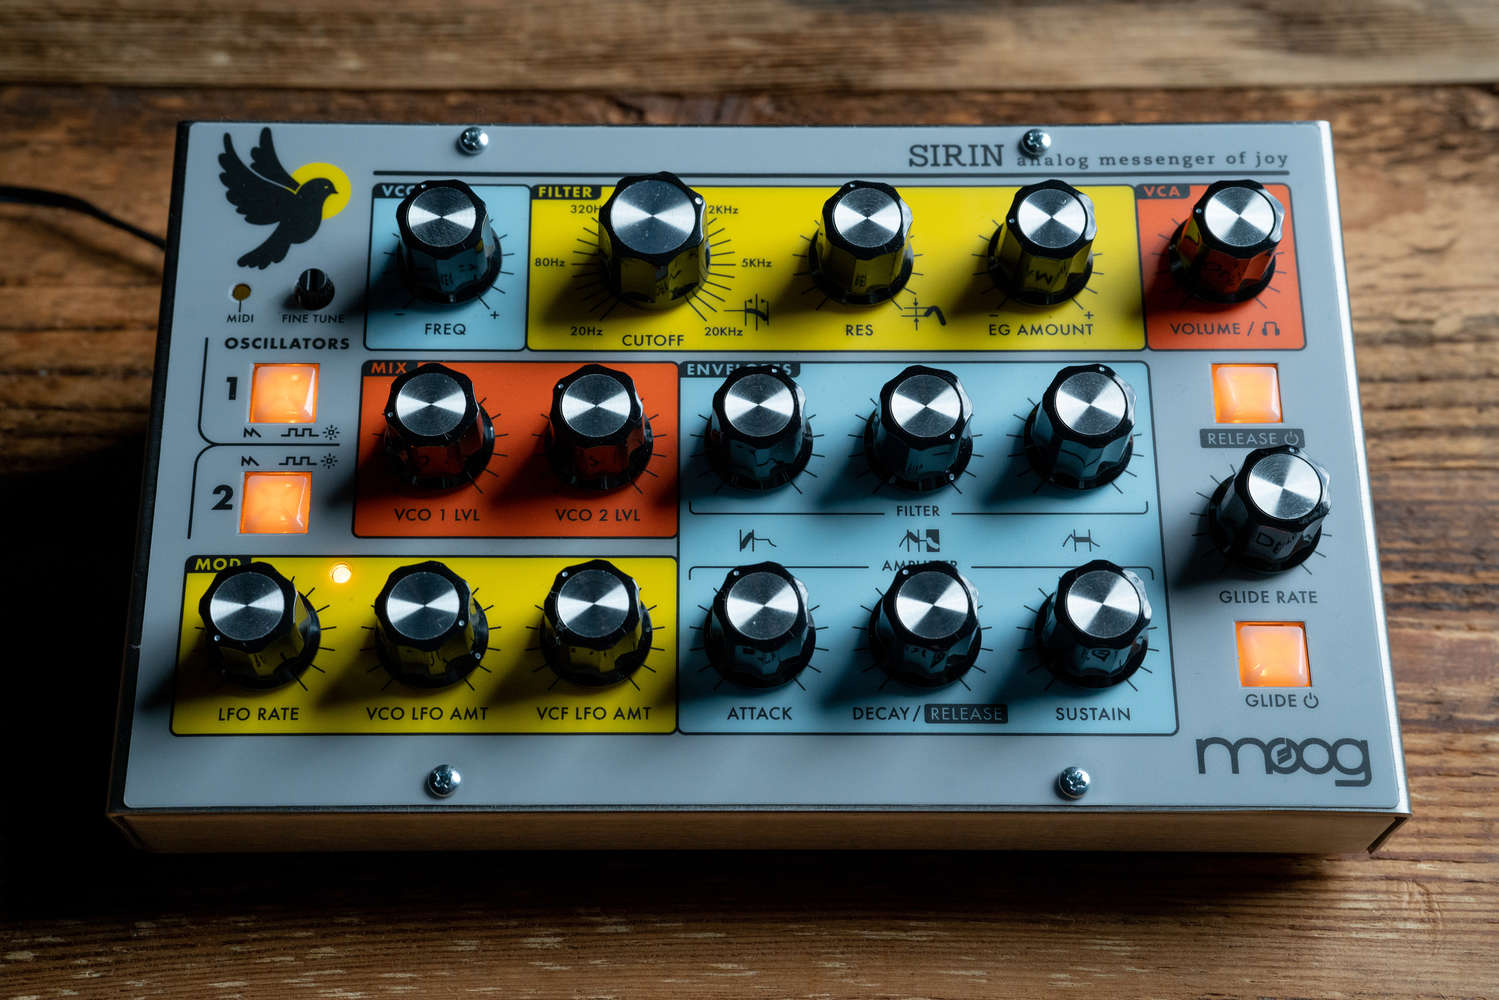
Okay, cool!
This one is a particularly useful example because as you'll notice from the image above, the Sirin doesn't have a keyboard. But not to worry, we will sort that!
So, the first thing you will need to do is add a new track. Usually we are used to picking Software Instrument or Audio, but in this case you can choose External MIDI.
Now, you'll notice that there's a checkbox labelled Use External Instrument plug-in, which is down below the Details disclosure triangle, in case you can't find it!
This will then set you up to work with the external instrument.

So, the thing with a synth like Sirin is, that as we mentioned before, it doesn't have a keyboard. So we have to get note information to it somehow.
This is where the MIDI Destination dropdown comes in handy. You can see in the image above, Logic is detecting the Sirin as a MIDI destination because it's connected via USB.
This now means we can send MIDI information from Logic to Sirin.
First step in the process is done, but we still need to hear what's coming back.
That's where the External Instrument plugin comes in handy.
So far we have the external synth on and ready to go, we have the MIDI destination mapped, but we need to ensure we have our selected input (in the image above it's Input 5) so we can hear the results. You'll know which input your synth is coming into based on your audio interface, so make sure you've set this up correctly.
The only thing left to do is to then add some MIDI information onto your External Instrument track, through which you will then be able to hear the returning audio signal.
Important Things to Remember
When we are working with external sound generators, it's easy to forget that the sound isn't actually happening inside Logic Pro. When you are so used to using software instruments, you can take it for granted that your sounds are going to be stored in your project.
But this isn't the case here, your sound for the external synth is happening in real time, and if you close down your project, go to bed and return to it the next day, you'd better hope you haven't changed any of the settings on your synth or the sound might not be the same. The MIDI information will be the same, but the actual timbre of the synth is totally external from Logic Pro!
This is of particular relevance if you're using something like Sirin, where you're sending MIDI information outside of Logic Pro and hearing the audio come back in. You need to remember that you're hearing the audio live, and if you want to keep it in your project, it needs to be recorded.
So, what you need to do next is to add an Audio Channel which will record the audio output of your synth. However, it's worth noting that we are already hearing it on the External Instrument channel, so we can mute this one.
Hit the Record Arm button on your new channel, and make sure the levels are coming in at the volume you want, and then you're good to go! It's important to make sure there's no clipping, and you leave enough headroom to apply processing when it comes to the mixing stage.
So, if you've kept up with me so far, we've covered how you can get your external synth hooked up, how you can send MIDI information to it, and how you can then hear audio and record it.
But there's one more thing we need to be aware of, and that is Latency.
Latency: a short period of delay, usually measured in milliseconds, between when an audio signal enters a system and when it emerges.
Latency crops up whenever you're working with externally recorded audio. Whether it's vocals, guitars, drums or indeed, a fancy synthesiser. Basically, your computer needs to give itself a (milli)second between all the tasks it's performing, especially with the high CPU demands that a DAW like Logic Pro can have.
In this case, we have an external instrument which is generating audio in real time, and this is happening at the same time that your computer is going to be slightly buffering the audio playback in order to make sure that it can handle everything that's going on. Essentially, the playback you're hearing out of your speakers is ever so slightly delayed to compensate for this.
This is particularly important to remember because when we are using internal sound generators inside Logic Pro, as well as plugins and effects, this all has a tangible effect on the CPU of your computer. Logic Pro will compensate for this slightly, which is where Latency can come in.
What you may find once you've recorded your part, is that even though it sounded like it was perfectly in time when you were playing it, the recording plays back out of time.
So, the thing you may need to do is to manually move your recording so it is perfectly in time, as you want it to be. You can see this in the image below. The recorded audio begins slightly before all of the rest of the sound information, despite sounding perfectly in time when playback was going on.

If the recording is early, zoom right down to the waveform level and find the beginning point that you need to in order for it to be perfectly in time.
Then, you adjust the beginning of the audio part to the exact beginning you need to, and then you can use the semicolon (;) key to move the audio file to the playhead. Obviously, you'll need to have the playhead in the position you want your audio to start!
Once you've done this, you've then completed today's task! You've succesfully connected and recored an external instrument into Logic Pro!
Final Thoughts
So, that was a pretty technical guide today, but it's all super useful information to help you get the most out of any hardware you have in your music set up.
It's also worth noting that there are many different scenarios in which you might want to use Logic's External Instrument plugin, because it isn't just instruments which exist as hardware.
You can use external effects too, so any type of crazy effects pedals or units you have can be set up to then use with the signal happening within Logic Pro itself.
There's really so many possibilties for this, so try it out with whatever gear you can get your hands on!
So, thanks for checking in with us here at logicxx.com. While you're here, be sure to check out the rest of our blog for more guides on a wide variety of topics related to music production and Logic Pro specifically.
We also have a huge selection of professional quality remakes of some of the biggest tracks in the EDM scene, which have been expertly crafted by our international team of producers.
The purpose of these is to give you some insight into what exactly makes a professional quality track. You can see how the pros do things, and your dreams of making a super successful hit track may seem closer when you get to learn all of the processing and production tricks present in our remakes, so head over and grab yourself a deal now, and come back soon!
Share this post
- Tags: Logic Pro DAW