Compressor in Logic Pro
Posted by Esteban Miranda on
If you've been following along with our guides this month, we've been putting a focus on getting back to basics. You can't ever go over the core pricinples too many times!
So, hopefully you've had some nice discoveries (or re-discoveries) within Logic Pro, or just with ways you can use some of the basic effects and principles.
We've covered Reverb and EQ, and in this guide today we are going to go over Compression.
Our theme this month has been how important it is to remind ourselves of the basic concepts. And this is true whether you're a music producer or any type of creative. It could even be argued that this is a fundamental life skill. It can actually be applied to pretty much anything.
I'm a firm believer that we don't just stop learning once we've been taught the information. It's important to remind ourselves; to keep an eye on what we have learned in the past, and another on what we plan to learn in the future.
By doing this you can ensure you're always improving and learning new skills, but not at the cost of forgetting old ones.
So, with that being said, let's jump in.
Compression in Practice
Before we go into the specifics of the Compressor in Logic Pro, let's just remind ourselves what compression is, and what it's used for.
Compression (or Dynamic Range Processing) is a process whereby audio signals are treated by either lowering the louder parts or amplifying the quieter parts (or doing both of these things).
This therefore lowers the dynamic range of the audio signal, or the difference between the loudest and the quietest point. It's easy to think that a Compressor is just a tool you use to make things louder, but it's a bit more complex than that.
When working with loudness, there is actual loudness and perceived loudness. Altering the dynamic range of an audio signal can affect both of these, so it's important to understand just how.
Now, there are two types of compression, Upward or Downward compression.
As mentioned above, upward compression increases the loudness of quiet sounds, as measured below a certain threshold, while leaving louder sounds unaffected, bringing the quieter ones up to the same level as everything else.
Downward compression, on the other hand, reduces loud sounds which are higher than a certain threshold, while the quieter sounds are unaffected. These are subtly different in essence, but used in different ways in practice.
It's worth knowing that a Limiter is also a type of compressor, traditionally with a high ratio, and usually a fast attack. A Limiter is mostly used when you want a track or piece of audio to avoid clipping over a certain volume level. It can be useful in a Mastering context as well as every day production scenarios.

Now, every compressor will have some standard controls, and these are as follows:
- Threshold: As we mentioned above, this is the point below (or above) which the compressor begins to take effect. It's is set in dB (decibels) and the basic concept is; the lower the threshold, the larger the portion of signal is treated by the Compressor.
- Ratio: So, once the compressor is working, the ratio is the control which dictates by how much the signal will be reduced. A common starting ratio for compressors is 4:1, which means that for every 4dB above the threshold, the signal is reduced to 1db above the threshold. A higher ratio means more gain reduction, and the ratio can go all the way up to infinity:1. This then basically becomes a Limiter.
- Attack & Release: These controls should be familiar, but in the context of a Compressor they dictate how quickly the compressor kicks in (attack) and how long it takes to return to normal working level, when no gain reduction is happening (release). Experimenting with these can create very varied results.
- Knee: This value adjusts how quickly or slowly the compression occurs as the threshold is neared by the source signal. A lower setting on the Knee means no compression is applied to signals below the value set by the Threshold, and full compression applied to those over or at the Threshold. This is called a Hard Knee, and with a higher Ratio it sounds very apparent. A higher Knee setting means the compression begins more gradually as the threshold is approached, creating less of an abrupt sound. This is called a Soft Knee.
- Make Up Gain: This is an output gain control to apply a fixed amount of gain to make sure the perceived volume of the signal isn't reduced too much. This is good when you want to shape the dynamics of a specific audio signal, without affected the actual volume itself.
Those are the basic controls you'll find on compressors everywhere.
I thought it would be useful to go over those here, so we don't have to cover them more specifically in the main body of this guide.
Now, let's take a more detailed look at Logic Pro's Compressor.
Or, to be more precise....Compressors.
Logic Pro's Compression Magic

As I mentioned in a few of my previous articles, I've been re-discovering Logic Pro, and I've been pleasantly surprised at how solid its options for stock plugins are.
Just look at the amount of options bundled with Logic:
- 70 effect plug-ins including Pedalboard, which includes 35 stompboxes
- 25 software instrument plug‑ins
- 9 MIDI plug-ins
- 7 instrument and effect plug-ins with support for up to 7.1 surround
- 14 effect plug-ins with support for up to 7.1.4 surround
- Custom instrument-tuning system including 97 fixed tuning presets, equal-tempered, custom and Hermode tuning
We've recently covered the various EQ options in Logic, and those Vintage EQ emulations are seriously good. We've also covered the selection of Reverbs available too.
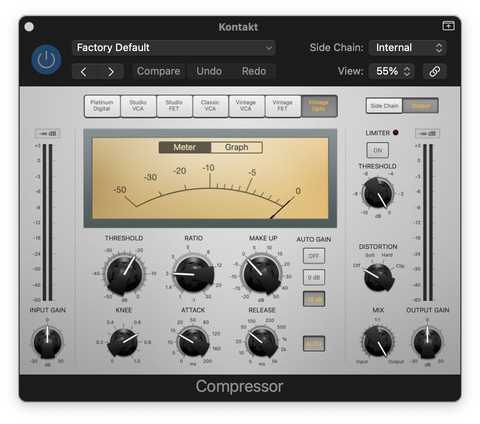
Now, take a look at the image above. You'd be forgiven for thinking that it's a screengrab of seven different plugins, but it's actually all of the different emulation options in Logic's Compressor.
So you're getting all of the above, in one unit.
Built into Logic's Compressor on top of its native system are six analog circuit models, each one emulating the sound and response of a professional level compressor, some of which are legendary.
So, once again considering that this is a free plugin that comes bundled with the DAW, it's a really fantastic unit.
Let's explore the individual modes and see how they sound, and what they're good for.
Platinum Digital

This is the default setting of Logic's Compressor. It's the native logic sound, with very little in the way of colour. To clarify going forwards, when we say colour, this can be confusing for a lamen.
It's used as a reference to whether or not a plugin adds any character to a sound. Older analog equipment was famed for adding colour to a sound, such as tape that added warmth, or certain overdrives which add punch or grit.
These are all rather unusual words to use to describe sounds, but once you actually hear the effect on the sound source, they're all rather intuitive descriptors.
So, now that we've got that out the way, let's move onto see how Platinum Digital works.
It's got a transparent sound, and the transient responses are nice, clean and quick. If you don't want any sonic colouration from your compression, this is the option to go for.
It's super versatile, so you can throw it on pretty much anything and be confident it's going to do the job.
If you check out the right hand side, you'll see a Distortion control, which gives you the option of adding a little analog colour if you'd like it, while retaining the precision of digital compression.
Studio VCA

Incase the glaringly obvious UI change didn't give it away, the Studio VCA option is an emulation of the Focusrite Red 3 Dual Compressor/Limiter.
Check it out below.
You'd never guess it was the inspiration, would you?

The Focusrite Red 3 originally hit the market in 1994, and it's a dual mono/stereo compressor/limiter. It features a single-VCA design, which allows high quality and independent compression and limiting.
VCA stands for Voltage Controlled Amplifier, and it's an amplifier that alters its gain (applied to the input / carrier signal) in proportion to a controlled voltage (CV) or modulator signal, which is where the name comes from.
You can find out more about them here.
The Focusrite Red 3 is an award winning unit, and favoured by many grammy award winning producers.
The emulation in Logic is clean and balanced, and just like the native compressor, doesn't colour the sound like some of the other analog emulations, though don't forget that Drive control if you do want some colour.
It works really well on your master bus. It has a fast and tight response, meaning it's quite versatile and is suited well to a lot of uses.
Studio FET

The next mode is Studio FET, which is an emulation of the 1176 Rev E by UREI / Universal Audio.
Tracing its origins back to 1967, the unit on which the Studio FET is based is legendary.

The 1176 lent some of its signature character to some of the greatest recordings ever made, and it's a real favourite in the industry. I feel like you can hear the tone just looking at that image!
In fact, some engineers and producers would run audio through the 1176 without the compression turned on, just to get the nice tone imparted by its signature circuitry. You can hear this instantly when you switch to the Studio FET mode.
It has super fast and responsive attack and release times, which makes it perfect for use on drums, bass or guitars. Things that have quite big transients can be tamed quite nicely.
It's also great for bringing vocals to the forefront of your mix.
What makes the Studio FET so good is the aggressive sound you can hear straight out the gate. There's a tangible sense of energy, and it adds some really nice brightness and presence to pretty much any signal you throw at it.
You can really push it hard on drums, too. Load up a Logic Drum Loop and play around with the settings, see what you can get out of it!
Classic VCA
The next model is the Classic VCA, which is perfect for adding a grainy warmth and punch to your sounds.
If you want to give your bass some beef, add some sauce to your synths, or some grit to your guitars, this is the one to do it. Seriously, try this on a bluesy guitar riff and you'll hear it come alive!

It owes its character to the original dbx 160 line, a line of compressors from the 1970s. The original dbx 160 is considered by many to be one of the best drum compressors ever, and has a really nice vintage character to it.
As you can see from the image below, the original is also super simple.

The original dbx 160 line was introduced in 1971, and is present on pretty much every major recording of the late 1970s through to the 1980s.
The 160 became a legend because of its simple controls and classic hard-knee compression.
One of the first things you'll notice with this particular emulation mode is that there are no Attack or Release controls. This means it will be doing this automatically.
So, use the Classic VCA model on a group or bus to inject some subtle fatness, or particularly on drums, to see what you can get out of it. As I mentioned above, this compressor sounds really nice on fat bodied sounding electric guitar lines too.
Vintage VCA
The next emulation on Logic's Compressor is the Vintage VCA mode.
This emulates the SSL G Bus Compressor, an absolute legend master bus compressor, which excels at making mixes bigger, adding in more power and punch and enhacing the clarity and cohesion.

If you're a user of Ableton Live you should be familiar with the Glue Compressor plugin.
Much in the same vain, the SSL G is prized by top engineers for its ability to 'glue' tracks together, which makes it perfect for adding to your master bus, which is where the Vintage VCA really shines.
It's also great at adding punch to drums and percussion, or taming the dynamics of piano parts.
 The original SSL G has been around since the 1980s, and is a 'Holy Grail' when it comes to bus compression. It adds loudness and punch to a mix, while imparting some modern cohesiveness which has become a staple sound in popular music.
 Vintage FET

The Vintage FET model emulates the UREI 1176 Rev "Silverface" Compressor/Limiter.
The original model is renowned for lending its character and punch to some of the greatest recordings in history.
It boasts super-fast attack and release times, which are great for controlling drums, enhancing bass or guitars, and making vocals shine.
The Vintage FET’s aggressive sound delivers a tangible energy that adds brightness and presence to anything that runs through it.
When driven hard, it can add some desired edge to your drums.
In case you hadn't noticed, this is based off of a different model in the same range as the Studio FET model we discussed earlier.
Vintage Opto
The final mode availabe in Logic's Compressor is the Vintage Opto.
This one is based on the Teletronix LA-2A Optical Compressor, which has been revered for over 50 years for its smooth, natural, musical compression.
Originally introduced way back in 1965, this iconic compressor became a studio staple quickly. It found itself on many hit records due to its subtle warming qualities, which were thanks to its tube-driven electo-optical circuits.
The original was a technological breakthrough for its time, using photocells for controlling audio gain in a new way, which offered more stability and transparency than other circuits of the time.

Vintage Opto emulates this character really nicely, adding some serious personality to your compression.
Whether it's subtle and transparent or hard overdrive, the Opto can do it.
Logic's Compression Overview
So, if it wasn't clear at the beginning of this guide, perhaps it is now, Logic Pro offers a stunning selection of stock plugins, and Compressor is a shining example of this.
Far from being a gimmick, these different emulations of famous compressors have tangible effects on your sounds, making a real difference and adding distinct character and colour to your sounds.
In a lot of other contexts, you'd have to pay to get these kind of emulations of vintage hardware, but Logic is giving you them for no extra cost.
What's great about Compressor is the different tones and sonic characteristics you can get out of the different emulation modes, some of them are subtle, but others are nice and in your face. It's a really good range of timbres and sounds.
Each is suited to its own type of compression, so be sure to use a bit of trial and error to get things where you want them.
Thanks for checking in with us here at Logicxx.com. We are dedicated to helping you learn and get the most out of Logic Pro, so while you're here, be sure to check out our deals on Logic Project Templates.
Our international team of producers recreate some of the top tracks in electronic music, right down to the finest detail. These are a really good way to learn how professional, industry standard tracks are put together, so make sure you grab some while you're here!