Logic Pro Reverb 3: Space Designer
Posted by Esteban Miranda on
This is the final part in a three part guide on the stock reverb plugins that Logic Pro comes bundled with.
If you missed the first part, we did a brief reminder of what reverb is. I'm a really firm believer that as music producers (or just as human beings) we need to constantly remind ourselves of the fundamentals of our craft.
Habits can form when you do the same thing the same way every time, and it can lock your mind away from some other potential creative avenues.
You never want to lock yourself in a creative box, especially when it's possible to do this without even realising you're doing it.
So, let's jump into part 3 of this guide, and check out Space Designer.
Convolution Reverb
We briefly touched on this in part 1 of our guide, but we will cover it here in a bit more detail.
Space Designer is a Convolution Reverb.
This means that you cna put your audio signals in super realistic recreations of real-world acoustic environments.
Convolution Reverbs do this by combining the audio signal with an Impulse Response reverb sample.
What exactly is an Impulse Response?
An Impulse Response is created by playing a very loud, short signal (such as a click or hit) which is called a signal spike. Then, the reverb characteristics of a room- which means all reflections within the space - is recorded. The actual Impulse Response is a standard audio file.
So, when an incoming audio signal is combined (convolved) with the impulse response, we get a reverb signal.
Let's look at an example to explain how this works.
You have a guitar track in Logic, without any effects. An Impulse Response file which was recorded in an actual Concert Hall is then loaded into Space Designer.
When the Impulse Response is convolved with your guitar audio file, it has artificially place the guitarist in that Concert Hall.
This is obviously a fairly standard example, but where Convolution Reverb gets interesting is in its ability to place your sounds in any space. If an Impulse Response recording of that space exists, you can do it.
A speaker cabinent, a plastic toy, the inside of a guitar, a cardboard box, your kitchen cupboard. The possibilities are endless. All you need is an impulse response.
Space Designer
So, now that we have a basic understanding of how Convolution Reverb works in principle, let's look at Space Designer.

Logic's Convolution Reverb offering boasts the ability to load impulse responses, as well as an on-board impulse response synthesis facility. This means you can create completely unique effects, especially when the impulse responses being synthesised aren't representations of actual real-world spaces.
There are also features such as envelopes, filters, an Output EQ (which we're familiar with now) and stereo/sound balance controls. These give you the ability to precisely control the dynamics, timbre and length of the reverb signal.
Before we move onto the more precise controls, it's worth noting that because it requires reloading of the Impulse Responses and recalculating of the convolution before audio can be routed through it, Space Designer can't be fully automated.
You can, however, record, edit, and play back any movement of the following Space Designer parameters:
-
Stereo X-Over
-
Direct Output
-
Reverb Output
Now let's check out the interface.
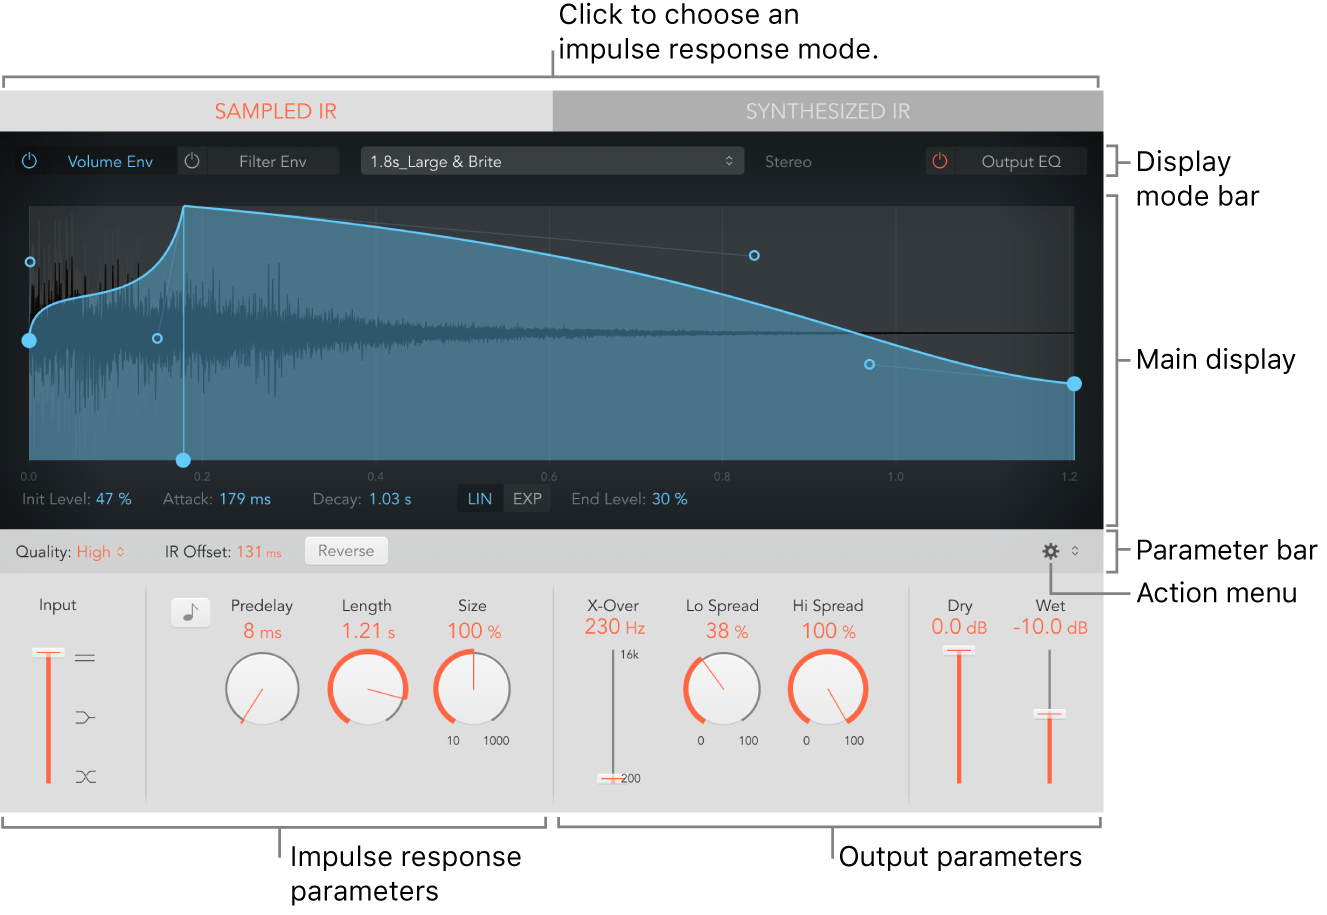
As you can see from the image above, there are plenty of parameters to get into, each in different sections.
For simplicity, they can be defined as:
- Impulse Response parameters: Use these to load, save and manipualte recorded or synthesised impulse response files.
- Envelope, filter and EQ parameters: Using the display mode bar (labelled above) you can switch the main display between envelope, filter and EQ views. The main display can be used to edit the parameters numerically, while the parameter bar allows you to edit them numerically.
- Global parameters: Once you've loaded an impulse response into Space Designer, you can use these parameters to determine how it operates on the overall signal and impulse responses.
The bottom panel contains all of the main controls.
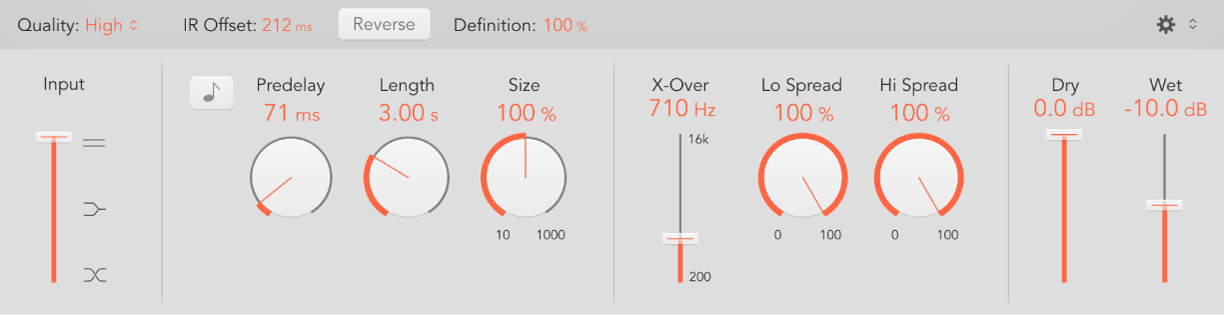
The smaller bar along the top contains the following controls:
-
Quality pop-up menu: This chooses the sample rate. Low produces a grainy reverb. High matches the host application sample rate. Ultra is smooth and clean sounding.
-
IR Offset field: Set the playback start point in the impulse response sample.
-
Reverse button: Reverse the impulse response and envelopes. When the impulse response is reversed, you are effectively using the tail rather than the front end of the sample. You may need to adjust some of the parameters when reversing, as this can create some unusual sounds. Experiment until you're happy with the sound.
-
Definition field: Set a crossover point (as a percentage of the overall length) to reduce the synthesized impulse response resolution. This emulates reverb diffusion and saves CPU resources.
The menu on the right hand side of this bar, with the small Cog icon, allows you to select a few menu commands.
- Reset Selected Envelope: this resets the currently displayed envelope to its default values.
- Reset All Envelopes: this does the same, but to all envelopes.
- Latency Compensation: By enabling or disabling the internal latency compensation feature, you're delaying the direct signal in the output section to match the processing delay of the effect signal.Latency can occur because Space Designer is making complex calculations and this can take a small amount of time. Latency is the processing delay between the input signal and the output signal. The latency increases if Low or Lo-Fi is chosen in the Quality Pop-Up Menu.
- Volume Compensation: this feature enables or disables internval impulse response voume matching. This attempts the match the perceived - not the actual- volume differences between impulse response files. Generally, you'll want to leave this on, though it may not necessarily work with all types of impulse responses.
- Show Bezier Handles: Enable or disable envelope curve handles (nodes) shown in the main display, with which you can preciesly reshape envelopes.
So, those were quite technical options, but it's important to know them.
The other parameters such as Predelay, Size and Length are standard reverb controls, so I'm sure you're comfortable with them.
The final section is Global Parameters, which are listed below:
-
X-Over slider and field: The X-Over slider sets the crossover frequency. Any impulse response frequency that falls below this value is affected by the Lo Spread knob. Frequencies above are affected by the Hi Spread knob. S
-
Lo/Hi Spread controls and fields: The Spread controls set the perceived width of the stereo field.
Note: No Spread controls are shown in the Sampled IR mode of surround instances.
-
LFE to Rev slider: Set the output level of the LFE channel independently of other surround channels.
-
C(enter) slider: Set the output level of the center channel independently of other surround channels.
-
Bal(ance) slider: Set the level balance between the front (L-C-R) and rear (Ls-Rs) channels.
-
In 7.1 ITU surround, the balance pivots around the Lm-Rm speakers, taking the surround angles into account.
-
In 7.1 SDDS surround, the Lc-Rc speakers are considered front speakers.
-
-
Dry/Wet sliders: Set output levels for the dry (source) and wet (effect) signal.
Now, you can see above a comprehensive overview of what all of the controls in Space Designer do.
Convolution Reverb can seem quite convoluted (pun intended) but hopefully this helped you make sense of what's going on.
Because it's a Convolution Reverb, the main thing you're going to be working with is Impulse Responses.
So let's take a more detailed look at that in the context of Space Designer.
Impulse Responses
Space Designer uses either recorded Impulse Responses of real world environments, which we've discussed previously, or synthesised impulse responses.
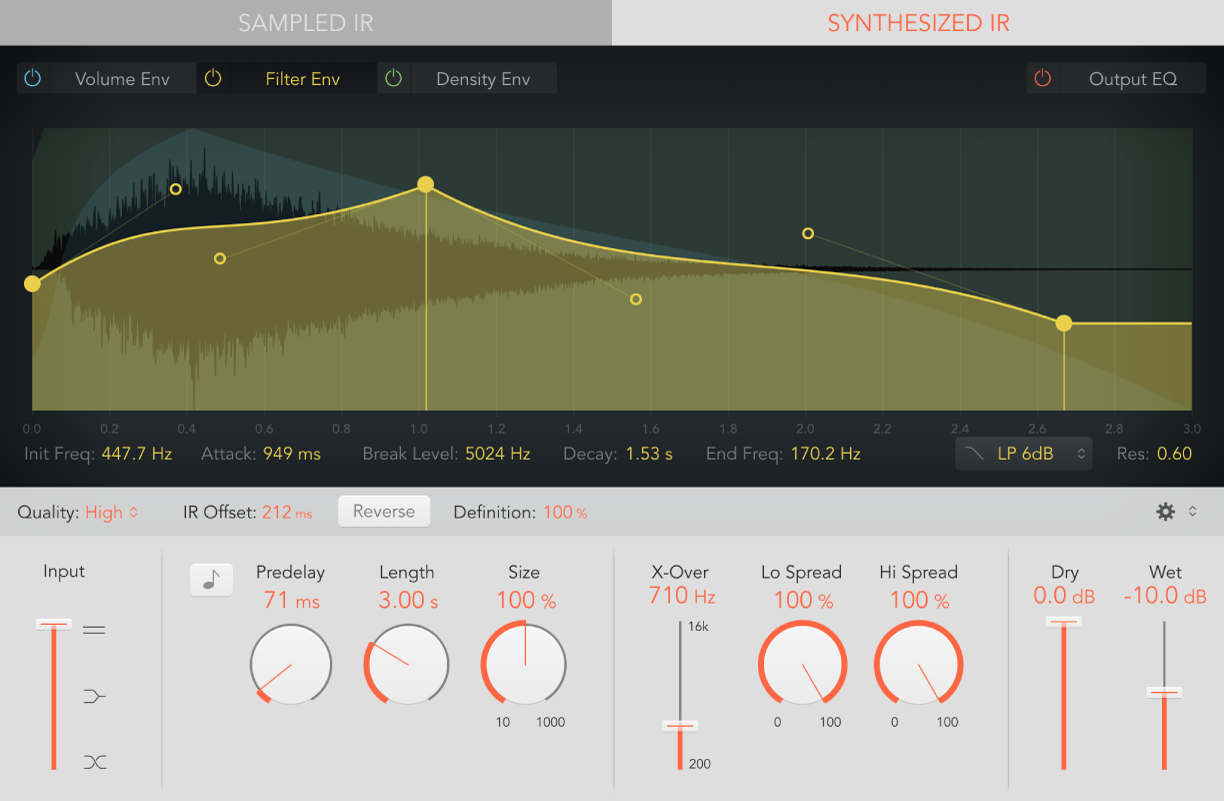
You can select which of these you want to use by hitting either the Sampled IR or the Synthesized IR buttons along the top of the interface.
We touched on this point earlier. To convolve audio in real time, Space Designer needs to first calculate any and all parameter adjustments to the impulse responses. This means it needs a moment or two following any parameter edits. You'll hear this in real time as you're listening, but it's also shown by an adjustment in the waveform in the display.
Using recorded Impulse Responses of real places is pretty self explanatory by now, but what makes Space Designer so cool is its ability to synthesise them.
It does this based on the values of Length, Envelope, Filter, EQ and Spread parameters. What's even cooler, is that repeated clicks of the Synthesized IR button randomly generate new impulse responses with slightly different reflection patterns.
The current impulse response state is saved with the setting file, including parameter and other values that represent the IR reflection patterns and characteristics.
The final thing we will talk about is editing the envelopes within Space Designer.
You can edit the volume and filter envelope of sampled or synthesized impulse responses. You can also alter the density envelope of synthesized impulse responses. All envelopes can be adjusted graphically in the main display, or numerically in the parameter bar. This editing allows you to shape how the reverb sounds over time, and is another way in which you can get more out of this plugin.
Overview
So, hopefully this has given you a good idea of the basics of how Space Designer works, as well as some of the concepts of Convolution Reverb, if you weren't familiar with them.
Space Designer is a solid and well-loved reverb for a reason. It's worth noting that you're not limited to using the preset Impulse Responses either, you can download or create your own. There are loads of free or inexpensive impulse responses available online, and this just serves to extend the sonic range and usability of Space Designer.
If you've stuck with us for all three parts of this series giving a comprehensive overview of the reverb plugins available in Logic Pro, then thank you! We appreciate it.
While you're here, be sure to check out some of the deals on our Logic Pro project templates, which are professionally recreated versions of tracks by our international team of producers. You can get a sense for what an industry-standard electronic production looks like, and dig in to find all the little tricks that go into it.