Top 10 Tips for Mixing & Mastering in Logic Pro
Posted by Esteban Miranda on
Mixing & Mastering are integral parts of your music production process, but they can so often be overlooked because it's easy to focus on the parts that are only "musical" and forget there are much more technical elements to creating a track from start to finish.
This is especially relevant if you're the type of music producer who habitually starts tracks but ends up never finishing them. You're missing out on these final stages of making music; the mixing stage and the mastering stage.
Logic Pro contains a comprehensive suite of plugins, which are amazing for achieving a solid mix and master, so in this guide we are going to cover 10 tips for mixing and mastering in Logic Pro, to help you get better results in your productions.
In this guide we will cover:
- Mixing tips for Logic Pro
- Mastering tips for Logic Pro
- Specific plug-ins and settings you can use to get your mix and master to pop
- and more!
So, let's jump right in!
The Mix
It's an often overlooked part of making music, because many hobbyists rarely get to the stage where they're putting together a comprehensive mix. Sure, you might do a bit of on the fly balancing of levels as you go, but tackling an entire mix is a different beast entirely.

But it's a skill that as a music producer you need to have!
So, before we jump into our main topic, it's worth pointing out that even if you aren't regularly finishing tracks and getting things to the mix stage, there are ways you can practice mixing!
One such way is Weathervane Music's Shaking Through Project. It's a non-profit in the US which records bands in a studio, and then allows members to download the stems of the projects to practice their mixing skills, as well as using them to create cool remixes.
It's a super efficient way to practice your mixing, and it's actually how I practised my mixing skills before I was making full tracks of my own!
The Master
It's the final stage of the music production process. It's arguably the most important, because this is purely technical. It isn't about the chords you're using, or the lyrics in the song, it's about levels, loudness and balance. It's about holding your track up against the standards of streaming music, or radio music, and making sure it stands up to scrutiny.
You want your music to sound as radio ready as it possibly can, and it's mastering that achieves this.
As we mentioned in the beginning of this guide, in a lot of scenarios where you're having your releases put out by a label, they'll have their own mastering engineer to handle the mastering process. But this doesn't mean that you get to flake out and not know what mastering is or how to do it!
Mixing Tips for Logic Pro
When you're mixing your tracks in Logic Pro, you need one of two things;
- Good heaphones
- Good studio monitors.
If you have both of these, that's even better!
There's not much point trying to get a comprehensive mix done if you don't have a good pair of studio headphones. There are probably what I'd recommend most, because even with a good set of studio monitors, you've got the sound of the actual room you're in to contend with. This isn't always ideal. So having a solid pair of studio headphones is an essential part of mixing.
So, once you've got the equipment sorted, let's look at some actual tips and tricks you can use to enhance your mix.
Start with EQ.
While many producers start with Compression, I like to start with EQ. If you start with compression, you're only going to have to use EQ next anyway to clean up the sound. This can be especially true when adding compression makes unwanted noise more obvious!
So I start by using EQ to clean up my tracks.

You'll be using your EQ differently depending on the context, but generally speaking, you want to put a high pass filter to clean up the lower end, and a low pass filter to clean up the high end. These areas in the frequency spectrum can hide lots of unwanted (and sometimes inaudible) noise, which can really begin to interfere with your mix down the line if you don't sort it at this stage.
Every track will need EQ.
So you need to go through each inidividual element in your music and apply EQ to it, cutting frequencies which aren't adding to the overall sound. The good thing about Logic's EQ is that it has a really clear visual analyzer, so you can see exactly where the audio is sitting on the frequency spectrum and whether your EQing is cutting too much into it (but you'll be able to use your ears for this last point anyway).
So, make sure you use EQ to clean up all of your tracks, because this will make your mixing job a lot easier!
It's all about Balance
Consider the overall goal of a mix. It's balancing the levels and volume of the individual elements of your music, to ensure cohesion and a polished product.
But how do you actually achieve this?
You can't have your instruments all at the same volume, and you can't have them all over the place at random either.
Instead, you need to be actively balancing the volume of your tracks consistently until you're happy with your mix.
A clear balance of volume is almost half the work when it comes to mixing.
Balancing levels is neither the beginning, middle or end of your mixing process. It's something you're always trying to do. Sure, you can begin with EQ like I said previously, but that's just a starting point for the steps in the process. The balance is the overall process' goal.
A great way to achieve this is to pick a leading part in your track, that you want to work all of the other levels around. If you're making electronic dance music, that could be the kick drum. If you're recording a singer-songwriter, it could be the acoustic guitar, or the vocals.
Bring all the levels down all the way, and then set your guide at around -6dB. You need to leave some headroom for mastering.
Then, use your ears and bring in other elements of the track one by one until you have some semblance of cohesion and balance. It's worth noting though, that you'll be re-balancing all of the time. As you add more effects processing to individual tracks or groups, the levels will change and you'll need to rebalance your faders.
Over time, balancing your levels becomes something you do instinctively, even before you get to the mixing stage. It will become second nature; you'll be balancing things relative to each other as you lay down ideas. But either way, before you start your mix, spending 20 minutes or so balancing your levels will save you a lot of time in the long run!
Don't underestimate Pan.
No, we aren't talking about the ancient greek god here.
Panning refers to the placement of sounds in the stereo field, and it's an integral part of the mixing process.
When you're creating music, you're placing it in a metaphorical space. This is why effects like Reverb exist, because we want the listener to imagine our music in a space, and we use effects to capture this.
Panning refers to whether your signal is situated on the left, right or centre of the stereo field.
And just like balancing volumes, where you couldn't have everything at the exact same volume or things would get crowded, you need to balance the panning of your tracks too, so everything is fighting for centre stage.
Logic Pro X offers three different types of panning.

By right-clicking the pan control in the mixer window, you can access the options for the three different types of panning.
Stereo Pan is ideal if you're mixing something which is a stereo audio source (meaning there are two sides of the audio) like a recorded keyboard.
Balance is used for mono tracks, where there is just one source of audio. This is the default panning mode in Logic Pro.
Binaural Panner is mostly use for post-production, or for placing your audio in super specific three dimensional sound-source positions.
Deciding which elements you want to have panned where is based on certain conventions, with a lot of do whatever you want thrown into the mix!
Certain elements like drums have specific conventions; you want your kick panned down the centre (as well as your bass, mostly). You might want hi-hats and snares slightly off to the side, to replicate where they sit on a real drum kit.
Panning vocals can really help spread the balance of a multi-layered harmony recording, and panning two guitar parts hard left and hard right, respectively, can emphasise the two different parts in a really dramatic way.
But generally speaking, when we are working in a DAW with lots of electronic parts like synth lines and samples, you can pan things in whichever way works for your music.
As long as there is a coherence to the panning, you can get creative! I love adding some automated panning going from side to side on parts like hi hats or shakers, which really help add a sense of movement to the rhythms!
Compression is your best friend.
Logic Pro X has a wide range of options for compression. We did a deep dive into the power of Logic Pro's compressor on the blog last year so be sure to check that out here.
Using Compression in a mix not only helps even out the volume of individual elements within your track, but it can be used to some really creative ends to define how your mix sounds.
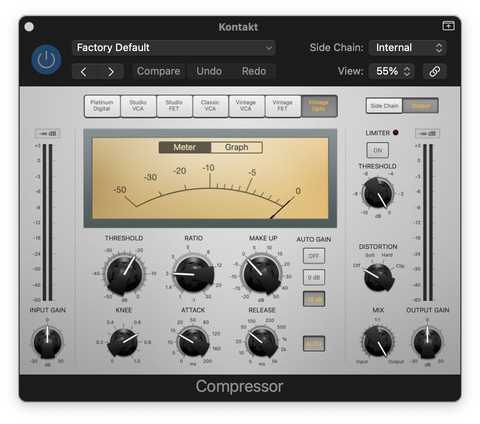
Using Logic Pro's compressor, you can access a variety of different emulations, some of which add a distinct tone or character to the audio. You can use this creatively, or just use it for basic compression duties. Logic's Compressor is a powerhouse, and you can get fantastic results from it.
You can use Side Chain Compression to set off certain elements in your mix, and this goes way beyond the dance music pumping effect we all think of when side chaining is mentioned.
The basic concept behind side chaining is to duck the signal of one piece of audio when another signal hits. Using this concept, we can use subtle side chaining to emphasise certain elements of our track that we want the listener to focus on.
Another compression trick is parallel compression, where the signal from a track is sent to an auxiliary channel, with heavy compression applied. The dry, unprocessed signal is then mixed and blended with the heavily compressed signal, which gives you the best of both worlds. Try this out on drums in your next track and see what you think!
Referencing
The final mixing tip for this guide is to always use Reference Tracks.
Whether we like it or not, our audience has listened to so much music, that their brains have been trained to instinctively know what a good mix sounds like. Therefore, if your mix is bad, it will stick out like a sore thumb.
You can prevent this from happening by constantly using reference material when mixing. Find other producers or musicians from your genre and compare how your mix is sounding when held up against their music. You can learn a lot from this!
Referncing is also a great tip for when it comes to mastering, which we will move onto now!
Mastering Tips
Mastering is the final stage of music production. It's when an idea becomes a product; a finished and polished piece of music, ready for consumption by audiences everywhere.
Those are the standards you're working to when mastering your music.
When doing research for this guide, I found a really useful bit of info over at whylogicprorules.com, which I'm going to share here.
There are 4 things you need to remember when it comes to mastering.
- You're processing every single instrument in your mix at the same time. This is no longer the mixing stage where you can solo things, apply individual Compression and EQ to that annoying shaker part which just won't sit right. You're at the Mastering stage now, which means your ears are thinking big picture. All you have is one single stereo track which is your whole mix. Any processing you apply here applies to everything in your mix.
- Your master can only be as good as your mix. This means that you better master the art of mixing before you try to master the art of mastering. Confused? Me too. The point is, no mastering engineer in the world can make a bad mix sound good. If you deliver a poor mix to a mastering engineer (whether that's you, or a dedicated mastering engineer) no amount of mastering can change a bad mix.
- You need headroom for mastering. This is why, when mixing, it's important to leave at leat 3-6dB of headroom for the mastering processing to take place. This means when you mix, don't mix anything higher than -3dB. But the more headroom you leave, the more processing you can do in the mastering stage.
- File types matter. Do not submit an mp3 for mastering. Just don't. The file quality isn't high enough. Always use WAV files for mastering, prefereably 24-bit but nothing smaller 16-bit.
So, these are all the things you need to have nailed before you dive into mastering. Logic Pro has some great plugins for mastering, and if you want a comprehensive look into the process, check this article out here.
Now, let's jump into some tips for mastering in Logic Pro!
Match EQ
Logic Pro has an awesome feature hiding in the menus of all its plugins.
If you've ever seen Match EQ and wondered what it was for, you're about to find out!
The last tip I gave for mixing was to have reference tracks. And this is an equally vital technique when it comes to mastering.
Using Match EQ you can compare the frequency differences between different audio files, and this obviously has huge implications for you when it comes to mastering.

You can see above that Match EQ has three tabs.
Current, Reference, and EQ Curve.
The first thing you need to do is drag your current mix onto the Current tab, and analyze it.
Second, get a reference track and drag it onto the Reference tab, and analyze it.
Then, head over the EQ Curve tab and hit Match.
This then gives you an EQ Curve which estimates how your mix differs tonally from your reference mix.
You can do this for several different reference tracks, comparing the results until you have an idea of any EQ trends you may need to apply to your mix. Obviously, the more reference tracks you use, the more you'll be able to see how your mix compares across the board. If every single one you did shows a boost of 5 - 10dB around the 200Hz mark, make a note of this.
It should be noted that these are not one and done fixes. You can't just simply apply the EQ curve to your mix and leave it at that. They're estimates, and since every mix is going to be different, you can't just apply the EQ curve unchanged to your own mix.
However, what this technique does do is give you a solid idea of where your mix might need some slight boosts or cuts.
If you're seeing common trends across the different reference tracks, make note of these, but if there's anything that sticks out too much, you may want to revisit your mix.
Using Match EQ to get an idea on where your mix is sitting compared to reference material is a super useful and not so well known tool in Logic Pro, so make the most of it!
Multimeter
Logic Pro has another plugin which comes in really useful when you're mastering, and that's the Multimeter.
It's a risk management tool, which allows you to keep a super detailed eye on your mixes, giving you information on loudness, phase and RMS levels.

There are two different screens for Multimeter, one showing an analyzer which shows the level of each 1/3-octave or major second frequency band, or the Goniometer which allows you to judge phase coherency in the stereo field.

It's a swiss army knife of tools to help you keep an eye on your mix and make sure you don't have any huge problem areas.
Using Multimeter as part of your Mastering chain is a great way to identify if you're doing things right. It's something you can throw on to check up on the progress of your master (or even your mix) to see how things are sounding at a certain point, before moving on.
It's a great way to get some technical feedback on your mix, so make sure you're using it!
Adaptive Limiter
When we're talking about mastering, we are also talking about loudness. It's a result of modern music production, things have been getting louder, and part of preparing your music for general consumption by the public is ensuring it stands up to the loudness of other artists tunes.
However, you need to keep an eye on your loudness otherwise things can get ugly.
In order to ensure you don't have any overloading, throw an Adaptive Limiter onto your mastering chain with the following settings.
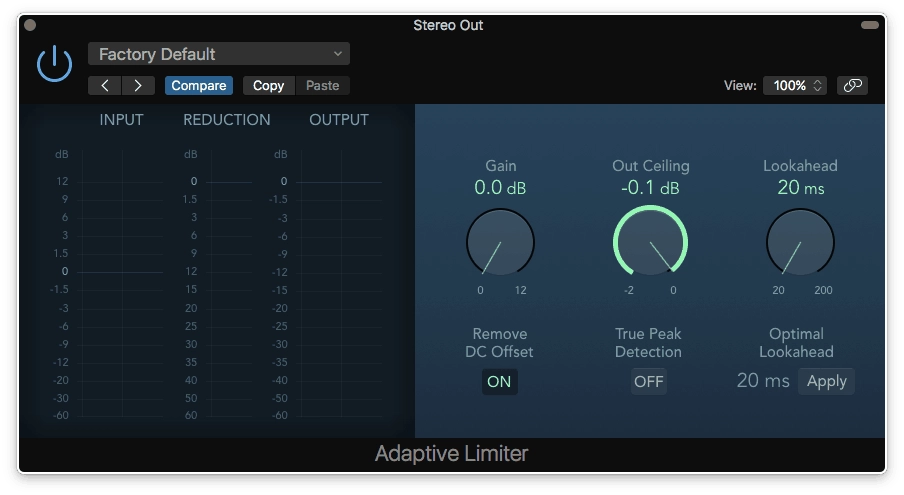
Be sure to keep your Out Ceiling at -0.1dB. This ensure that your track won't ever exceed the volume level of 0dB, which is what's referred to as overloading.
If your mix exceeds 0dB, Logic doesn't care. When you export your mix, anything over 0dB is cut off as part of the process, and if you don't have an Adaptive Limiter applied to catch those peaks, you'll get digital distortion, which is never what you want when it comes to mastering.
Always leave the gain on the Limiter at 0.
Gain
Logic Pro has its own Gain plugin, which you should throw on before your Adaptive Limiter.
The reason for doing this, and not just cranking the Gain control on the limiter itself, is that it gives you a way to A/B compare what your Limiter is actually doing.
If you relied on the Limiter's Gain control, every time you turned the limiter off, you'd be losing 10dB or so of volume on your track.
However, applying this gain boost separately with a dedicated plugin allows you to turn the limiter on and off without having a drastic drop in volume, and this helps you to be able to hear what your Limiter is actually doing.
Loudness Meter
 The crucial part about mastering is getting your loudness right.
- Load the Loudness Meter onto your Stereo Output.
- Pick the loudest section of each of your references.
- Listen to each of those sections, one-by-one.
As you're listening, hit the Start button on the Loudness Meter. This will measure the reference's loudness over time, and you want to be paying attention to the integrated value for each of the references you listen to.
Once you've finished doing this, you'll have a solid idea of how much "squash" is acceptable from compression and limiting for your particular style of music, because this is actually what the Loudness Meter is measuring in your references - how much they've been squashed by any compression or limiting applied to them.
You can use this to determine how much loudness you need in your own music too!
The Final Stages
So, there are ten assorted tips to help your mixing and mastering in Logic Pro be the best they can be.
These are by no means a comprehensive guide on how to get a perfect mix and master! You'll need to put in the work yourself to achieve those.
However, they are some solid tips and tricks which should help you along the way.
If you're in the market for more production tutorials and content, particularly in regards to creating a good mix, you should check out our Logic Pro Templates. We have a dedicated team of producers working to create industry standard recreations of huge tracks, which you can download as Logic Projects. These can then be perused at your leisure, taking your time to discover what makes the mix work, all the different techniques and tricks that go into a professional standard track are just waiting to be discovered!
Thanks for checking in with us here at logicxx.com, and we hope you'll come back soon!