Logic Pro Tips
Posted by Esteban Miranda on
Logic Pro is a powerhouse DAW in the music production world. It's used by pros and hobbyists alike to make amazing music. Whether you're a seasoned professional or you're getting into music production as a hobby, Logic is a great tool.
But there is a lot to get your head around! So we are going to go through some of the key features of Logic Pro, and show you how you can make it work for you!
In this guide we are going to cover:
- Features of Logic Pro
- Multiple audio takes and comping
- A look at the visual interface
- Some great tips to know to help you start making great music
Let's dive right in.
The Visual Interface
There's a lot going on when you first open Logic Pro. If you're a relative newcomer, it can be quite overwhelming. There are lots of things that catch your eye, and it can be difficult to know where to begin.
So let's break down the basics.
Across the top, you have what's known as the Transport Bar. This is the home to all the controls that will affect your entire project.
In the middle of this Transport Bar is a small screen, this contains the information about the song's tempo, time signature, and where the project is up to in seconds/minutes and in number of beats/bars.
You can use this screen to edit these features, just click on the relevant thing you want to change. Your screen may be smaller by default, so to enlarge it and show more information, click the dropdown to the right and select 'Beats & Project (Large).
To the left of this screen are some buttons.
On the far left, you'll see a button which is a question mark in a circle. This is the Quick Help button. When this is toggled, it gives you a brief description of what everything on your screen does. Just hover your mouse over something you're not sure of, and Quick Help will explain what it does.
To the right of this is the buttons that affect playback. These may seem self explanatory, but we'll cover them anyway.

Play begins your track playing.
Stop stops the playback.
Record begins recording on whichever track you have armed to record.
You can use key commands for these buttons, which we will talk about later.
On the right hand side of the central screen, there is your Count In and Metronome buttons. The count in button gives you a bar before Logic starts recording. The Metronome button simply toggles the metronome on or off.
So, that's the basics of the Transport Bar. It's essentially the control hub for your entire project. It contains all the info which affects everything, so familiarise yourself with what it does.
Now, let's look at some key commands.
Key Commands
Key Commands are a huge time saver when it comes to actually getting your music made. We mentioned at the beginning of this guide that Logic Pro can be quite visually overwhelming, with its huge array of buttons and controls.
But there are ways to make things quicker and easier!
If you want to make your workflow faster, you should learn these key commands, as they will help you spend less time clicking and messing around and more time on seamlessly making music.
Key Press |
What it does |
| r | Record |
| spacebar | Stop/Play |
| , | Rewind to the previous bar |
| . | Fast Forward to the next bar |
| cmd + z | Undo |
| cmd + shift + z |
Redo |
| cmd + c |
Copy |
| cmd + v |
Paste |
| delete |
Delete |
| enter |
Rewind to the beginning of the track |
| option + cmd + S | Create a new Software Instrument track |
| option + cmd + A | Create a new Audio track |
| k | Turn the metronome on / off |
Fun Fact: these key commands are so ingrained in to my memory from using Logic Pro for so many years, that I often try to use them in Ableton and then get confused as to why they aren't working!
Recording Audio and Comping
Logic Pro is a great program for recording audio. I always preferred doing my audio work in Logic and then moving it over to Ableton, and it's only recently that Ableton has been updated to include some more up to date Audio editing features.
But let's not lose our focus!
While recording audio into Logic Pro may be an obvious process to some, it may not be to others, so let's briefly explore exactly how you can record your audio to get the best results.
It starts with creating an audio track, which you can do by using the key command listed in the table above. You can also use the "+" button just under the main interface on the transport bar.
You'll want to make sure that your input source is correct. So if you have a microphone coming into the first input slot on your audio interface, make sure to check Input 1.

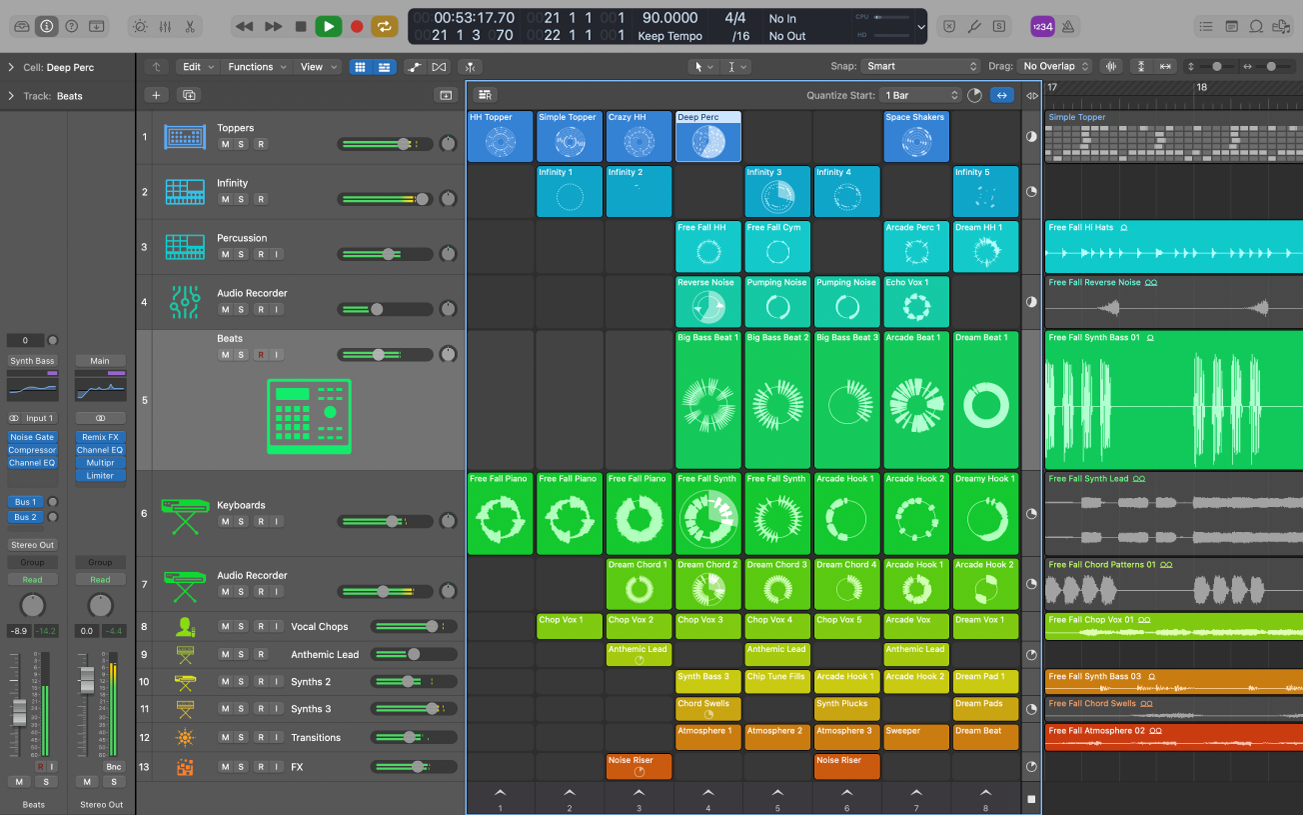
As you can see in the image above, each audio track has a few control buttons. The M and the S stand for Mute or Solo. The red R button you can see on the first two tracks is the Record Arm button. This means that each track is "armed" so audio will actively record onto the track.
The I button is for input monitoring. This allows you to hear what you're recording on each track as it is being recorded in.
There is also a volume slider and panning control for each track.
Multiple Takes
I mentioned previously that Logic Pro has always been a great program for recording audio. That is thanks in large part to the ability to record multiple takes and comp them together.
What does this mean?
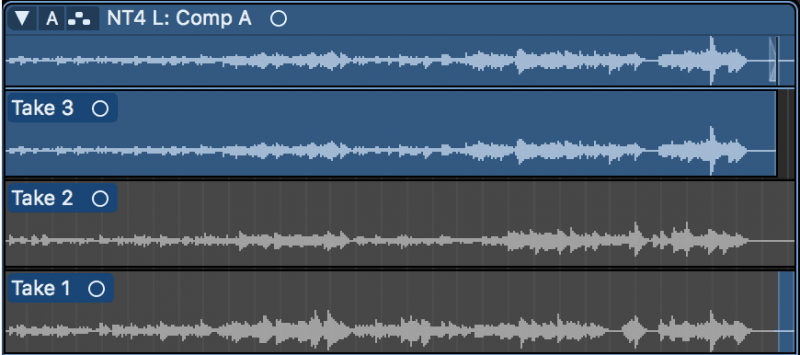
On an audio track, if you record over the clip that's present, instead of overwriting it, Logic will create several takes which you can compare and choose from by clicking the dropdown arrow on the top left of the audio clip. You can see this in the image above.
This is really useful for vocal performances, and it's an industry standard production technique. Vocalists will record multiple takes of the same performance, and then the best bits from each will be comped together to create one solid recording.
So what this means for you is that you can record several takes, then go through each one highlighting the best bits. This often sits invisibly in the back of pretty much every professionally produced song you'll hear, and it's great way to get your vocals sounding that much more polished.
Live Loops
I've always said that Ableton Live is a better DAW environment for producing electronic music. Particularly if you're working with loop based electronic music, Ableton Live's dedicated Session View is an ideal place to jam out these ideas.
Well, in Logic Pro's 10.5 Update, they included a new feature called Live Loops, and this is a new way to make music in Logic.
This is just a little teaser, as we will cover Live Loops in more detail in another article, but just be aware, Logic Pro now has some really great features for creating music in new and exciting ways!
Logic Pro's Drummer
This is actually a feature that's be in Logic Pro for some time, but it's often easy to overlook it. If you're creating electronic music you're probably going to be programming your own drums with your own set of samples (at least that's how I work anyway). On the other hand, if you're in a band you may have your own drummer to record.
But with music production becoming more and more accessible and the number of people writing music in their bedrooms increasing, Logic Pro's Drummer is the answer to the question that is: how do I get realistic sounding drums without a real drummer?
Well, enter Drummer, a powerful drum tool, with a variety of features and even Drummer Profiles. The first thing you'll notice when you create a track and load up Drummer is a library window with a variety of profiles. These are given cute names and labelled with what style they fit into.
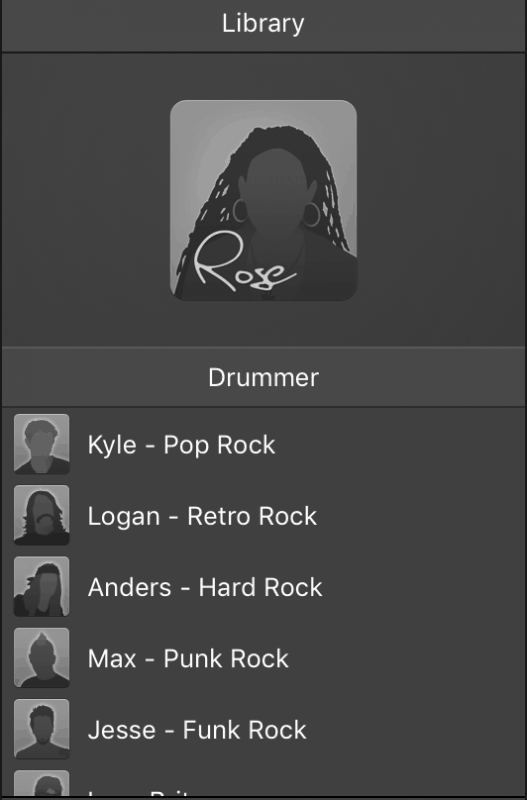
As if this wasn't enough, each drummer profile has their own 'personality' and style. They have a range of unique patterns, with each drummer playing differently to the other, so they sound distinct. Just like actual humans playing drums in different ways!
Now this is where it gets really cool. Logic have done super well with this plug in. Once you've chosen your drummer profile, and the particular pattern you want them to play, there are even more customisation options.
You can adjust:
- What kit they're playing
- The dynamics of your drum pattern
- The complexity of the drum pattern
- Individual drum sounds
- And more!
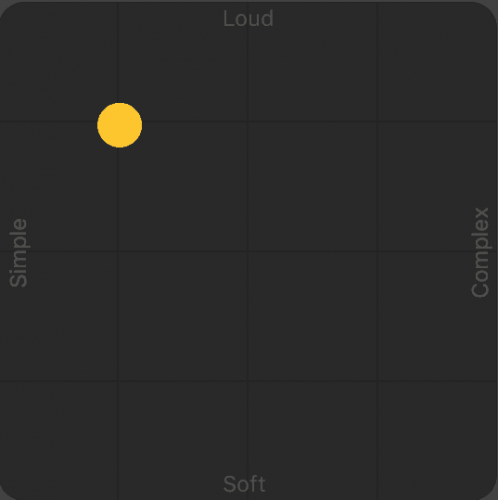
Logic Pro's Drummer is an amazing tool. If you take the time to humanise the part, you could fool listeners into thinking you have a real drummer. Below is the square matrix where you can edit the pattern your drummer is playing.
Want it loud and complex? Drag the yellow dot up and to the right.
For a quieter and simpler pattern, move it down and to the left.
You can hear the pattern changing in real time as you adjust this matrix, and the results are great!
Using Samples
Logic Pro introduced a new sampling instrument with the 10.5 update called Sampler. This is a complete overhaul of the EXS24 machine that used to be Logic's sample processing powerhouse. Sampler has a new interface, and a tonne of new features.
When creating an instrument track, you can select Quick Sampler from the panel and you'll be given a Sampler interface which you can drag and drop your own samples right into.
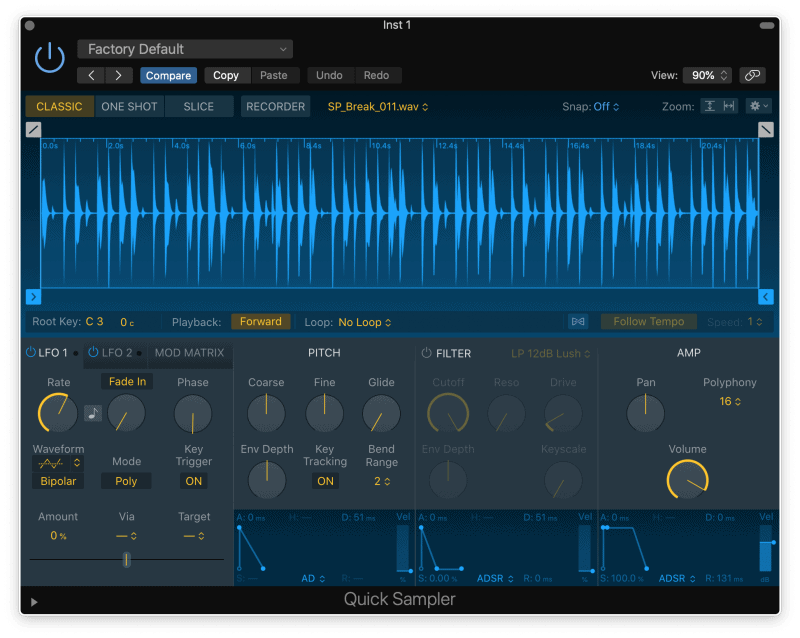
It automatically pitches your sample up and down, so if you have a MIDI Keyboard you'll be able to play your sample at different pitches. This is a great trick when using more unusual samples. Try recording a sample of your voice and seeing how the results sound!
There's also a handy 'slice' feature, which automatically chops up a sample into its constituent parts. This is great if you want to isolate each drum hit from a drum beat sample, and then play them on individual keys or sample pads. You can also get creative with a vocal phrase for some chop and screwed effects!
So that's Quick Sampler which allows you to process one sample. Its big brother, Sampler, allows multiple samples processing at once. There's a 'Zone' tab on the main interface, which takes you to a new panel, and allows you to drag and drop your sounds and load them onto specific keys. You can do this in the 'Mapping' tab.
These are just a few of the features of Sampler. And as with all software synths, the best advice I can give is to dive in and have a look at it yourself. Play around with the different sections to really see what it can do!
Conclusion
iI you're new to Logic Pro, then hopefully this guide gave you a good overview of the basics, as well as some solid pointers on where to start if you're looking to make your own music.
Logic Pro is formidable, and we are quickly reaching a point where the DAWs available can all do similar things to a comparable standard, so it's really just a question of taste!
Hopefully this article was helpful, and while you're here, check out our deals on some great Logic templates. These are an awesome way to learn how professional level production is done, allowing you to dig into reconstructed versions of some top tunes!