Basic Interface Overview of Logic Pro
Posted by Esteban Miranda on
If you own a Macbook or a desktop Mac computer, you've probably played around on Garageband. It's a fun experience; giving you the basics and allowing you to get a feel for what making music in a DAW is like.
Logic Pro is a step up in terms of productivity and the results you can get from it compared to its smaller sibling program. While Garageband is a free stripped back DAW, Logic Pro is the full package, allowing you to create music to a professional standard.
If you haven't used Logic Pro before, however, it can be a tad daunting. Even for a seasoned Logic user, there will be plenty they remain ignorant of. In this guide, we are going to focus on the basics of Logic Pro. It's got a complex interface full of nifty little tricks and features, so we are going to explore the fundamentals to ensure you have a solid undersdtanding of all you can get out of Logic when you open it up onto the main window.
If you're new to Logic, then this is the perfect guide for you, but if you're experienced, you may also learn something or be reminded of a detail you'd previously forgotten, so stick around!
The Main Window
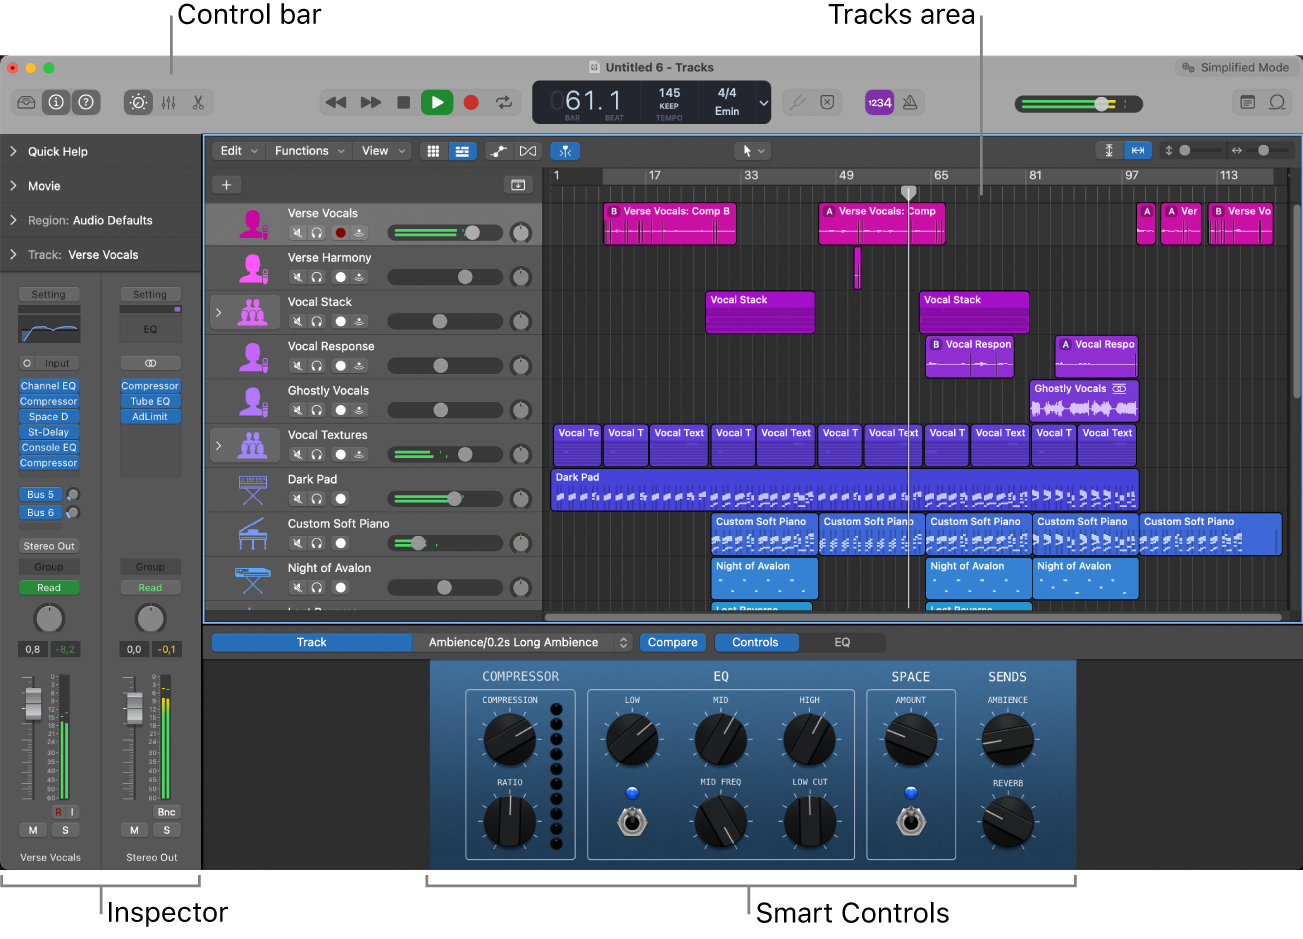
The image above will look familiar to users of Logic; we see it, understand what we are looking at and know where to go for the tools or bits of information we need. However, it isn't obvious to everyone, so let's break down what we're seeing.
You can see the various sections are labelled. You've got the Control Bar, Tracks Area, Inspector and Smart Controls.
The central part of the main window is the Tracks Area, and this is where you'll construct your song. You'll drag all of your audio loops, record any audio and MIDI into this area. It's also where you'll arrange your tracks to create the structure of your song.
Traditionally, this is the only way you could create tracks in Logic Pro, but the latest versions now include the Live Loops mode, which is similar to Ableton Live's Session View. You can see this below. Instead of arranging your track on a musical timeline like in the Tracks Area, you arrange individual loops which you can toggle to play on and off.
This can be a really fun way to jam out an idea before you commit to arranging it fully.

Across the top of the main window is the Control Bar. This is where you control playback and recording, but it also contains several buttons which open up individual tabs within Logic Pro. You can see these pictured below, and we'll cover them in detail shortly.
The Control Bar also contains the master volume fader, metronome controls and the LCD in the centre, which displays information such as the position of the playhead in the track, the project tempo and time signature, as well as the key of the song. In this display you can also see contextual information such as a live label of any MIDI chords you play into Logic, which is a really useful feature. Play any combination of notes on your MIDI keyboard, and the Logic LCD will display what chord you're playing.
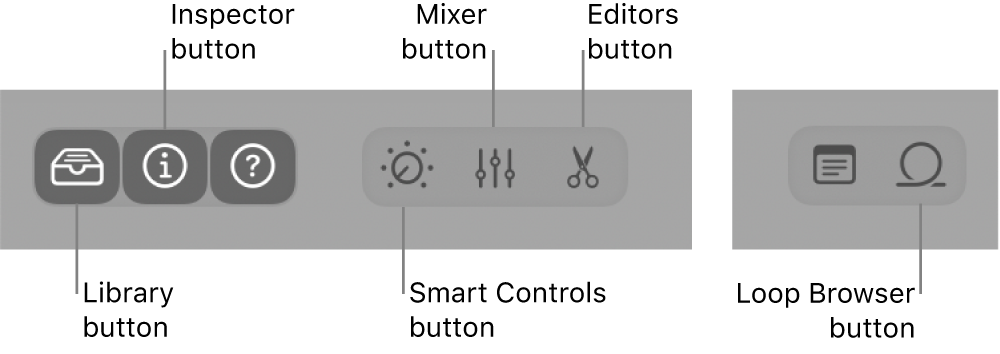
So, the image above shows some of the different control buttons in Logic, so let's explore what these are.
The Library - this is where all of your track patches are housed. You can audition patches for the selected track here. A patch contains an instrument, effects and routing settings which all control the overall sound of a track. If you're looking for some sound inspiration, this is the first place you should start. The library is split into categories of sound, and then further subcategories, and when you select a patch, it will load onto your selected track. It also displays plug-in presets and other settings when a corresponding item is selected.
The Inspector - This area is contextual, meaning it will change what information it presents you based on the region, track or other item you have selected.
Smart Controls - This is an intuitive and fun area, because it allows you to quickly adjust a set of controls for the selected track. Again, this is contextual, so it will show different controls for different tracks, depending on the plugins and devices you have loaded onto them. These can control both channel-strip and plugin parameters, meaning you can adjust the overall sound of your track using parameters from multiple effects or instruments within the track itself.
The Mixer - Logic Pro's mixer is where you'll do all of your volume, pan and other channel strip control adjustments. You can mute and solo individual channels, and also control the signal flow of your project. It shows a detailed screen with all of the channel strips from your project, allowing to balance the levels and pan both visually and by using your ears.
Editors - This is a track specific area, and you'll be offered a different editor based on the type of track. If you're working with audio, it will be the Audio Editor, and if you're working with MIDI you'll get the Piano Roll Editor. There is also a Score Editor to allow you to work with music notation, which is super useful if you're a classically trained musician.
The Audio Editor in Logic allows you to copy, paste, move, trim and split or join audio in a number of ways. You can use flex time and other tools to manipulate audio to create some really exciting results.
The Piano Roll Editor is where all your MIDI will be edited. If you record it in using a MIDI keyboard, this will display it. If you draw your MIDI in, you'll be using the Piano Roll Editor a lot. Notes are displayed as small blocks which you can edit the length of, move around in the bar and also change the velocity.
The Loop Browser - This is one of the things that Logic is great for, and will be familiar to users of Garageband. There is an extensive collection of prerecorded Apple Loops which you can use in your projects. There's a detailed loop browser which allows you to search by instrument, genre and style, and there are both audio and MIDI loops.
Apple Loops are extensive, and cover as many genres and styles as you can think of. They're royalty free, meaning you can use them in your own music, and you can chop and edit them as much as you like. These are really good for practicing building arrangements and working with the song writing concepts of music production, without putting pressure on yourself to create any musical ideas too. You can use the Apple Loops library to practice arrangement and mixing.
So, they're all the main controls you'll want to be aware of when using Logic Pro. These will cover all the main areas you'll need to work in, and you can get a good sense of what each area contains by checking it out and experimenting with what you find there.
Hopefully you found something useful in this guide, it was a quick refresher for those who are familiar, and an easy overview for new users of Logic Pro.
Thanks for checking in with us here at Logicxx.com, and while you're here, be sure to check out the rest of our blog for some great informative content on Logic Pro and music production in general! You should also head over to our remakes page, where you can grab high quality Logic Pro remakes of popular EDM tracks, to get a real deep dive into what goes into a professional level music production project!