Getting more out of your DAW - Logic Pro
Posted by Esteban Miranda on
I've recently been very fortunate and got hold of a MacBook Pro with Apple's M1Pro chip, and it's a stunning device. You may remember our article here, where I discussed the options for the best Mac for running Logic Pro, and now having an M1Pro chip in my home production arsenal, I can safely say that the verdict was right.
The M1 Pro chip runs Logic Pro seamlessly, enabling faster editing, producing and music making like never before.
But I acknowledge that I'm very fortunate to be able to use one of these machines, and not everyone has an up to date Apple computer.
But it has given me a new appreciation for Logic Pro, so in this guide we are going to cover some ideas for getting the most out of your Logic experience, even if you aren't running a new Mac machine.
So let's jump right in!
Logic Pro - An industry standard
I recently saw an article which described Logic Pro as 'not exactly an industry standard DAW', which confused me. I have to say I wholeheartedly disagree with this assessment, as Logic Pro - especially after its latest update - contains an entire suite of tools for the modern music producer. Whether you're making beats, composing for film or just a singer-songwriter, there is something for everyone.
At a glance, here are some of Logic Pro's best features:
- Loops - since the humble days of Garageband, Apple have had a vast library of loops, which are a perfect way of getting into music making and creating quick ideas in your DAW.
- Native Plugins - Logic Pro boasts a wonderful collection of its own native plugins, each of which features a stunning UI and brilliant sonic capabilities.
- Beats Tools - using Live Loops and Step Sequencer, making electronic beats in Logic Pro has never been easier
- and much, much more!
These are just a few pointers as to why Logic Pro is a powerhouse DAW, but let's move on and look at some specific things you can do in Logic to get more out of it, and enhance your production experience.
Speed is the key
One of the best things you can do in any DAW is find ways to efficiently speed up your workflow. These are the parts of your process that aren't directly creative, but that help facilitate your creativity.
A good analogy is to think of a chef preparing a meal, learning how to quickly dice onions and chop vegetables will help speed up the actual cooking process.
In this same way, finding ways to get the workflow stuff done quicker is super beneficial, and there's no better way to do this than with key commands. Logic is equipped with a tonne of really useful key commands, but here are some of the main ones you should know to get you started, and we'll also cover where in the menus these options are found, if applicable.
-
Press Shift-Command-N to create a new project. You can also do this by choosing File→New, but the key command is always quicker!
-
Press Shift-Command-T to show the Tempo Track (or choose Track→Global Tracks→Show Tempo Track) to show it. This is where you can easily automate tempo changes within your project.
-
Press K to turn the metronome on or off.
-
Press Option-Command-S to create a new software instrument track. You can also choose Track→New Software Instrument Track to achieve the same thing.
-
Press Option-Command-A to add an audio track. Alternatively, (or if you forget the key command) choose Track→New Audio Track to do the same.
When you're recording in Logic Pro, you can do this quickly and efficiently by arming the track you want to record onto by pressing Control-R and then pressing R to begin recording.
So they're some of the ways you can speed up your Logic workflow. Now let's move on to some more in depth and specific tips to help you improve your production. These are somewhat under the radar, so hopefully learning these tips will help you get things done smoother and quicker!
Alternative options
Now, when you're a music producer, one of the most difficult things can be settling on a creative decision, especially if you're something of a perfectionist. It can be a big commitment to abandon one idea and decide on another, but luckily for you, in Logic Pro you don't have to.
There are a range of options within Logic to allow you to audition alternative ideas within your projects.
The first is Track Alternatives. So let's have a look at what they are and how you can use them.
Track Alternatives
By using track alternatives, you can create multiple arrangements of a track. Using the same channel strip, you can have multiple versions of the same idea.
This can be great for working with vocal takes, or just trying alternative arrangements with your tracks.

So how can you use them?
It's worth noting at this point that you must enable Show Advanced Tools in order to enable this option. When you're setting up Logic Pro for the first time, it will prompt you to select whether you're a beginner or a seasoned user. If you selected beginner, you'll have to enable the advanced tools. To do this, go to Logic Pro > Preferences > Advanced and select Show Advanced Tools and select Advanced Editing.
Now, any plugins or channel strip settings you have on a track will affect all alternatives, and any Track Based Automation present on a track will also affect all alternatives. So this is something to bear in mind if you're thinking of using alternatives.
If you want to have different effects settings, making different tracks will be your best bet. But if you want to experiment with arrangements then Alternatives is the best option.
So, once you've enabled Track Alternatives, a dropdown option will be shown next to the channel name. Then, you can click the button and choose New from the menu. The new alternative appears in the track lane and becomes the 'active' track. Alternatives are named alphabetically, and you'll see a list of them when you click the dropdown.

This works great for live recording. If you're recording vocals or a real instrument, it can be a great way to record multiple takes.
Let's take an example, you're recording multiple vocal takes, and you want to comp them together to get a final vocal take for your track. But comping them will delete the other takes in the folder, which isn't ideal.
But by using Track Alternatives, you can duplicate the track, and you can then create a comped version of your vocal takes on the duplicated alternative, while still retaining all of the individual takes on the original!
Project Alternatives
Tracks aren't the only thing you can make alternatives of. A super common issue producers face, which is kind of extension of the last issue, is wanting to try out different mixes of your projects.
In some DAWs, this means creating an entire other project, and flipping between the two, which can be cumbersome and clunky.
But in Logic Pro, you can create Project Alternatives. This allows you to create additional versions of your track without ever having to open an entirely new session. It's seamless, quick. and efficient.

To use Project Alternatives, go to File>Project Alternatives and then you can create a new alternative version of your project.
It's going to instantly create a new alternative, and open up your new version of the project.
This is perfect for if you're wanting to make different version of a track. For example, you might have made a 9 minute progressive electronic track, but you might want to cut down a 4 minute version for radio play.
Or if you've got a full band's song, maybe they want to make an acoustic version.
As we mentioned earlier, it can also be great for auditioning different mix alternatives without losing any of your work, and containing these ideas all within the same project.
Chase that MIDI
One thing that can be jarring when you're working with Logic Pro is that when it's playing back MIDI regions, it won't play a note unless the playback bar passes through the beginning of that note. This can be especially bothersome if you've got a loop set up in the middle of your track for doing some small scale editing of a particular section, but there are MIDI notes in there that begin before your loop starts.
Luckily, there's a way you can fix this issue.

If you open up Logic's Preferences by hitting Command + , (or navigating to Logic Pro > Preferences > MIDI).
Once there, go over to the Chase tab and then make sure the two options I've highlighted above are selected. This will mean that your MIDI notes will play even when the start of the note isn't within the playback of a loop you have running.
Freezing Tracks
Another issue that can get in the way of your listening back to your projects is when a track doesn't play back fully because sometimes you're using way too much processing or samples for your Computer to handle. It happens to all of us, our computers are only capable of so much, after all!
Luckily, there's a fix for this too.
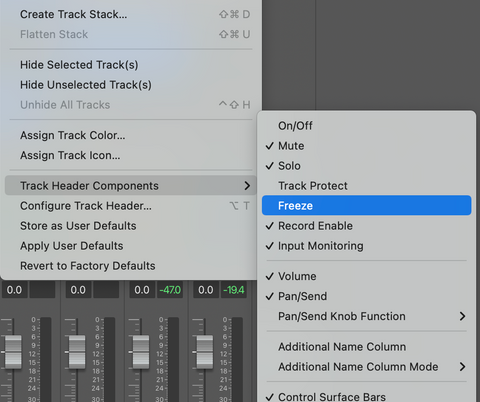
Right click on a Track header and go to Track Header Components > Freeze.
Once enabled, a little snowflake button will appear next to the Record arm button, and this will essentially scrub through your track once you press play, and let Logic 'learn' it, so that playing back is less demanding on your system.
It's worth noting with this however, that if you want to do any further editing to the track you've frozen, you'll have to unfreeze it and then adjust any parameters you want to change.
So this is best used when you've finished all of your track-level processing and you're working on your mix, listening through to your finished track over and over and adjusting your levels.
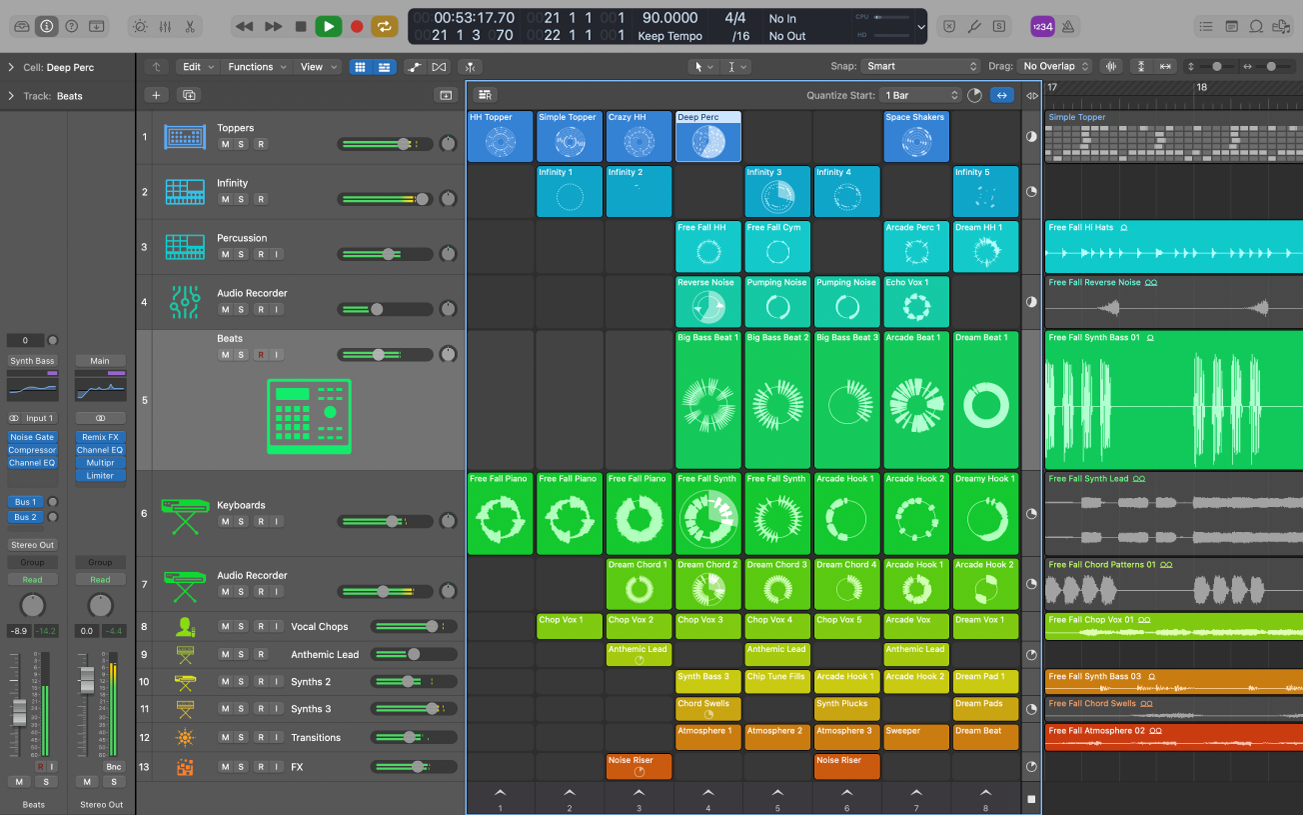
Track Stacks
We've all been there; you're working on a track and adding layers and layers of sound, and then you realise you have something ridiculous like 80 tracks in your project. That's going to be a headache to try and organise when you're mixing, but luckily there are smart ways you can reduce this number to something more manageable.
By using Summing Track Stacks, not only can you organise your projects more easily, but it also allows for bus processing in a much easier way.
So you could group a selection of audio files, such as vocals or a drum selection. To do this, select the tracks and then right click and click Create Track Stack.
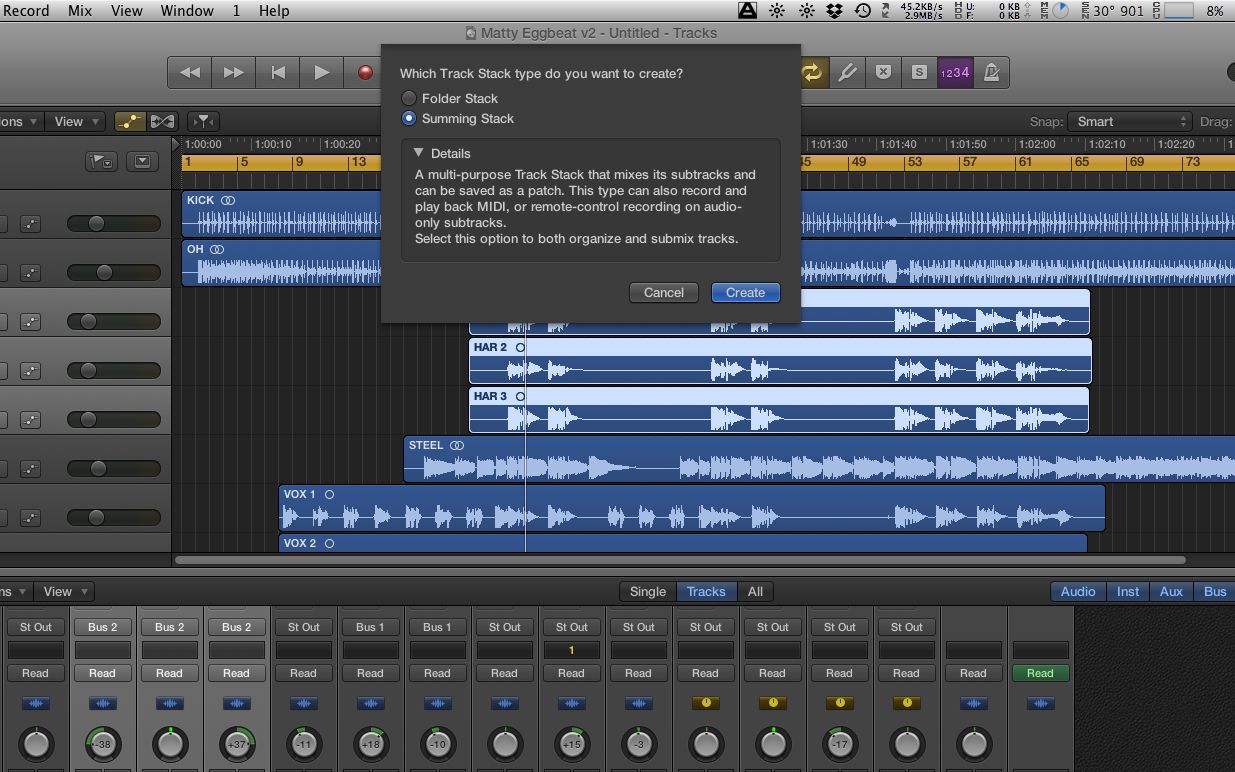
It's important to note that you'll want to ensure you've got Summing Stack enabled before you click the create button.
What this does is it groups your tracks together, and routes the output of those tracks to a Bus. Now, you can apply overall processing to this group of tracks all on the one Bus track. So anything that's inside the Summing Track Stack will be processed by the effects you apply.
Magic Recording
There was a time where if you were messing around on your instrument, and inspiration struck, but the tape wasn't recording, then that idea could be lost forever.
Thankfully, we live in an era where the machines are always listening!

If you enable Capture Recording, by right clicking on the grey control bar and hitting Customize Control Bar and Display you can instantly create a MIDI clip out of the notes you just played by hitting the second record button that's created, which is pictured below.

Fade Zones and Speed Controls
One of the coolest features in Logic Pro, and one that not everyone may be aware of, is the various functions you can assign to the fades on your audio regions.
One of the most obvious is applying small fades to the beginning and end of your audio clips, so that any audio you are working with won't suffer from pops and clicks during playback.
For those who aren't aware, a pop or a click is caused when audio playback begins somewhere that isn't a zero-crossing point. What this means is that when an audio waves' peaks and troughs are playing back, there is a point directly in the middle of the two where there's silence. So, from the top of one peak, to the bottom of one trough, the part in the middle is called a zero crossing point.
When audio doesn't start on one of these, it's beginning halfway through existing audio, which is why it pops or clicks. So, assigning fades to the beginning and ending of your audio regions can help avoid this.
To do this, head over to your Preferences, and find the Editing tab in the General section of your preferences. Next to where it says 'Point Tool in Tracks Provides' you need to ensure Fade tool click zones is enabled. This will mean that when you hover your cursor over the top half of an audio region, instead of getting the resize option, you get the fade option.

You can drag your fade in to adjust its size according to your needs, but you can also do more than just a fade in or fade out with it. If you Ctrl + Click, then a dropdown menu of options appears.
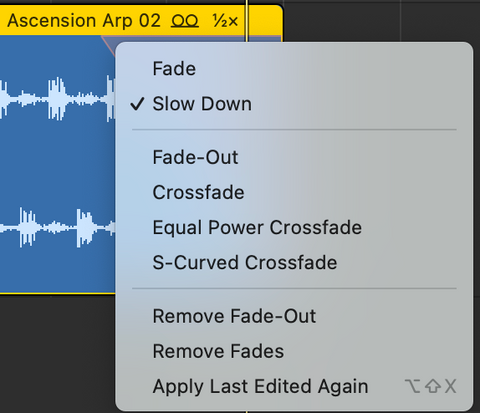
You can see in the top of this dropdown, you can choose between a Fade or a Slow Down effect. Note that this will be a Speed Up effect if applied at the beginning of an audio region.
You can drag your cursor along from the top of the region to dictate how long or short the fade is, and then a little further down your cursor will change, and you can apply curves to the fade to affect its character.
So this tool can be used for some standard audio editing, to ensure you don't have any pops or clicks or unwanted noise in your tracks, but also as a really fun creative effect to get some nice speed up and slow down sounds, which mimic a record turntable starting or stopping.
Logic is back in the building
So, I've been without a Mac computer for a few months up until quite recently, so there's not been as much content on Logic Pro as there otherwise would have been. However, that's all about to change because I'm back on a Mac, and ready to dive back into Logic Pro.
Hopefully these tips helped you out, maybe you found out something about Logic Pro that you didn't know before! Or maybe you were just reminded about a feature you'd forgotten.
Either way, there's some really cool features hiding under the surface in Apple's flagship DAW, so be sure to check back regularly for more updates and tips on how you can get the most out of Logic Pro.
While you're here, be sure to check out some of our deals on Logic Projects. These are created by our international team of producers, who work tirelessly to recreate professional tracks in Logic Pro. These are an invaluable way to learn how professional producers put together a chart topping hit, so be sure to grab some while you can!
Thanks for checking in with us here at Logicxx.com, and check back soon for more production resources!