Back to Basics: EQ in Logic Pro
Posted by Esteban Miranda on
Equalisation - or EQ - is one of the most-used audio processes. Whether it's a musical project, or post-production video work, EQ uses filters at various frequency bands to either subtly or drastically shape the sound of an audio file, instrument or vocal performance, to name just a few.
It's going to be one of your most reach for tools in your producer's arsenal, and as such, it's easy to take it for granted and overlook some of the best applications you can get out of it.
So in this guide, we are going to take things back to basics, and focus on the various options for EQ that are present in Logic Pro. You can see just a few of these present in the screengrab below.

We'll cover the basics of EQ first, to make sure any beginners out there are clued up, and then we will explore the different EQs that ship with Logic.
So let's jump right in!
The basics of EQ
So, if you're new to music production, chances are you've heard of and already used EQ. Maybe you're quite a seasoned producer, and you just haven't taken the time to explore the options out there, or really dig in to what you can do with EQ.
Whatever your circumstances, we are going to cover the basics here, and then move on.
So what is EQ?
All EQs are in essence, specialised filters that control the frequencies of the sound they're applied to. They allow certain frequencies to pass through unchanged, while they can raise or lower other frequency levels. This is called boosting and cutting, respectively.
There are various types of EQs, and these can be used in different ways. Some can have more of a broader application, changing a large range of frequencies, while others - in particular Multiband and Parametric EQs - allow for more precise control over the audio editing process.
There are several types of EQ out there, from Graphic EQ to Parametric EQ, or Dynamic to Shelving EQ. But it's easiest to get your head round if you break it down like this:
- Single Band EQs - The simplest type of EQs, these allow you to apply changes to one frequency band within the spectrum. The particular Single Band EQ in Logic Pro has different modes, with basic controls for each. Types of Single Band EQ include low cut and hight cut, lowpass and highpass, shelving and parametric EQs.
- Multiband EQs - these combine several filters in one unit, which allows you to control a large part of the frequency spectrum. This is your typical Channel EQ, in Logic. You can independently set the frequency, bandwidth and Q factor of each spectrum, which allows precision editing and tone-shaping of your sound source.
There are also some software EQs which emulate older hardware units, as vintage units were known to give distinctive tone or 'sonic colouration' to the sound, and Logic has a bunch of these too!
So, hopefully that overview gave you a good solid idea of the purpose of EQ, let's jump in and explore what Logic offers in the EQ department!
Channel EQ

Logic Pro's Channel EQ is your workhorse. It's a versatile multiband EQ, with 8 (beautifully) colour-coded frequency bands.
These include highpass, lowpass filters, as well as low and high shelving and four flexible parametric bands.
The parameters are fairly straightforward;
- Along the top you have your band selection buttons. Bands 1 & 2 are the High Pass and Low Shelving filters, respectively, while Bands 7 & 8 are your High Shelving & Low Pass Filters. The other bands are parametric filters.
- Along the bottom, you have the specific controls for each band, here you'll find the Frequency, Gain and Q Value for each band. Note that these can also be adjusted by dragging the lines and control points in the Graphic Display.
- The Analyzer button toggles the Analyzer on or off.
- The Q-Couple button turns on Fain-Q coupling to automatically adjust the Q when you change the gain on any EQ band.
- The HQ button enables oversampling, which is useful when your EQing near upper end of the spectrum and your project sample rate is below 96kHz. Without oversampling, filters (notably peaking filters) can sound harsh because they become narrower at high frequencies, and have an asymmetric slope.
- Processing pop-up menu: Choose to process both sides of a stereo signal, or the Left Only, Right Only, Mid Only, or Side Only signal.
Built in also is a Fast Fourier Transform (FFT) Analyzer, which shows real time changes to the frequency curve, giving great visual feedback of what's going on in your frequency spectrum. You can see any obvious issues with the Analyzer, which is a big advantage over other types of EQ that lack this visualisation. We'll cover this graphic display in more detail shortly.
I personally love the UI of this plugin. I remember the upgrade from Logic 9 to Logic X, and the new look of this EQ plugin was stunning. But far from being just a lovely looking EQ, it delivers on functionality too.
Channel EQ's Graphic Display
The layout of Channel EQ's graphic display is really straightforward.
You have the current curve of each EQ band, shown in decibels, and colour coded to match the buttons running along the top of the display.
Each coloured band is highlighted as you move your cursor over it, for even more visual clarity.
To adjust the band, you can click anywhere in the coloured space between the zero line and the EQ curve, or the centre frequency control point, which is the coloured dot in each band.
It;s worth noting that once you've selected a band for editing, no other band control point which falls within the active area of your band can be selected, so you're going to be editing one band at a time, and there'll be no unwanted overlap.
If you want to deselect a band, click the graphic display backgroun outside the coloured band to do so.
There are some handy additional controls you can apply to your editing if you hold down Command while doing any of the following, and it will limit dragging to vertical or horizontal movement.
-
Drag anywhere in the colored band to adjust gain and the center frequency.
-
Drag the vertical lines that encompass the selected band to adjust the Q (bandwidth) only. Two arrow icons are shown.
-
Use a two-finger vertical swipe with the trackpad, or a single-finger vertical swipe with the Magic Mouse, to adjust the Q value of the selected band.
-
Drag the horizontal line in the selected band to adjust the gain only. If Q-Coupling is enabled, both the gain and bandwidth are adjusted. Two arrow icons are shown.
-
Drag the intersection of vertical and horizontal lines in the selected band to adjust the gain and Q simultaneously. Four arrow icons are shown.
-
Drag the control point to adjust the center frequency only.
Note: Horizontally dragging the control point in band 1 and band 8 adjusts both the frequency and Q.
-
Hold down Option-Command to adjust the Q and center frequency simultaneously. A “Q” icon is shown at the pointer position.
So that's the basics of the Graphic Display. In my opinion, it's what makes Channel EQ stand out against other built in EQs in other DAWs, just compare how it looks to Ableton Live's EQ Eight, pitcured below.

When compared to Ableton's EQ Eight, purely from a visual perspective, Channel EQ is really nice to look at, which is important to me - I'm one of those people who really appreciates a good UI. This is why Ableton Live was a bit of a challenge to get into after I was so used to using Logic, but anyway....
A note on Linear Phase EQ

Logic also comes bundled with a Linear Phase EQ, which is similar to Channel EQ, as it shares the same parameters and layout, but has a black background instead of a blue one. You can copy settings between them, and if you replace one with another in the same slot, the settings will remain in place.
The key difference, though, is that Linear Phase EQ uses a different underlying technology, which preserves the phase of the audio signal. Phase coherency is always maintained, even when extreme EQ settings are applied.
But what doe this mean in practice?
Essentially, you'll want to use Linear Phase EQ when you want phase coherence between tracks, such as on multi-microphone recordings. With this EQ, there is no phase shift in the signal ( which can happen with Channel EQ, but it isn't always a bad thing). Using Linear Phase EQ can be beneficial in mastering.
Single-Band EQ
So, above we have covered Logic Pro's Channel EQ and Linear Phase EQ. Both of these are 8 band EQs which offer broad applicability and many uses. But there's also a Single-Band EQ in Logic, so let's explore it.

- Low Cut: Low Cut EQ attenuates the frequency range that falls below the selected frequency. This is your standard 'get rid of the bass' filter.
- Low Shelf: Low Shelving EQ affects only the frequency range that falls below the selected frequency. Similar to the above option, but with a more horizontal cut off than a Low Cut tends to have.
- Parametric: Parametric EQ is a simple filter with a variable center frequency. It can be used to boost or cut any frequency band in the audio spectrum, either with a wide frequency range or as a notch filter with a very narrow range. A symmetrical frequency range on either side of the center frequency is boosted or cut.
- High Shelf: High Shelving EQ affects only the frequency range above the selected frequency.
- High Cut: High Cut EQ attenuates the frequency range above the selected frequency.
So, if you've been paying attention, you'll notice that each of these modes are what are collectively grouped as the 8 bands in Channel and Linear Phase EQs.
A Single-Band EQ is more appropriate when you only want to adjust one specific frequency band, it can be good for using the High or Low Cut filters to get some interesting filter sweep effects on your music.
The Vintage EQ Collection
One of the many debates you'll find on Music Production forums online, or between groups of producers in real life, is that of analog vs digital.
Many of the seasoned producers who grew up using analog gear swear by it; just look at how many Tape Emulation plugins are out there and you'll get the point.
The reason that in the modern digital age of music production, we are making digital emulations of old hardware units, is because those units invariably added a signature tone or colour to the sound, that just isn't present in many modern digital devices.
So, entre the Vintage EQ collection in Logic Pro.
The collection is comprised of Vintage Console EQ, Vintage Graphic EQ and Vintage Tube EQ. Each of these are modelled on the original EQ circuits of three classic units from the 1950s, 1960s and 1970s.
So, before we go over what each of the Vintage EQs do, it's worth noting that they all share common Output parameters.
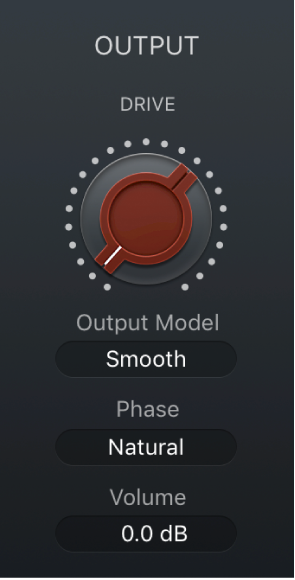
- Drive Knob sets the amount of gain/saturation of the chosen vintage EQ output stage. This is where the distortion and colouration of the original hardware model is emulated.
- Output Model Menu allows for choice between the different EQ modelling mides. The three options -Silky, Punch or Smooth are based off one of the models, but you can use either with whatever plugin you choose.
- Phase menu allows you to choose the processing mode of the EQ and the chosen output stage. You can choose between Natural and Linear, which affects the phase as per our notes on the Linear Phase EQ earlier.
- Volume Field allows you to adjust the overall plug-in output level, with a range of 25dB either way.
So, that's the common Output parameters that are present across the whole Vintage EQ range in Logic.
Now, let's move on to explore each one individually.
Vintage Console EQ

The Vintage Console EQ emulates the EQ section of a well-know mixing channel, in particular the Neve 1073 channel strip EQ. The original unit was designed in 1970 by Rupert Neve, and is a favourite for so many engineers. It's been used on tonnes of hit records.
As we mentioned earlier, vintage equipment was loved so much because of the warmth and tonal colour it applied to the sound. This EQ unit does a great job of emulating that tone, it has a smooth top end, and mid-forward presence.
Its parameters are as follows:
-
In/Out switch: Turn the EQ circuit on or off.
-
Low Cut button: Turn the low cut/highpass filter on or off. This is a third-order filter set at 18 dB per octave.
-
Low Cut knob: Set the low cut/highpass filter frequency at 50, 80, 160, or 300 Hz, or set values between these increments. Frequencies below this are rolled off at a fixed 18 dB per octave.
-
Low button: Turn the low shelving filter on or off.
-
Low Gain knob: Set the low shelving filter level. The gain range is ±16 dB.
-
Low knob: Set the low shelving filter center frequency at 35, 60, 110, or 220 Hz, or set values between these increments.
-
Mid button: Turn the mid range filter on or off.
-
Mid Gain knob: Set the mid range filter level. The gain range is ±18 dB.
-
Mid Freq knob: Set the mid range filter center frequency at 0.36, 0.7, 1.6, 3.2, 4.8, or 7.2 kHz, or set values between these increments.
-
High button: Turn the high shelving filter on or off. Fixed at 12 kHz.
-
High Gain knob: Set the high shelving level. The gain range is ±16 dB.
Notably, this unit features the same controls as the original Neve EQ, but where it differs is in its ability to set the controls to frequencies between the original stepepd EQ points. Which means you have much greter control over the sonic balance of the sound; you can edit more frequency bands than the original unit could, but you're still getting that signature drive and tone from it.
Vintage Graphic EQ

You can tell by the appearance of this unit that it's based on the API Graphic EQ.
The original unit was introduced in 1969.
The 10 bands of EQ feature 12dB of cut and boost, and it emulates the Proportional Q design of the original API unit. This widens filter bandwidth at lower cut or boost levels, and narrows filter bandwidth at higher cut or boost levels.
This plugin differs from the original unit by including the Tune feature, which you can see in the top left of the UI. What this does is allows you to globally adjust the frequency centre-points of the EQ's sliders, allowing you to proportionately scale all bands to provide more focus on a portion of the overall frequency spectrum.
This makes it great for precise signal shaping or tuning rooms.

When set to +12 the top filter’s centre-point is doubled to 32 kHz which allows for some really nice subtle boosting of the high end, giving a lovely airy quality to the sound.
Vintage Tube EQ
The final one in the group is the Vintage Tube EQ. This is based on not one, but two individual EQ units that were often paired becayse their sounds compliment each other so well. What's interesting to note is that these units are still in use today, despite being out of production for decades.

The two units on which the Vintage Tube EQ are based are the PulTec EQP-1A and the MEQ-5.
The unit is split up into two sections, one controlling the lows and another controlling the highs.
Here's a rundown of all the parameters:
The upper unit parameters -
-
In/Out switch: Turn the EQ circuit on or off.
-
Low Boost knob: Set the amount of low frequency boost, up to 13.5 dB.
-
Low Atten knob: Set the amount of low frequency attenuation (cut), up to 17.5 dB.
-
Low Freq knob: Set the low range center frequency to 20, 30, 60, or 100 Hz, or values between these increments.
-
High Boost knob: Set the amount of high frequency boost, up to 18 dB.
-
High Bandwidth knob: Set the Q, or bandwidth, of the high frequency range from narrow to broad.
-
High Freq knob: Set the high range center frequency to 1, 2, 3, 4, 5, 6, 8, 10, 12, 14, or 16 kHz, or values between these increments.
-
High Atten knob: Set the amount of high frequency attenuation (cut), up to 16 dB.
-
High Atten Sel knob: Set the high range shelving frequency to 5, 10, or 20 kHz, or values between these increments.
The lower unit parameters -
-
In/Out switch: Turn the EQ circuit on or off.
-
Low Freq knob: Set the low range center frequency to 0.2, 0.3, 0.5, 0.7, or 1.0 kHz, or values between these increments.
-
Low Peak knob: Set the amount of low frequency boost, up to 10 dB.
-
Dip Freq knob: Set the Dip (attenuation) center frequency to 0.2, 0.3, 0.5, 0.7, or 1.0, 1.5, 2, 3, 4, or 5 kHz, or values between these increments.
-
Dip knob: Set the amount of attenuation (cut) for the selected Dip frequency, up to 10 dB.
-
High Freq knob: Set the high range center frequency to 1.5, 2, 3, 4, or 5 kHz, or values between these increments.
-
High Peak knob: Set the amount of high frequency boost, up to 8 dB.
Overview
As we mentioned at the beginning of this guide, the EQ in your projects is one of the most important things, but one of the easiest to overlook.
With a lot of DAWs, your stock plugin options are fairly limited.
However, Logic Pro offers a really wide range of plugins for your EQ tasks.
Whether you're using the standard Channel EQ, or adding some nice tonal colour to your tracks with the Vintage EQ Collection, there are so many options within Logic, and you don't have to spend any extra money!
Hopefully this helped you get more of an appreciation of some of Logic's stock plugins. It's a super powerful DAW with loads of under appreciated resources, and perhaps this gave you the inspiration to do some experimenting with what Logic has to offer.
Thanks for checking in with us here at Logicxx.com, and while you're here, be sure to check out our project templates. We have loads of deals available, and they are a great way for you to learn how professional level tracks are put together, as our international team of producers are working constantly to get you industry standard recreations.
Download them, learn the best tricks for producing music, and keep making tunes!