ADSR Envelopes demystified
Posted by Esteban Miranda on
If you've been producing music for any amount of time, chances are you've encountered ADSR envelopes. They're a common feature on all types of music production devices you'll find in your DAW. But they're responsible for a lot more than you'd think.
Even I am always finding new and exciting ways to utilise them in my productions, and I've been making music for 15 years now.
What's interesting about them is that the concept behind them can apply to all sound, no matter what sound source you're using, and they're most commonly found on synths and samplers, whether that's a digital or a physical one. We can use the terminology of an ADSR envelope to describe the sonic characteristics of any sound, whether it's natural or part of music.
For example, a stone hitting the floor is often a short sound, whereas a bus letting out its air brakes is a long one. These aren't musical sounds at all, but by understanding ADSR envelopes, we can understand the sonic characteristics, which when applied to sound design and music making, can help us take things up a level.
After all, knowing what an ADSR envelope is, what each part means, and most importantly how to use them, is an essential part of being a good music producer.
So, in this guide, we will discuss what ADSR envelopes are, where you're likely to find them, and how you can use them in your music to create the sounds you want.
Out of the brain and into the box.
Music production is essentially the process of using computers and other technology to get sounds you imagine in your brain out and into the real world. We do this by using musical instruments, and writing the songs we hear in our heads.
But how many times have you tried to encapsulate the sounds you're hearing in your head and put them down in your DAW, only to find that they're aren't what you imagined?
Well, a huge part of being able to do that is knowing how to design and shape sounds, and that's exactly the purpose of an ADSR envelope.
An envelope is fundamentally a tool you use to sculpt and design your sounds. Specifically, an ADSR envelope dictates how a sound unfolds over time.
What's cool is that all sound can be described using ADSR, but to really understand how it works, we need to understand exactly what each part of an ADSR envelope is.
So let's take a look at each individual part, and then we will move on to some examples of how you can use ADSR Envelopes to create some sounds.
What is an ADSR Envelope?
An ADSR Envelope is made up of four parts - Attack, Decay, Sustain & Release.
Each of these plays an important pupose in sculpting the character of a sound in the context of time. So, we aren't talking about whether a sound is high or low, whether is distorted or clean, we are talking about its characteristics as they evolve over time.
In a previous article I mentioned how music is an artform which uses time as the canvas, which I thought was a beautiful description, so bear that in mind while you read this guide!
Before we break down what each part is, we should mention that many ADSR Envelopes are represented visually in synthesisers and other devices you'd find them on, as well as being shown as a list of parameters. So we will showing a few diagrams, and using some language alluding to the visual representation of an ADSR envelope.
But I find there's a lot of crossover with visual language and sound; we often talk about the shape of a sound when talking about ADSR envelopes.
Let's break them down into their constituent parts.
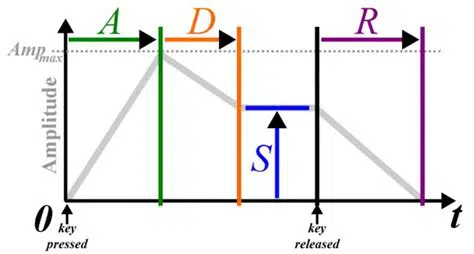
Attack
Attack is the first stage of an ADSR envelope. It determines how long the sound takes to reach its maximum volume.
This is a familiar concept to us; instruments like a guitar or piano have a very fast attack, meaning they reach their maximum volume pretty much as soon as the note is played. Other instruments can have a much slower attack; particularly synthesisers, as we can tailor the attack speed to the needs of our music.
When working with synthesis, the Attack paramater can dictate a lot of the character of your sound. A super quick attack creates a plucky or mallet like sound, while a slower one can be used for a pad sound.
A slow Attack means a sound gently slopes up to its maximum volume, whereas a fast attack means it comes out all guns blazing.
Decay
Decay is the time that the sound takes to reach its sustain level. With a decay time of 0, the sound will immediately drop to its sustain level.
If a sound has a particularly loud start, the Decay time is significant, because you can control whether you want it to remain loud or immediately drop to its sustain level.
Sustain
The other parameters we've discussed so far deal with time, whereas Sustain is controlling volume.
This is the volume at which the sound is maintained while the key remains pressed. In the Attack parameter we have the time the sound takes to reach its peak volume, and sometimes this peak volume can be the same as the sustain volume, but sometimes the volume can be lower.
The Decay time then controls how long it takes for the volume to drop from its peak volume to the Sustain level, if indeed there is a difference.
The Sustain is often shown as a percentage of the peak volume, from 0 to 100. In other instances, it's shown as a voulme meter measuring in decibels (dB).
Release
The final parameter in the ADSR envelope is the Release.
This dictates how long your sound takes to fade away once the key is released.
This is also referred to as the tail of your sound. If you have a long Release time, your sound is going to take a long time to fade away, and if you're playing lots of consecutive notes, this may muddy your mix.
However, a long Release time can help create really lush textures in your music if it's the specific effect you're going for!
Opening the Envelope
So, now we've covered the basic functions of an ADSR envelope and what they're for, we can start to explore how you can use them to create a range of different sounds for your music.
It's worth noting that there are infinite possibilities for using ADSR envelopes, and they aren't just for sculpting synth sounds. You'll find them in a range of other plugins too, so getting your head around how they work to change sounds is a good basis for any time you encounter one in a new plugin.
As we mentioned at the beginning, there's a really beautiful synergy between the way changing the parameters of an ADSR envelope sculpts sound, and how it is visually represented in the traditional ADSR diagram.
So, going forwards, try to bear this in mind as we explore techniques for using ADSR.
So, now let's explore some different ways you can use ADSR envelopes in their most basic forms to create a range of common sounds you'll find in music production.
Creating Pads
One of the best ways to get an understanding of an ADSR envelope is by loading up a synth in your DAW. Every synth has them, so it doesn't matter what you use.
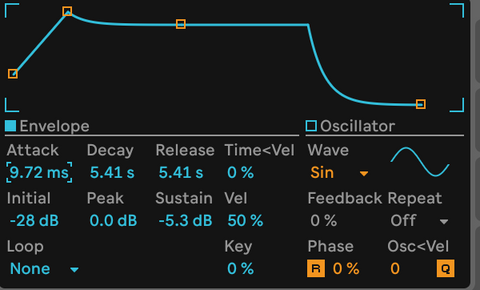
I'll be using Ableton's Operator, but the concept applies to any synth you may have.

When you load up Operator, the envelope section is in the middle. As you can see, there are the individual controls we've discussed, as well as the visual representation in the central panel.
The Attack parameter is instantaneous by default.
So, how can we adjust the initial parameters to create a pad sound?
(Note, we are only discussing ADSR in this guide, so any of the other aspects of sound design won't be covered. We will just be using the default Sine wave, and we won't be applying any filters or LFOs.)
The first thing you want to do when creating a pad is to generally have a longer Attack time (though this isn't always the case, as we'll see.)
Setting it to something more medium will work great.
You'll also want to adjust the Decay time to be medium as well.
A Pad sound is, by definition, one with a long Sustain and Release time. It's something that will be playing constantly, rather than a more staccato feel. In terms of acoustic instruments, a Pad sound is analagous to a violin; the sound lasts a long time, and doesn't instantly come in, instead it has a fade in.
If you use a fast attack and fast release, you can subtly adjust your pad sound so it sounds plucked initially. This means you'll have a louder sound hit first, and then a tail afterwards. This can be great when creating percussive sounds. A good way to think about this is to imagine playing a piano chord with some force, while having the sustain pedal pressed. You'd have the fast attack of the initial pressing of the notes, but then you'd have a nice tail sound which would last a bit longer.
These are all settings you can experiment with, but this is what my settings looked like for creating a nice pad sound.
Going Staccato
On the opposite end of the spectrum to long, lush pad sounds, are plucky staccato synth sounds with really fast attacks.
These types of ADSR settings are great if you're looking for a percussive sound, such as a drum hit, which you can synthesise really well using a variety of synths. But you'll also find them on hard hitting trance stabs, for example.
Now, this is an extreme example, so don't think you have to only use this type of sound in the scenarios I listed above; with subtle manipulation of settings you can create an infinite variety of sounds.

Here we have a really plucky sound, using an instantaneous attack with really short decay and release.
If you recreate this in your own synth in your DAW, you'll hear how the sound plays and then instantly dies away.
It's almost as if it's in a rush to be silent again.
This can be a really good way of getting a synth line to dance on top of your mix, especially with some cool effects applied.
You can further experiment with this sound by adjusting the Sustain level.
Another cool trick in this vain is to keep your short Decay time, but add in a slightly longer Attack time. This sound still has that instantaneous and rushed feel, but the slower Attack time adds some interesting character to the sound.
The settings for this are below.

Visual Envelopes
So, above there are some examples of how to create different sounds, along with screengrabs of the envelopes for each example. If you followed along and created them yourself, can you then look at the envelope visualisers present here, and begin to hear how the sounds would differ?
When you've been familiar with these envelopes for a good amount of time, you'll start to be able to anticipate how a particular synth will sound, just from seeing the envelope visualiser. You'll be able to imagine how a synth would sound without even hearing it. And this works in reverse too.
You'll be able to hear a sound (or imagine one in your head) and then know what the envelope for that sound would look like in the visualiser.
What's cool as well is that in many synths, you can adjust the parameters either by changing the numbers, or clicking and dragging on the nodes within the visualiser itself, so you can use the visualiser to create a shape initially, and then go into the parameters to adjust them with some fine tuning.
This visual element gives you a really good method you can use to literally sculpt your sound to get the results you need.
Going beyond Sound Design
So far, we've covered the concept of using ADSR envelopes in synthesis to create and shape sounds from scratch. However, this is only the tip of the iceberg. If you start looking, you'll notice ADSR envlopes (or at least some of the controls from them) are present in many different areas within your DAW.
In fact, ADSR envelopes can control filters, effects, and also be applied to pre-existing sounds.
You'll also find controls like Attack and Release on many plugins such as Compressors.
Now that you have a fundemental understanding of how these work, you should be able to apply them in a more considered way when making music.
So, let's look at a few places you'd find an ADSR envelope that isn't all about creating synth sounds.
Working with Samples
A great way to make use of an ADSR envelope is to shape a pre-existing sample, turning something from its original sonic character into something quite different!

Ableton Live's Simpler is the simple sampler that loads up when you drop an audio file onto a track. You can see along the bottom right of the interface are the ADSR controls, and we can use these in a few cool ways on samples.
The first is by using the Attack control to reduce or remove unwanted sounds from the beginning of a sample, which can be a common nuisance when you're using samples.
Sometimes, if you've chopped a sample from a wider loop (or perhaps it's come to you that way), there can be unwanted pops or clicks at the beginning of the sample. You can use the Attack parameter of the sampler to hide this, meaning that when that unwanted sound hits, your sound will be too quiet to hear it.
It's a subtle tool, but it can be really useful. There's nothing more annoying when you're working with samples than having unwanted sonic artefacts. Especially when you start adding in effects like delay, the problem can multiply.
Now, you can also use the Attack parameter to take a highly percussive sample and turn it into something more gentle.
The sample I've used in the image above is a Tongue Drum, which has a lovely melodic element to it which reminds me of a singing bowl, but there's also this quite harsh percussive hit at the beginning.
Using the Attack control and turning it up to a rather drastic 5.79s, I was able to scuplt the sound into something much gentler and really capture the tail end character of the sample while totally eliminating the percussive hit at the beginning.
Of course, you can use more than just the Attack parameter when dealing with samples. By experimenting with all the ADSR controls present on your sampler, you can get really creative with how you shape pre-existing sounds.
Going further with ADSR
ADSR is far from just a set of tools you can use to create synth sounds.
In fact, using ADSR in your mix can help you achieve clarity and definition with a range of different techniques.
As we said in the introduction; ADSR can be used to describe the characteristics of all sound, so it makes sense that you can apply changes to these characteristics, no matter what the sound is.
So let's look at a few ways you can do this.
Shaping Audio with Envelopes
I covered this in a recent guide, and it's a really great technique for adjusting how things sound in your mix.
There are a whole collection of plugins out there called Transient Shapers, and this is a great example of how you can use ADSR techniques to adjust sound.
Most Transient Shapers have two settings; Attack and Sustain. These can both be boosted or cut, depending on what you want to achieve.
![]()
In this context, here's what each control means;
- Attack - this either sharpens or dulls the initial transient of your sound. Increasing the Attack makes it sound punchier, while decreasing it softens the overall character of the sound.
- Sustain - this effects the tail end of your sound, so if your decrease it, the sound gets tighter, while increasing the Sustain gives the natural reverb tails a place to shine.
Transient Shapers are great tools for drums. You can use them on individual drum samples to scuplt it to your needs, but it also works great on recordings of drum loops.
You can use a Transient Shaper's Sustain control to completely eliminate any room sound and eally tighten up any tails from the cymbals, for example. Similarly, you can use the Attack control to tame some overly punhcy drums, or add in some much needed punch to a weaker sounding recording.
Now, this isn't the only thing you can do with a Transient Shaper.
By using the Attack control, you can make things sound punchier, as we discussed, but this also has the effect of making things sound closer in your mix.
By turning up the attack parameter, you emphasise the initial hit of a sound, without turning up the entire sound's volume. If done well, you can increase a sound's perceived loudness, while actually reducing it by a dB or two of actual volume.
Something useful to note is that many Transient Shapers have high pass filters on them, which is useful when you're using them on kick drums. In this context, the high pass filter means the transient shaping will only apply to frequencies above the lower end, so you can increase the mid and high frequencies (where hard hitting transients normally are) without bringing unwanted sub frequencies into your mix.
So, by reversing this concept, we can also make things sound further away. By using a slower Attack value on a Transient Shaper, we can really push back the perceived loudness of a piece of audio, meaning it sits further back in our mix.
Softening the initial hits of sounds can push them back without risking overcompression, which can be a common problem if you're trying to tame the volume of some audio.
Finally, you can make some really cool changes to audio by using the Sustain control of a Transient Shaper.
By bringing it down, you can clean up any unwanted noise in a recording. All recordings have noise at the tail end of the sound, and sometimes it is quite quiet, and other times it can be louder.
If you have a drum break with lots of room noise in it, for example, you can use the Sustain control to tame this, bringing down the volume of the tail end of the sounds. It's like adding a short volume fade to the end of a clip. This gets rid of room noise, and makes things sound tighter. This is also great for getting rid of unwanted buzz sounds from electric guitars.
On the other hand, you may have recordings which sound too tight, in which case you can add some personality and character by increasing the Sustain control.
This has the interesting effect of making it sound as if there was a second microphone further away from the intstrument. It's really similar to adding reverb, but it's not the same.
Particularly on audio recordings, there is interesting sonic information at the tail end, and increasing the volume of this can add some nice presence to a recording. This can also help increase the perceived loudness of a sound.
Conclusion
In this guide we've discussed the concept of ADSR envelopes; what they are, how they work, andh ow you can use them.
As we've seen, there's a lot more to them than just shaping a sound. While they're a crucial part of interesting sound design, they can also be used for effects, and can be a great tool when mixing.
As with all aspects of music production, there's a basic level of knowledge and then a whole world of experimentation which opens up on top of it. But having that fundamental base of knowledge on which you can build is crucial.
So, hopefully you found something useful in this guide. When you're a self taught music producer, sometimes things can be overlooked, so if that's you, this guide has all the info you'll need on ADSR envelopes. Even if you're a seasoned producer, it can be useful to remind ourselves of the basics, as they're often so far in thepast of our learning journey that a refresh can help us refocus.
Remember, these are only a few of the ways an ADSR envelope can be used. There are tonnes more, and you'll discover them when exploring your DAW and the synths and plugins in it.
Thanks for checking in with us here at Top Music Arts. While you're here, be sure to check out the rest of our blog where we have many more guides and tutorials on music production. Also, we have an international team of producers who work to re-create chart topping EDM tunes to as near perfect as possible, and you can download these recreations of Ableton Live Project Templates to really dig into the tricks and techniques that go into a professional level track.
Be sure to head back soon for more music production tutorials, guides and content!