Maximizing Your Workflow in Logic Pro: Tips and Tricks
Posted by Esteban Miranda on
I see the term "workflow" being spoken about all over music production forums and communities. It seems to have become a bit of a buzzword in recent years, with many a site and content creator giving people ways to "hack their workflow". I think it shows that we're becoming more aware of how little time we actually have, and how busy we all are in the modern world. So naturally, we want to make the most of the time that we dedicate to our music.
But what is workflow really? The goal of having an efficient music workflow is to spend as much of your allocated music production time as possible actually making music, rather than getting lost in menus or sample folders, or doing things in a way which is inefficient. Obviously this is going to look different to each person individually, but there are certain things you can learn within Logic Pro to help you reach this goal.
So, in this guide we are going to look at:
- Ways of identifying what your workflow actually is.
- How you can speed up your workflow.
- Tips to help you create an efficient way of working.
- Specific features in Logic Pro which help facilitate quick workflow
- and more!
So, let's jump right in.
Exploring Your Workflow
Being a music producer means something different to every single individual who practices music production around the globe. There are myriad ways you can achieve it, and conventions and best practices not only differ from genre to genre, but from person to person too.
Consider your own background; I came from playing in bands when I was younger, so I have plenty of experience on playing guitar and piano, as well as working with other musicians. This experience of working with real world instruments has no doubt informed how I approach working with my production. But this isn't the case for everyone.
Some people didn't have this ensemble live performance background, perhaps they took a single course on music technology, or they're a solo musician. Many producers have only ever been music producers, beginning making electronic music right away.
Nowadays, there are also a huge number of self taught music producers. There are many online resources such as YouTube creators or reddit forums dedicated to helping people learn music production. And every individual who learns in this way will pick up different tips from here and there.
The point is, we are all different, and this translates directly into how we approach our workflow.
So, the first tip I'll give you here is to do a bit of self-discovery. Try different ways of working to see which way suits you.
Let's take an example and explore it in the context of Logic Pro.
To Loop or Not to Loop?
For a long while, there was only one way of organising your song structure in Logic Pro, which meant that there was only really a single way to approach song creation.
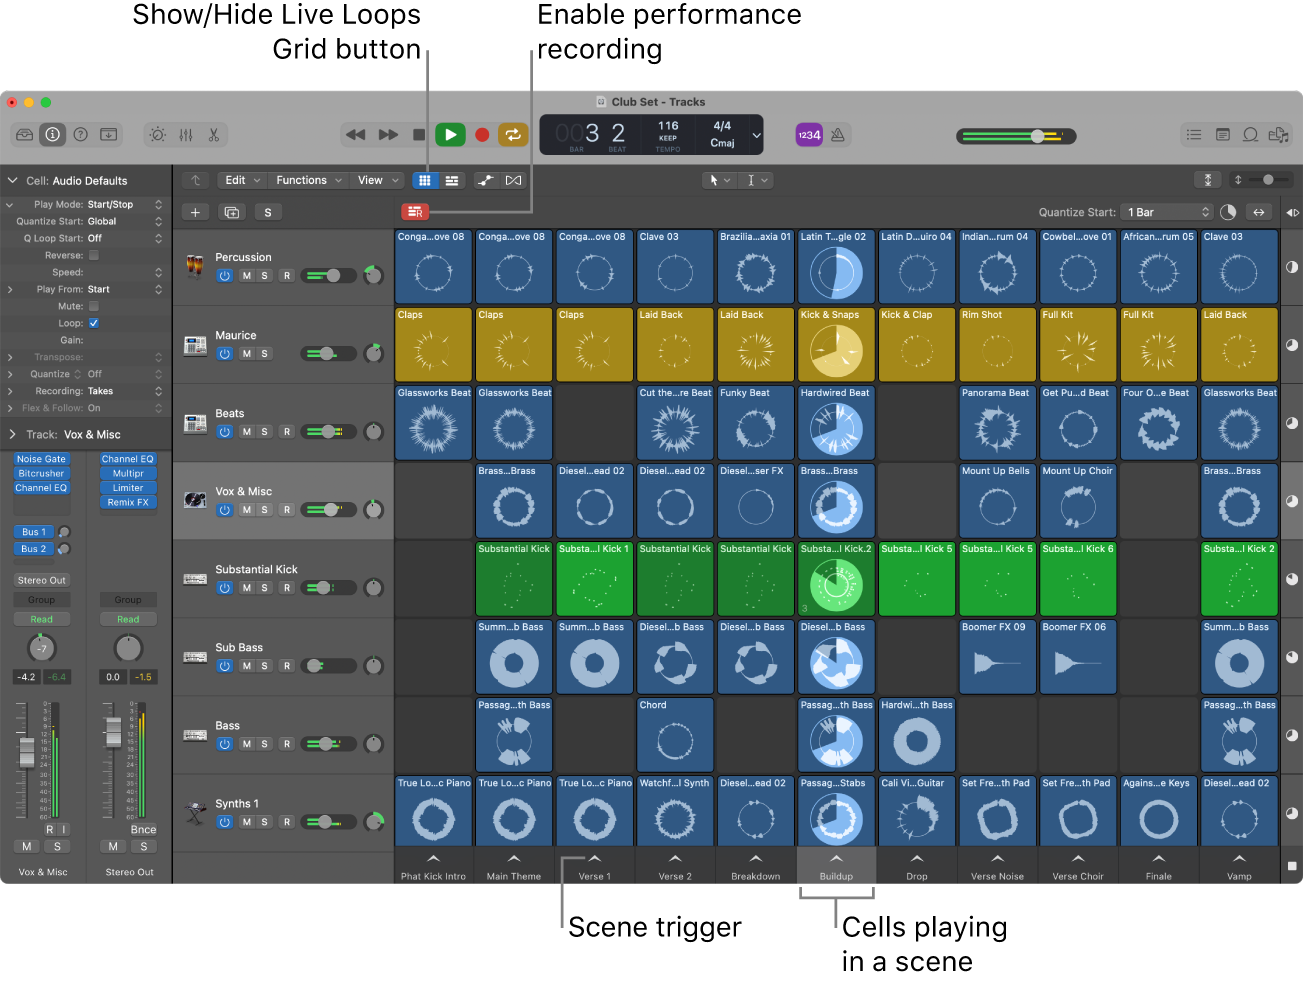
However, when Logic updated to version 10.5 they introduced Live Loops, and this gives you two different options for how you want to go about creating your song right from the get go.
Let's explore them:
- Using Live Loops - this is a novel way of music making for long time Logic users, but it is great fun, and can facilitate a type of music making which is quick, intuitive and simple. Using Live Loops, you can create music on the fly, in real time. You can add in different cells containing whatever musical idea you want to, and hear how they work in the context of your ongoing musical jam session.
- Using the Tracks Area - this is the traditional, linear timeline based way of making music which we are all familiar with. It's a mainstay of most DAWs, and it's where you organise the structure of your song in a linear way.
So, as you can see, there are already two very different ways of approaching your workflow in Logic Pro, and these will have different angles from which you want to tackle your music making as a whole.
Live Loops is a great tool if you're wanting to make loop based electronic music. It's undoubtedly based on Ableton Live's Session View, and Ableton has a reputation for being aimed at electronic music producers. The point is, this type of real time music creation is a totally new way of doing things compared to the options available in previous versions of Logic Pro.
I wanted to highlight this concept before we dive into some specific tips for maximising your workflow, because it's a fun and insightful idea that there isn't just one way of working. There are many ways to approach music production within Logic Pro, and this highlights just two of those different approaches.
What's important to remember is that everyone develops their own ways of using Logic Pro; while there are the core mechanics we all need to learn, each of us has their own individual approaches. Logic Pro is a complex program, which means it can accommodate a wide range of unique creative visions.
So, with that being said, let's look into some tips which can help speed up and maximise the efficiency of your workflow, no matter what approach you take!
Logic Pro Workflow Tips
Logic Pro has a huge selection of things you can do to facilitate quicker working, and none of these is more obviously designed for this purpose than the Key Commands.
Key Commands
You can find Logic Pro's full list of key commands here.
It's a super useful collection of keyboard shortcuts which, when learned and used frequently, will drastically improve the efficiency of your time spent in Logic.
There's the obvious one: Space Bar = Play or Stop, but then there are much more specific key commands.
For example, hitting R starts recording. Hitting Enter takes you back to the beginning of your track. Hitting Command + 2 will open a mixer window while hitting X will show it within Logic.
By using key commands in Logic Pro you can do so much with just your keyboard. You can open all of the specific windows you want to, you can set the cycle length, show or hide musical typing (Command + K) and more.
Another great key command is Option + Arrow Key Up or Down. If you select either an Audio or MIDI region, this shortcut allows you to quickly adjust the pitch in semitones. This is great for quickly changing the pitch of bits of MIDI or Audio to get in line with your project.
If you learn these key commands, or at least the key commands to facilitate your way of working, you'll greatly speed up how efficiently you spend your time in Logic Pro.
What's really cool, however, is that you can edit your key commands so they're more comfortable for you. Head over to Preferences (Command + ,) and find the key commands tab. This allows you to search for key commands and reassign them to your liking.
Seriously, in terms of speeding up your time in Logic, this is a game changer!
Markers
When you're creating a song in Logic, it's a good idea to insert markers to help you navigate the structure of the track. Getting these in early can help you build your song, and it adds a level of organisation to your workflow which ultimately increases the efficiency.
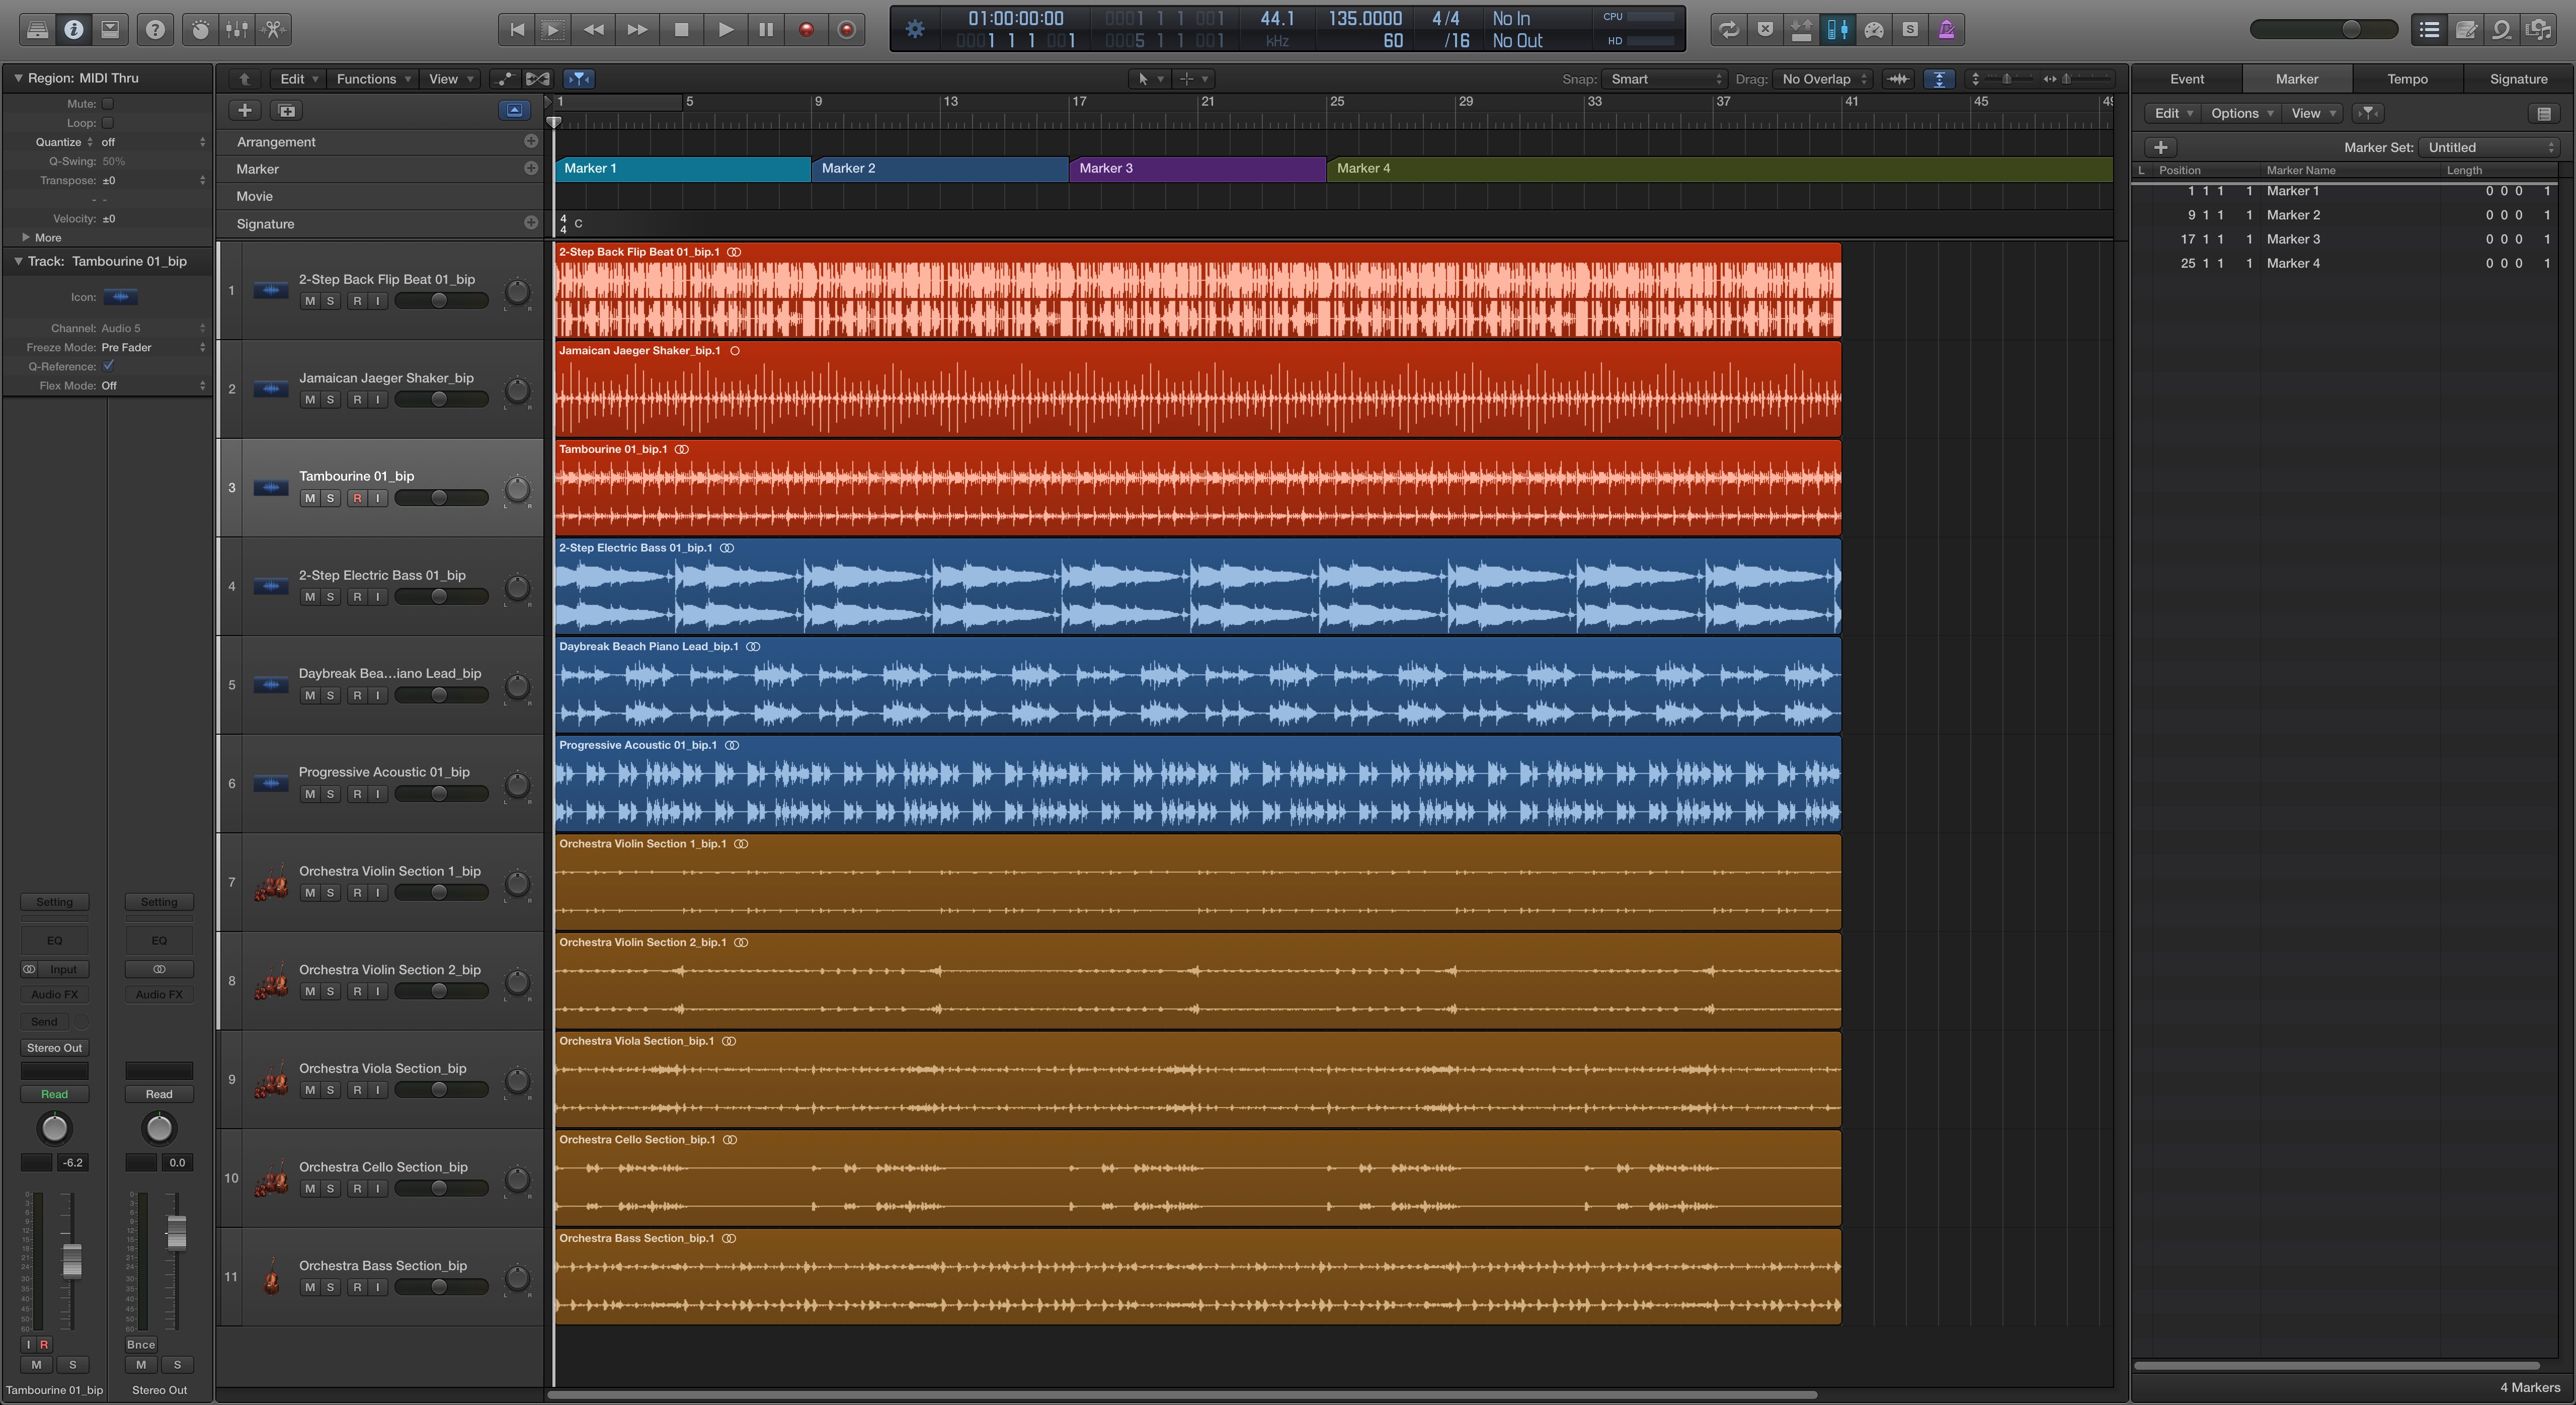
What's more, is that it's one less thing for you to remember, and it gives you a visual indication of where the different sections of your song are.
If you want to navigate to a specific part of your song, dragging the playhead around or just clicking in the bar ruler where you think the first chorus starts will get the job done, sure, but it's tedious and imprecise. And while it may seem like a only a small amount of time saved, these things add up.
Not only can you create markers, but you can use key commands to navigate to the next marker, the previous marker, or even a specific marker by number. You can also create these in your templates, and they can then be easily moved around and renamed. You can also change their colour for that extra sense of visual clarity.
Doing this ensures you can navigate your project efficiently, which helps you achieve our elusive goal of a quick workflow.
Organising Presets
Any producer worth their salt knows how to edit and adjust synth patches to get them just right. Maybe you shy away from using preset patches altogether, and instead make your own?
Either way, I'm going to assume for this section that you have at least a few synth patches that you've made or tweaked yourself.
Having a method of organising these presets is crucial if you want to avoid diving through menus and folders and wondering where that specific sound is that you can't remember the name of.
If you're using Sampler, you can go behind the scenes in Logic's support files to really get your presets organised. You can make file folders to sort your presets into whatever category system works for you, allowing you to navigate to them super quickly.
To do this, close Logic head to the Finder and navigate to Your Home Folder > Library > Application Support >Logic >Plug In Settings and then head over to Sampler Instruments to organise your presets.
This is essential for improving your efficiency in selecting your sounds, especially if you have a core selection of sounds you use in your productions.
Colour Coding
When you're an experienced producer, you have your typical groups of sounds, or categories that you usually reach for. Similar to how a traditional band has guitars, bass, drums and vocals, we group different instruments or sounds together in music produced or recorded in DAWs too.
It's really important from the point of view of streamlining your workflow that you have an organisational approach to these elements of your music.
Luckily, Logic Pro has got you covered.

When you've got different regions present in Logic's Tracks Area, it can quickly become confusing trying to identify all of the different things you're looking at. Sure, we can name them, but even still, these are just small text boxes in the top of regions, not very clear at a quick glance. There also might be variation between regions on the same track, which can quickly become confusing.
However, what you can do is colour code your regions to correspond with your organisation method.
So for example, you could use Blue for drums, Red for synth pads, Green for lead sounds. Basically, you can use whatever system you want. But this is guaranteed to ensure that even when you glance at your track in Logic, you'll know what you're looking at, and what lives where.
To ensure you're setting this up correctly, choose Logic Pro > Settings > Display and then click the tracks button. In the Display Track settings panel, make sure that the Region Color pop-up menu is set to "individual".
This means you can colour code individual regions, regardless of the track colour. If this option is set to "As Track color" then you will be limited to the colour of the track. This is essential for including variation; I like to colour code different variations of my drum patterns, for example. So the top loops without a kick might be light blue, and then when I introduce the kick I can label them dark blue. This helps me see my arrangement without the need to hear where different elements drop in and out.
Once you've enabled this, hit Option + C to bring up the shortcut menu.
Colour coding is an essential part of having a clean and efficient workflow. If you hadn't figured it out by now, speeding up your workflow is all about little tips like this. They add up, and all work together to streamline your production workflow, making sure you're being as efficient as possible.
Screen Real Estate
Before we dive into this one, it's worth pointing out that not everyone is lucky enough to be able to spend money on flashy new toys for their studio, but if you are able to do this, this tip is for you.
When you're working in a DAW, screen real estate is super valuable. If you've ever had to try and produce music purely on a 13inch Macbook using Logic you might be able to imagine how much of a dream it would be to have two screens to work with.
When I used to have a more permanent home studio set up, I had two monitors, and it was great for productivity.
The main thing I used it for was for permanently having my mixer visible in a second screen. Hit Command + 2, and then drag that mixer window to your second monitor.
This makes a huge difference. I've mentioned before about mixing with your ears vs mixing with your eyes. All of us, to some extent, mix with our eyes; we keep an eye on where the levels are in our mixer, and being able to see this all the time gives you a better overall idea of how your mix is sitting.
Again, this may seem like a small change; adding a second monitor to shave seconds off of your production time that would otherwise be spent switching back and forth between the mixer. But, as I've already mentioned, all of these tips add up. You'll find you've saved a lot more time than you realise if you put these tips into practice!
Getting a good monitor these days is also fairly cheap. I have a really nice Samsung curved monitor at home which cost less than $150, and it's 27 inches, and my DAWs look amazing on it.
Seriously, even if you have a Macbook, consider picking up a second monitor for when you're using it at home. You'll thank me later!
Bounce in Place
This is a super useful tip, especially if you have the tendency to get caught up in the minute details of editing your MIDI parts, which ultimately can get you stuck in one phase of production, unable to move onto the next one. You think it's finished, but then you end up going and editing something again which - let's be honest - isn't really making much of a difference.
If this is you, then this tip will help you know when you're done, and be able to focus on moving onto the next phase of your production.
 When you're finished with a MIDI part, Right Click and navigate to Bounce and Join. From there, select Bounce in Place. The key command for this is ^B for all you newly obsessed key command junkies!
Smart Controls
 If you aren't familiar with this little button pictured here, you should be. It's the toggle for Logic's Smart Controls and these can make a world of difference when it comes to your workflow.
Smart Controls are a super useful way to consolidate the parameters you will need for a given track, and have them all in one easy to understand place. What's cool about this is that it's contextual, meaning it's different for each track. What's more, is that you can customise the interface and mapping to suit the exact controls you need, and even use it to map controls to external MIDI sources.

You can see in the image above a selection of controls from the selected track. The i button in the top left of the interface opens up mapping controls, which also reveals two unmapped knobs which I can use to control any parameter I want.
So, if you're using Sampler, or Alchemy which have a lot of confusing controls, you can map the ones you need to Smart Controls, giving you a quick and intuitive way of accessing them and changing only the parameters you need to change.
This is great if you have an external MIDI controller as well. It allows you to create on the fly automation changes in real time, adjusting only the controls you've decided are crucial to your track.
Logic Remote
Logic Remote is a free iOS companion App for Logic Pro.
Put simply, it is amazing.
If you have an iPad or even iPhone, you should seriously consider adding this app to your studio set up.

It allows precise control over Logic's functions, and integrates seamlessly with your DAW over Wifi. It means you don't have to be physically sat at your computer to use the DAW. If you record vocals, or another instrument which requires you to shuffle across the room to begin recording, those days are behind you!
Instead of having to give yourself 4 bar count ins so you can rush over to the microphone, you can simply take your iPad or iPhone with you and hit record when you're set up and comfortable.
Logic Remote also works really well for jamming with Live Loops, as well as offering you access to the Smart Controls we discussed earlier.
One of the best features of Logic Remote though is the chord strips. These are a panel of several different chords, arranged in multiple voicings, that make playing MIDI into Logic Pro an absolute dream. Honestly, I was blown away by this feature when I first tried Logic Remote and it changed the game for me. It allowed me to record in complex and lush sounding chord progressions super easily. It's particularly useful if you aren't a piano or keyboard player!
I can't overhype Logic Pro enough. It is a fantastic resource, and it guaranteed to integrate seamlessly into your workflow. If you haven't got it downloaded, get it done as soon as you finish reading this article!
Maximizing your Workflow
Hopefully the tips we've discussed in this guide will give you some ideas of how you can integrate things into your workflow to be as efficient as possible in your music making.
As we mentioned earlier, there's not a "one size fits all" approach to this, as everyone's music making process differs slightly. However, what these tips are great for is incorporating the things that are standardised; you can get these things sorted and boxed off to leave you room for your own approaches when there's room for that.
So, be sure to let us know in the comments if any of these tips helped, or if there are any other Logic Pro workflow tips you use which we didn't discuss!
While you're here, be sure to check out our deals on Logic Pro Project Remakes. Our international team of producers are always working to create accurate recreations of top EDM tracks so you can download the Logic Project and really sink your teeth into what makes a professional production stand above amateur ones. You might learn a thing or two and be inspired for more workflow practices!
Thanks for checking in with us here at logicxx.com and be sure to check out the rest of our blog for more tips, tricks and guides for Logic Pro!