Making Music in Logic Pro: A Beginner's Guide
Posted by Esteban Miranda on
If you're new to making music, and you've got your hands on Logic Pro, then you've got a lot of stuff to learn, and a lot of exciting things ahead of you!
Logic can be intimidating, but once you know your way around things, you'll have a much better understanding of how it works.
So, in this guide you'll learn:
- The basics of Logic Pro; Audio, MIDI, Mixing & more
- How you can use Logic Pro to make music
- Good ideas and tips for a Logic Pro workflow
Logic Pro's Interface
Opening up any DAW for the first time can be daunting, and Logic Pro X is no exception.
There are a lot of different buttons, screens and menus for you to get your head around, but as with most things, it's not as complicated once you're familiar with the various functions.
One of the best tips for getting to grips with Logic Pro is enabling the Quick Help option.
 This is a super helpful feature, because enabling it means you'll get a small info window giving you a detailed description of whatever area of Logic Pro X you hover your mouse cursor over.
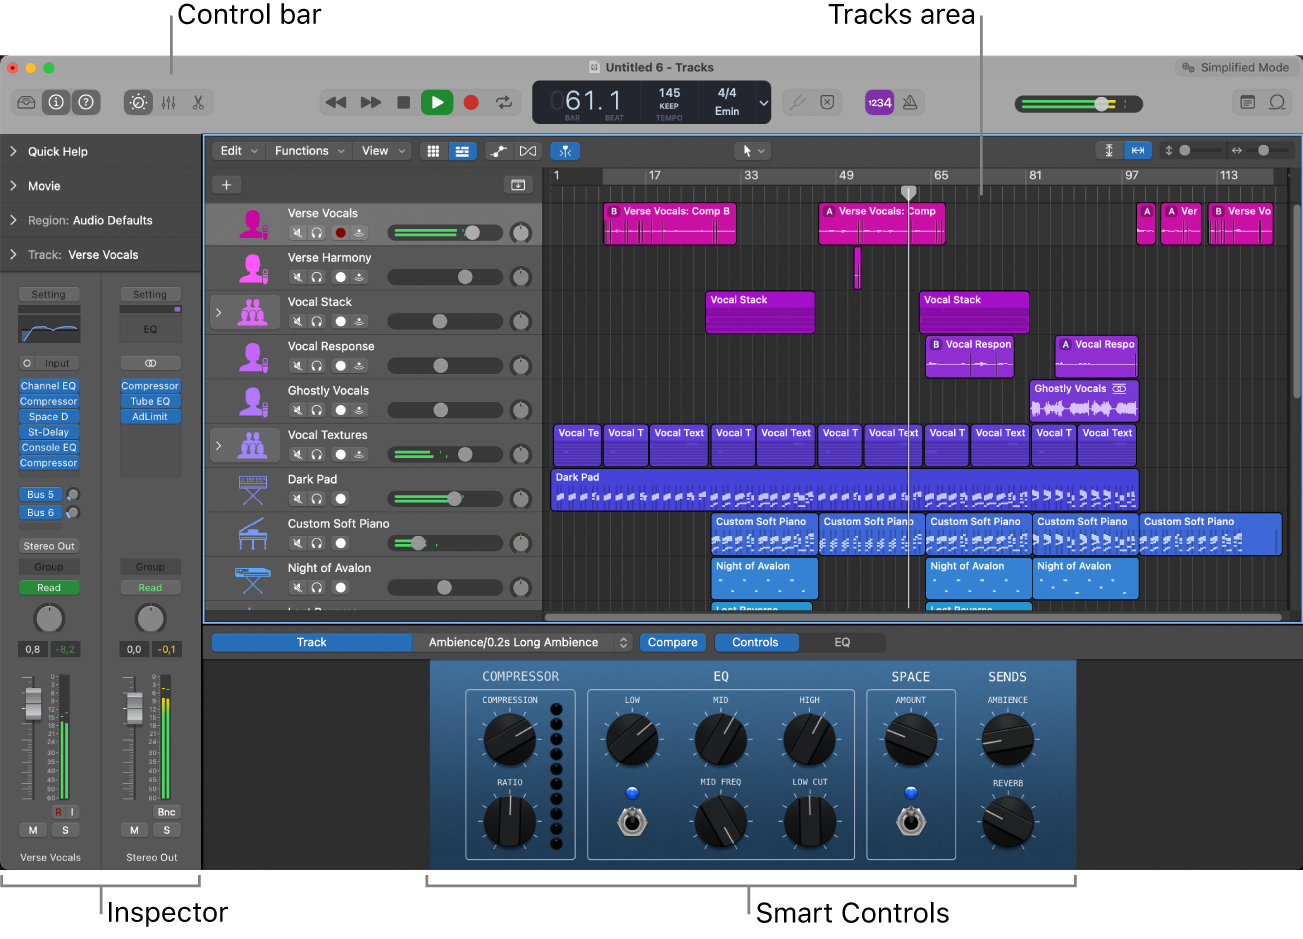
Above is a screengrab of Logic Pro X's interface with the main sections labelled for you. These are all of the areas you should be familiar with when making music in Logic Pro.
Along the top you have the Control Bar, which houses all of the controls you'll use for the entire project. The play, stop and record buttons are here, as well as the central LCD showing info about the tempo, time signature and playback position of your project.
The Tracks Area is your musical timeline. This is where any recorded audio or MIDI will go, and it's in this area that you will construct the arrangement of your song. In Ableton Live this is called the Arrangement View, which I think is a nicely descriptive name in that it tells you exactly what you're going to be doing with that area.
To the left, you have the Inspector. This is where you're shown contextual information based on the track and/or region you have selected. You'll notice two volume faders. One is the Stereo Out which is the master volume for your entire project, the other one will be the volume level of whichever track you have selected.
Along the bottom you can see the Smart Controls section. This is another contextual menu, showing you a range of quick controls based on the track you have selected.

There is also the Library, which is where you'll find all of the available channel patches for use in Logic. A patch is a preset channel strip, consisting of an instrument as well as some effects. These are pre-made sounds which you can use in your music right away.
They're perfect if you're just starting out.
Another amazing resource for the new Logic Pro user is the Apple Loops Library. Opening up the Loops Browser (pictured here) allows you to choose from a huge selection of loops, spanning genres, instruments and styles.
Finally, there is Logic Pro's Mixer. This is where you'll be adjusting volume levels of your various tracks.
Once you've got a sense of familiarity with these different sections of Logic, you'll be more comfortable using them to make music.
So, in the rest of this guide, we will walk you through the process of how you can put together a song idea in Logic Pro, using the various sections and highlighting some tips and tricks along the way.
Creating Tracks
Generally speaking, you'll be working with mainly Audio & MIDI Tracks in Logic Pro. To create a new track, simply click the Add Tracks Button (which is the plus sign in the top left corner) or right click under your current tracks.
You'll then be presented with a few different options so it's worth noting what they are.

- Software Instrument - This is your standard MIDI channel. It allows you to use either one of Logic's built in Instruments, or a third party one, to create MIDI data.
- Audio - This is a channel working with Audio, which can either be recorded in externally, or can be samples or loops.
- Drummer - Logic Pro's unique virtual drummer. This is a powerful combination of audio and MIDI, allowing you to choose from a range of genres and different virtual drummers to generate a wide variety of drum patterns. You should definitely try this out, because it's super fun.
- External MIDI - Outboard gear sometimes has MIDI out capabilities, meaning it can send MIDI information to a DAW. This is what an External MIDI track is for.
- Guitar or Bass - These are Audio Channels, but they use Logic's extensive Amp and Pedalboard plugins to emulate different classic guitar sounds.
So, they're the different options for you when creating a track in Logic Pro. You'll choose one depending on what your needs are, and then you can start working on your musical ideas from there.
If you're working with Audio, you can begin recording your external instruments or voice into Logic. If you're working with MIDI, you can use your MIDI keyboard or the Piano Roll to create some sounds, and you can browse Logic's library for synth sounds you might want to use.
As I mentioned previously, your main areas of working will be with Audio and MIDI, so we will take a look at how Logic works with these.
Audio in Logic Pro
When you're creating an Audio Track in Logic Pro, there are a few things you'll need to make sure are set up correctly. In order to ensure your audio will be working as you want it to, you'll first need to head over to your Audio Preferences by heading to Logic Pro > Preferences > Audio.


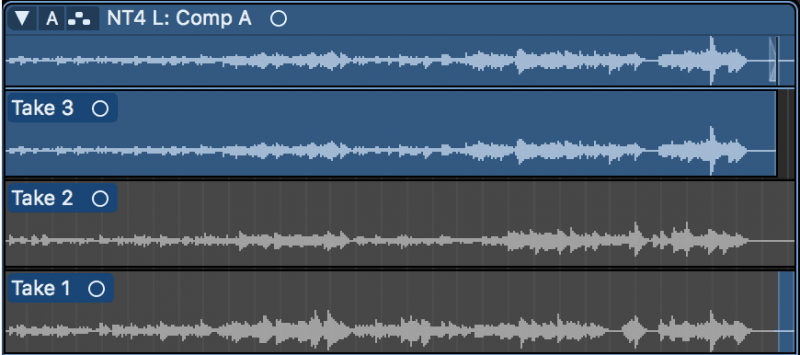
You can do this yourself in Logic Pro, by clicking the dropdown arrow on a take folder, and then clicking and dragging the sections of the different takes which you want to be your final recording. Once you're happy with this, hit the A button at the top of the track and select Flatten and Merge.
It's worth noting that doing this will get rid of all the other takes you recorded, so only do this when you're finally happy with the take.
Logic Pro also has some powerful Audio Editing features.
For example, you can easily split your audio recordings into different regions by pressing CMD + T on a highlighted region, with the playhead marking where the split will be.
Logic's Audio Editor also contains Flex editing, which allows for precise pitch and time manipulation of audio files. This is where you can super creative, adjusting your audio in a number of exciting ways. Be sure to look more into this to discover all of the tricks you can do with Flex Editing!
The other main way you'll be working in Logic Pro is by using MIDI.
MIDI in Logic Pro
Any internal instruments used in Logic Pro, basically anything that isn't audio coming in from an external device, will be created on a MIDI Channel.
Logic Pro uses Patches, which are basically channel strip presets for when you create a track. A Patch includes an instrument, as well as a few basic effects and Sends set up.
When you create a Software Instrument track, you get a default Electric Piano Sound.
You'll also notice a box is checked when you are creating a track which says Open Library. You can see this if you check the images further back in the guide.
With the Library open, you can choose from a wide range of different patches and sounds for your instruments. There are many options to choose from, and if you're just starting out, you'll find lots of inspiration here.
You can also use third party plugins to create sounds, but starting off with Logic's presets gives you plenty of options to use while familiarising yourself with the workings of the DAW.
So, Instrument tracks have the same basic controls as Audio tracks, but they don't have the Input Monitoring button because that's an audio-specific control.
If you have a MIDI Keyboard, once you hit record in Logic Pro (and ensuring you've remembered to hit Record Arm on your MIDI track) any notes you play in on your keyboard will appear in regions in the tracks area. Once you click on one of these MIDI Regions, you'll open up the MIDI Editor Window, which contains the Piano Roll.
Don't worry if you don't have a MIDI keyboard though - if you hit CMD + K on your keyboard to open up Musical Typing, which is a great and intuitive way to play in simple chords and melodies.
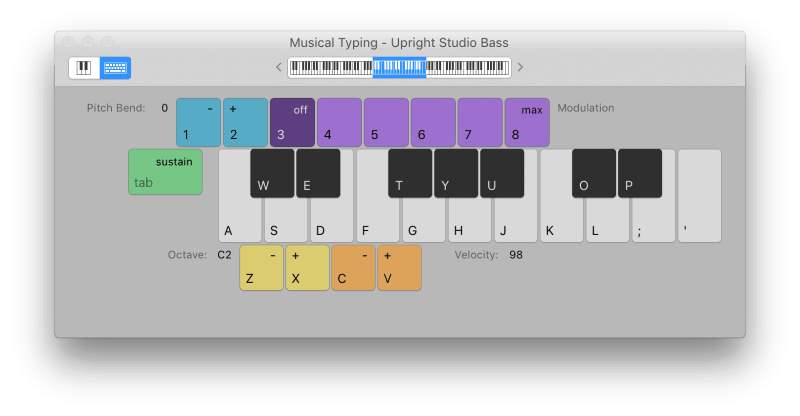
Musical Typing has some really intuitive controls.
The keys on your keyboard are the musical notes, as you can see in the image above.
The Z & X keys control the octave (which you can see highlighted in the top of the Musical Typing window)
The C & V keys control velocity.
Tab is the Sustain Control, so if you hold this down while playing, notes will be legato.
You've also got Pitch Bend and Modulation controls across the top.
If you're just a beginner, or if you don't have a MIDI Keyboard, or even if you're just travelling around a lot, the Musical typing mode is a great way to sketch down ideas.
So, once you've sketched in some ideas for chords or melodies, you'll be working in the MIDI Editor Window.

Now, the MIDI Editor Window shows the Piano Roll by default, but it's worth noting that there are also options for Score and Step Sequencer editing modes.
In the Piano Roll, notes are displayed as coloured bars in a time grid. The horizontal lines are the position in time, while the vertical lines (as indicated by the piano up the left hand side) correspond to pitch. In some instances, the notes in the piano roll will correspond to names rather than pitches. This is the case with drum or percussion instruments, so if a particular note, say C3 corresponded to a Kick Drum, it would be labelled as Kick Drum rather than C3, in this instance.
you can add, adjust, move, and shorten or lengthen notes. You can adjust the velocity of the notes, as well as the swing and quantize settings.
Quantizing is the process of aligning the notes rigidly to a user defined tempo grid. Adhering strictly to this creates very rigid music, while working outside of these boundaries is called 'swing' and it adds an element of humanization to your music.
There are a number of tools available to you in the Piano Roll. The main ones you'll be using are as follows:
 The Pointer Tool is your basic mouse pointer, which allows you to select, move, copy, resize or loop notes and events. You'll use this as your "default" option in the Piano Roll.
Humanization & Quantization
So, while MIDI is a wonderful thing, and indeed it's the driving force behind being able to make music on a computer, there are a few things you need to be aware of.
The most important one you need to know is that MIDI automatically sounds very robotic, especially if notes are recorded or drawn in all at the same velocity.
We have Quantization as an option for working with MIDI, which automatically snaps MIDI notes to the tempo grid, but this can work against you in certain scenarios. Sometimes you don't want your MIDI to be perfectly in time.
A good workaround for this is to head over to the Quantize controls section and adjust the Quantize Strength.
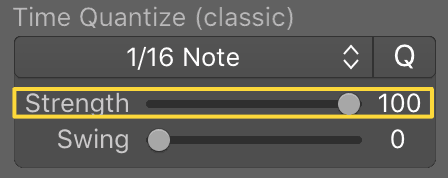
A strength of 100 will give you fully rigid timing, while moving it down will relax the quantization somewhat, giving you more of a natural sounding performance.
We call this process of making MIDI sound more natural Humanization, and there's another key way you can achieve this.
The concept behind Humanization is that no human can play something perfectly every single time, but a computer has absolutely no problem doing this. And since computer based music is a relatively new phenomenon, and for many centuries humans have been listening to other people play music, our ears are naturally inclined to prefer this type of music.
So, you can make sure your MIDI doesn't sound too robotic by adjusting Quantize settings, but you can also edit the velocity of your notes.
If you are recording your MIDI in through a MIDI keyboard, it should record in your velocity too. If not, you'll want to adjust it yourself.
The Velocity control of MIDI notes is an imitation of how hard or soft the key may have been pressed. If you only slightly tap a key, you'll have a low velocity, and if you play it hard, it's a higher velocity. This in turn effects how loud the notes are.
So, much like a human can never play a piece of music perfectly in time every time, we do not play notes all at exactly the same volume. There is a natural variation in the volume and velocity of the notes we play. So, by editing the velocity of your notes, you can make your music sound less robotic and more human!
To get Logic to do some humanization for you, find the MIDI region you want to humanize, and right click on it.
Next, scroll down to MIDI Transform and then select Humanize.
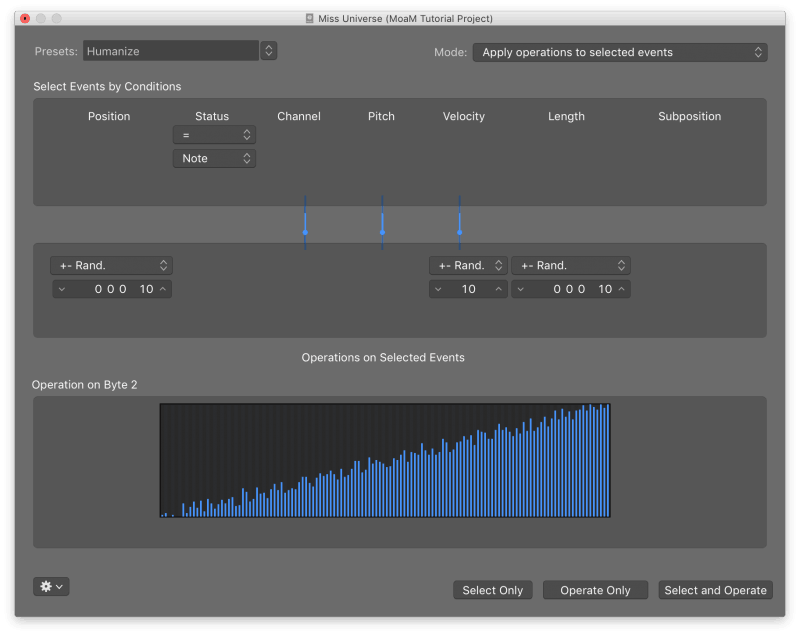
This opens up a window which allows you to apply some randomness to your MIDI, and by hitting Select and Operate, you can apply this process.
So, by now we've covered working with Audio & MIDI in Logic Pro, so you should be relatively comfortable with these two areas. Audio and MIDI are the building blocks of your music, and once you've worked with some of these, you should be ready to look at the Mixer.
Logic Pro's Mixer

There are two parts to making music in a DAW like Logic Pro.
The first is writing the music. We've covered the basics of this in the overview of Audio & MIDI tracks.
The second part of the process is Mixing your music. This is - generally speaking - the point in the process where your song's arrangement is fully put together, and you're going now in a position to balance the volume levels, pan position and effects.
Having said this though, when you're experienced as a music producer, you'll be jumping between writing your track and mixing it as you go. It isn't as linear a process as I'm describing here!
So, you can see the mixer in the image above. There are two ways to access this. You can hit X on your keyboard which will open the Mixer, or you can hit Command + 2 to open a standalone mixer window. This second option is great if you're working with a two monitor set up; having your mixer always visible on one monitor can be a big plus.
Now, let's examine what we're looking at.
Each channel in the mixer corresponds to a track in the Tracks Area. You can see this by how they're labelled.
Each channel has a volume fader, pan control, slots for effects, sends and other routing options.
We've already covered Volume and Pan controls, but to recap; your volume of each individual channel needs to be balance against every other channel in your track. The volume is measured in decibels (dB), with 0dB being the standard position for a fader, and +6dB being very loud. You want to ensure you balance these, all while keeping an eye on your Master Fader, because if the volume gets too loud (indicated by flashing red LEDs) you'll hear audible distortion and clipping in your audio.
The Panning refers to whether a channel plays in the Centre (both speakers) or the leaning more towards the Left or the Right. Panning something "hard left/right" means it is entirely coming out of the corresponding side of the Stereo Field.
Now, the mixer can be intimidating because of how much you can see, but it's all fairly straightforward!

You can see in this image, the controls we've just discussed. There is also a Mute and a Solo button, which either turns off the signal of that channel, or in the case of Solo, makes it so you're only hearing that channel.
You can see the volume displays in two screens (next to where the dB label is).
The left hand one is the volume level that I've set my fader at, which is -0.3dB. The one on the right hand side shows the peak volume during playback, which is registering at -5.5dB.
It's good practice to mix quieter than you think you need to. You should always leave some extra headroom for when you get to the mastering stage of your project.
Now, it's the top portion of a channel strip that has the most functions in the Mixer, so it's worth noting what these all are.

You can see on the right hand side here, the top section of the same channel on our mixer.
Let's go over what the controls are!
The top shows a greyed out Setting button. This allows you to load a preset Channel Strip Setting, which are collections of different effects, tailored to different mixing scenarios. You can save your own Channel Strip Settings to enable you to load them up quickly to save time.
If you always mix your vocals in the same way, with the same go-to plugins, you can save this as your default vocal Channel Strip.
Moving down from this, we see a bar saying Gain Reduction. This is a process found in devices such as Compressors, and this indicates how much Gain reduction is taking place on your specific channel.
Below this, we have the EQ section, which is where you carve out and adjust the frequency characteristics of your track to suit your needs.
Below this is a slot for MIDI FX, which are MIDI specific - you won't find this option on Audio Channels.
Input in this case (a MIDI channel) shows the instrument that is creating the MIDI sounds, but on an Audio Channel this would show as the audio input source.
Audio FX is where you will apply all manner of different effects; Compression, Delay, Reverb and other such effects.
Now, there are certain instances where you will not want to put an effect on the channel itself, and will instead use an Aux or Bus channel. This is what the Sends is indicating.
When you're mixing, you'll end up wanting to do a lot of group processing, so using Bus channels allows you to create one channel with a collection of effects, and you can then Send the signal from any channels you want to your Bus channel.
An example of this is if you're working with drums. You might have individual channels for your kick drum, your snare, and your cymbals and other parts of the kit. You would want to process all of these channels as one audio entity (i.e a drum kit) rather than individual parts. This saves you from adding the same collection of effects onto 7 different tracks. You can just create an Aux/Bus channel and send the signal to it!
Using the Send control dictates how much of your signal is sent to the Bus channel, the more you send the signal, the stronger the effects will be. But you can also use the Output control to entirely route the signal of your mixer channel to that of the Bus. There are other creative ways you can play with signal routing, but that's a bit advanced for a beginner's guide!
Conclusion
So, with this guide, you should be confident with the basics of working with Audio in Logic Pro, whether it's recording or working with loops. We also covered MIDI, and how you can play or record it in to make music.
Finally, we covered Logic Pro's Mixer, which is where you balance all of the different volume levels and other effects controls for the signal in the your project.
Logic Pro is a powerful DAW, capable of creating amazing sounds, and used by industry professionals all over the world. With completing this guide, you have gotten one step closer to becoming a proficient Logic Pro user.
While you're here at logicxx.com, be sure to check out the rest of our blog. We have lots of guides on music production concepts, whether it's extensive guides like this one, plug in spotlights, or recommendations for software!
Also, we have a huge collection of professionally crafted Logic Pro Project Templates, which are made by our international team of producers. These are perfect for seeing all of the complex skills and tricks that go into making a professional, chart topping tune. So check out our deals on remakes, and come back soon!