Logic Pro X for Windows
Posted by Esteban Miranda on
In this guide, you’ll learn everything you need to know about how to run Logic Pro X on a Windows PC.
What is Logic Pro X?
Why would you want to use it on Windows?
How to get Logic Pro X to work on a Windows PC using a Hackintosh method.
Other ways you can do this.
Let’s jump right in shall we?

WHAT IS LOGIC PRO X?
Logic Pro X is Apple’s flagship Digital Audio Workstation (DAW), used by recording engineers and producers alike, from the hobbyist to the industry leading professional. Logic Pro X allows users to record and manipulate audio, as well as program MIDI with a wide range of built in instruments, sounds, loops and effects. There are some really great built in VSTs that come with Logic, such as their Drummer program.
Here’s a rundown of some of its best features;
- Smart Tempo feature helps in matching the timing of your audio tracks automatically.
- Logic Remote feature allows your iPhone or iPad into a touch instrument with the support of a mixer with multi-touch and transport control.
- Flex Time and Flex Pitch features of Logic Pro tool allow Melodyne levels of pitch and time editing for audio such as vocals, guitar or drum sounds.
- Logic’s Track Stacks feature allows the merging of multiple related audio tracks into one.
- A vast library of loops and effects.
But it has always maintained its air of exclusivity because it is an Apple Mac product, and with their flashy hardware and hefty price tags, it can seem as though Logic is hidden behind a paywall for anyone using Windows. But is it? This leads us to the next section…
WHY WOULD YOU WANT TO USE IT ON WINDOWS?


Logic Pro X on a windows machine would allow you to access the great features of Logic Pro without having to pay huge amounts of money for some Mac hardware. Apple has always had a reputation for super expensive and flashy products, but with their most recent few releases of the Macbook Pro especially, things haven’t been so great for music producers. The amount of USB ports has reduced, as well as disk drives being a thing of the past.
However, if you have a Windows PC - which often cost a fraction of the price for a similar spec to a Macbook pro - you can get Logic to work.
Compared with Ableton Live, Logic has always had an advantage in its Audio editing and recording side. There have just been more options, a pretty good built-in pitch correction plug in, and even from a practical point of view, using Logic to record audio just runs more smoothly. It has also imported some helpful features from its little brother program Garageband; offering presets for audio channels with a rack of effects already in place for specific purposes. There are also some great plug-ins available; Logic’s EQ is great, but there are also Vintage EQ and advanced reverbs.
In short, Logic is a great program, so if you want access to it without having a Mac, read on…
HOW TO INSTALL LOGIC PRO X USING THE HACKINTOSH METHOD
When using Mac only software on Windows, you have to be prepared for a bit of a time consuming setup, but once you’re finished, you’ll be good to go. Many people go down the ‘Hackintosh’ route, which is to create a Windows PC hardware, then install macOS onto it. There are also ways to virtually run macOS on a Windows PC, which we will cover later. It’s worth nothing though that Apple doesn’t really want people installing macOS on anything other than Macs, so you have to be careful. In general, you’ll need a 64bit Intel Processor and you should be fine. As mentioned, some people build their own Custom PCs and then install macOS on it, while others do so on a machine they know is compatible, so just do whatever is in your budget, and make sure you check compatibility!
The first big tip is to create a backup of all your data, the last thing you want is to lose everything if you get one of the steps wrong!
Let’s look at the steps below:
- First, you’ll need a Mac on which you can download the OS Installer from the Mac App Store. Any Mac capable of running Mojave will work for this. You can also look at the software Unibeast from tonymacx86.com, which is a popular installer creation tool.
- Next, you’ll need a USB drive (at least 8gb) to put the installer on. You can find detailed guides on how to create an installer on the web, so make sure you check all your requirements and specs against one of these to ensure you’re doing it right.
- Then, using that installer, you can use Unibeast to install from onto your PC. It should give you an option for which drive you want to install macOS from. Navigate to ‘External’ and the macOS installer should begin. You’re one step closer to running Logic Pro X on a Windows machine!
- When it comes to selecting the drive onto which you want to install macOS, there may be no options to choose from. If this is the case, erase the drive and make sure you’ve formatted it to GUID and you should be good to go.
- Select the drive and step through the installer until macOS installation begins. Once you’re finished, restart the PC with the USB still in, and then the Unibeast boot menu will appear again, select the macOS boot disk and your PC will boot up macOS.
- Once it's installed, launch Multibeast and configure your settings.
So, once all of this is complete, if you’ve followed each step you should have a piece of Windows hardware with macOS installed, and then you’re free to run Logic Pro X on the machine. It should be noted however that there are a few drawbacks to running macOS on a Windows PC.
Because it’s technically a hack (hence the term Hackintosh) you won’t be able to get the same software support from Apple as if you were using their hardware. There can also be compatibility issues with some hardwares, but that’s why it’s important to check your PC before you begin.
But what about creating a virtual version of macOS?
VIRTUAL VERSIONS OF MACOS
Using the Hackintosh method isn’t the only way to get macOS and Logic Pro X to run on Windows. However, it is usually the most straightforward and the most likely to work best. But read on anyway!
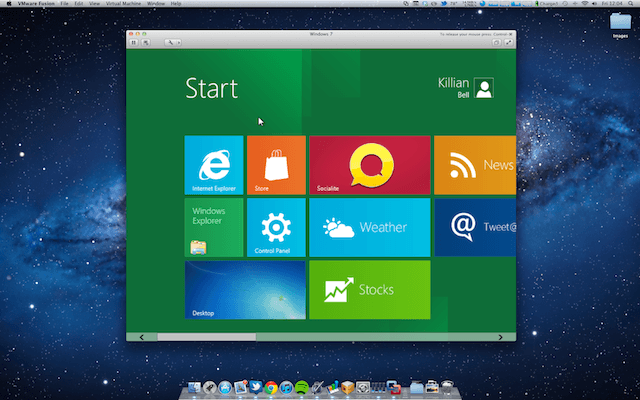
Creating a virtual machine on your hard drive is a great way to get programs that aren’t native to your operating system to work. It’s done a lot with creating a virtual Windows OS on a Mac, but there’s no reason you can’t do it the other way round.
Using softwares such as VMWare Fusion or the free tool VirtualBox is a great way to achieve this. But if this is the route you want to go down, you have to have a specially created virtual image of the macOS version you want to install, which can be tricky to come across. The process can sometimes be considerably trickier than the Hackintosh method listed above, too, so rather than explain myself, here is a great guide on using the Virtual Machine method to run macOS on a Windows computer.
WHAT NEXT?
So, if you’ve managed to successfully use one of the above methods, you’re ready to install Logic Pro X on your Windows computer. Remember, there may be some issues cropping up along the way, and you’re bound to run into these when running programs on operating systems that they aren’t native to.
However, if you have managed to make it work, you now have the powerful tools of Logic Pro X at your fingertips on a Windows Computer. So dive right in, explore all of the features Logic Pro offers and see what you can come up with.
Let us know in the comments below if you managed to make this work, and what your thoughts in general are on Logic Pro X and Windows. Do you think it should be made available to everyone? Or are you an Apple Mac purist?
As always, thanks for checking in with us here at Top Music Arts, and keep making music!
Share this post
- Tags: Logic Pro DAW, Logic Pro X