Logic Pro Drum Synth
Posted by Esteban Miranda on
If you checked out our last article, you'll be aware that Logic Pro has some really great ways of working with drums built into it. We covered Drummer, Logic's fantastic virtual drum plug-in, as well as the related Drum Kit- and Drum Machine Designers, which offer great ways of creating your own virtual drum kits (whether acoustic or electronic) for use with Drummer and other plugins.
But in this article we are going to shift our focus onto Drum Synth. Logic Pro's extremely powerful drum synthesis engine. Sometimes you might want to make and tweak your own drum sounds instead of using samples, the method a lot of producers go for. If that's the case, then Drum Synth is a great option for you to check out.
In this article we are going to cover;
- An overview of Drum Synth
- More details on the sounds it can create
- Tips throughout on how you can use it!
So let's jump right in.
Drum Synth Overview
Don't be fooled by Drum Synth's simplistic design. Despite its minimal interface and pretty colours, there is a lot going on under the hood.
It's a fully integrated and powerful synthesiser, giving you creative control over your drum sounds.
Depending on the type of drum sound you've chosen, you have up to eight specially selected controls for that sound. These include pitch, filtering, effect and envelopes which allow you to adjust the sound until you've created the perfect sound for your needs.
You can also add effects onto your channel strip or busses, to add further processing to the sound.
The power of Drum Synth to create versatile and unique drum sounds is ideal for adding extra flourish or fills to an existing Drummer groove, or a loop or sequenced part within your project. It's also great for replacing drum sounds and for drum doubling.
You can use multiple instances of Drum Synth, either as individual software instruments or within Drum Machine Designer, as we discussed in our previous guide. Using this method, you can create entire electronic drum kits using your own sounds.
So, let's have a look at the global parameters for Drum Synth.
Global Parameters
Within the plug-in window, there are four global parameters to Drum Synth.
-
Group type pop-up menu: The types of drum sounds you can use are broken up into 'families'. Use this menu to choose a drum or percussion instrument family: Kicks, Snares and Claps, Percussion, Hats and Cymbals.
-
Sound type pop-up menu: Within each family sound group, this menu allows you to choose a drum or percussion sound type from the active instrument group. Back to Default reverts all parameter changes to their initial values.
-
Instrument icon: The cute little image of the sound you're editing. Click it to play the sound.
-
Key Tracking button: Some drum sounds you want to always play at their original pitch, others you want to adjust the pitch chromatically. Enable this option to play the sound chromatically. Disable to play the sound at the root pitch when any key is struck.
The “Root Key” label is shown beside the keyboard in the Piano Roll Editor.
-
Mode pop-up menu: Choose a playback mode.
-
Mono: One voice can be played. If you play another key, the newly played note cuts off the playing note.
-
Poly: You can play multiple notes simultaneously.
-
Gate: Like ‘Mono’, but the sound is heard only while you hold the key.
-
So, these are the Global Parameters for Drum Synth. This is the plugin-wide controls that apply, but there are specific controls and options that are presented with each different type of instrument group you use. So let's take a look at those in some more detail.
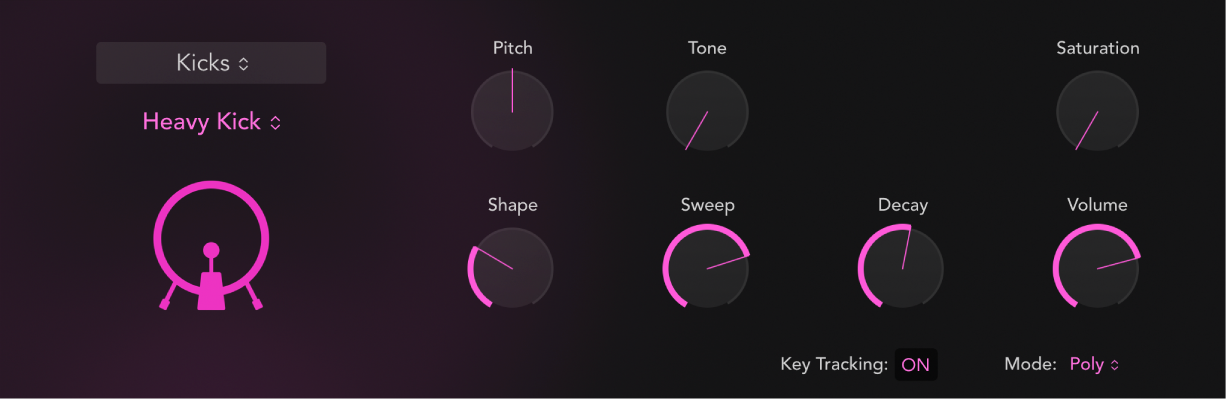
Drum Synth: Kicks
You'll notice on the image at the top of this guide that the Drum Synth instance is set to Kicks. This is -surprise, surprise!- where you will edit your Kick sounds. You can create sounds ranging from soft, classic electronic sounds to more modern punchy kicks.
So, for the Kick group of instruments there are some sound parameters. These are what you adjust to change the timbre of the sound, and it's worth noting that not all parameters are available for each type of kick drum sound. The parameters interact with each other, and this changes the behaviour and the impact of the adjustments you make, which in turn results in a very broad range of potential sounds.
You can constantly monitor the sound you're creating by clicking the drum icon. Which is a novelty, but I love this feature. Music production software is often so overwhelming with knobs and faders and parameters to adjust, that it can be nice to have some visual elements too.
So let's look at the parameters:
-
Body knob: Alter the depth of the sound, making it fuller and richer. This offers a really wide range of adjustments to the sound, and it's easy to spend a long time fine tuning this to get the sound you want.
-
Decay knob: Set the length of the decay phase of the sound. If you want a punchy hard hitting drum or a nice long 808 bassy sound, this is your knob to go to.
-
Noise knob: Add a noise signal to the sound. It's often a good idea to add noise to kicks, because when they are too low-end heavy the impact can sometimes get lost in your mix. Adding some noise helps it to punch through.
-
Pitch knob: Set the tuning of the sound in semitone steps. Perfect for those bassy 808s.
-
Punch knob: Adjust the tone of the attack phase of the sound. A kick sound all comes down to how hard hitting it is, if you want a super punchy sound try using a fast attack, and for more mellow kicks, dial this back.
-
Saturation knob: Set the saturation amount. This adds a warm distortion. Like noise, adding saturation and distortion to your kicks can help warm them up and let them stand out in your mix.
-
Shape knob: Adjust the shape of the kick drum. Sounds abstract, but use your ears. Adjust this parameter and see how it differs in sound each time.
-
Snap knob: Set the amount of beater noise. This can be good to add a bit of extra sonic quality to your kick.
-
Sweep knob: Adds heft to the attack phase of the sound. This is a great way to add some signature to the impact of your kick. After all, the attack phase is the first instance your listeners will hear of it, so using this Sweep knob is a great way to add character to your sound.
-
Tone knob: Set the overall tonal colour of the sound. Again, this one sounds a bit abstract, and the best way to appreciate it is to give it a try!
-
Volume knob: Set the output level of the sound. Does this one really need explaining?
So, there are all of the controls for your Kick sounds. As we mentioned, they interact with each other, and not all of these will be available for every type of kick sound. Taking the time to perfect your kick is a great way to make your music stand out. Default sounds become like background noise to people who hear them all the time, and remember, your kick is the driving force behind your music. So making it your own can really help you music pop!
Let's move on to snares and claps!
Drum Synth: Snares and Claps

So as you can see, selecting the 'Snares and Claps' menu changes the interface, and we've even got a lovely yellow colour now to replace that purple!
You'll also notice that the controls have changed. This is the instrument group where you'll make synthetic and electronic snare sounds, rim shots or hand claps. The part of your kit which usually drives your offbeat rhythms, accenting the parts your kick does not.
By now we know that these parameters are not available for every type of sound, and they interact with each other, creating a diverse range of sonic options.
Let's have a look at the parameters for Snares and Claps, shall we?
-
Body knob: Alter the depth of the sound, making it fuller and richer. Snare sounds run the gamut from full bodied acoustic snare sounds, to super snappy and thin sounding electronic ones. This is your go to knob for changing how your snare or clap sounds in this regard.
-
Crush knob: Add a lo-fi digital distortion to the sound. It's not possible to overstate how well distortion and crush alter drum sounds. Making your percussion sound super lo-fi and digital can be great in some instances!
-
Cycles knob: Smear the sound. Set the rate with the Speed knob. Have a listen to how this one affects your sound, what do you think?
-
Decay knob: Set the length of the decay phase of the sound. Sometimes the occasion calls for a really long ringing snare, maybe you've got a sparse arrangement and you want that snare to sing out when it hits. Or maybe you want a short and snappy sound to drive those rhythms. Adjust the decay to get your results!
-
Dirt knob: Add grit and fizz to the sound. Again, adding distortion to your sound is like drizzling maple syrup on pancakes. It's amazing.
-
Noise knob: Add a noise signal to the sound. If you've heard Kanye and Jay-Z's N***** in Paris, the end section of that entire song uses a loud noise hit as a snare. So maybe you don't have to go full Kanye (seriously, please don't, that guy is crazy!) but you can add some noise to your percussive sounds to help them stand out in your mix.
-
Pitch knob: Set the tuning of the sound in semitone steps. Pitched snares are really great fun, especially if you're doing trap-style 808 snare fills.
-
Position knob: Set the position of the drum strike. This type of digital mapping of real world musical instruments adds great customisation to your sounds.
-
Size knob: Set the size of the drum shell.
-
Speed knob: Set the rate of cycles. Use the Cycles knob to set intensity of smearing.
-
Tension knob: Adjust snare tension, making the sound snap more or less. Do you want it to be super snappy or not?
-
Tone knob: Set the overall tonal colour of the sound.
-
Volume knob: Set the output level of the sound.
Okay so, Kicks, Snare and Claps are all pretty standard drum sounds. Let's have a look at where Drum Synth gets a bit more out there.
Drum Synth: Percussion
We are now ditching the lovely yellow Snare drum photo for a cool green and picture of a robot.
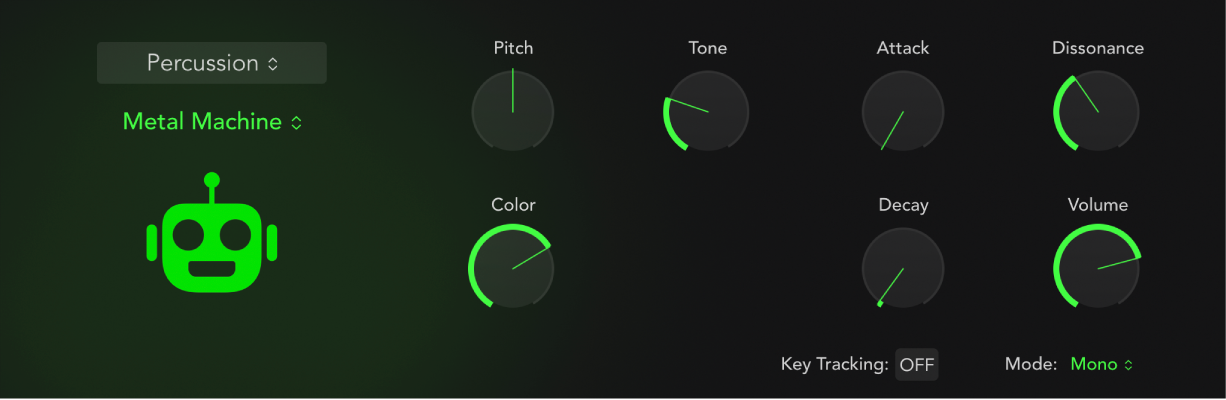
Cool, right? this should give you a clue that we are moving to more abstract percussive sounds with this instrument group. This is a great section, because I love using obscure and strange sounds for percussion. You can create electronic tom sounds, synthetic percussion and 'wild metallic tones' with the Percussion group of instruments.
I love using strange samples for percussive elements in my music, because when you think about it, any impact sound can serve as percussion. This section of Drum Synth lets you create and adjust them!
So let's look at the parameters which are specific to the Percussion instruments group.
-
Attack knob: Set the length of the attack phase of the sound. This one is self explanatory, and adjusting will determine whether you have a hard hitting or a more gradual sound.
-
Body knob: Alter the depth of the sound, making it fuller and richer. I like to imagine this one as a physical adjustment to the size (or the body) of the instrument. How would the sound change if the drum was huge versus if it was tiny?
-
Colour knob: Set the tonal colour of the sound. Using colour to describe sound seems pretty abstract, but it's one of those things that you'll appreciate once you get in there and use your ears!
-
Crush knob: Add a lo-fi digital distortion to the sound. Crush sounds work great when you're creating weird and wonderful percussive sounds, but they also work nicely to add a bit of distortion here and there.
-
Decay knob: Set the length of the decay phase of the sound. Again, self explanatory.
-
Dirt knob: Add grit and fizz to the sound. Do you want your sound to be clinical and clean, or sound as if it's struggling its way through a jungle of cables to reach your ears?
-
Dissonance knob: Alter tones by introducing inharmonic content. This can be a really good tool for creating those weirder sounds, and you can get super creative with inharmonic sonic content.
-
Harmonic knob: Alter metallic tones by introducing harmonic content. Don't underestimate how well a sound can jigsaw-fit into your mix if you get the harmonics right and consistent with those in the rest of your tune!
-
Material knob: Make the sound more woody, rubbery or bell-like. The Material knob interacts with the Tension knob. Craft and hone the distinct sonic qualities of your sound like a craftsman making something physical!
Note: The Material knob can also be impacted heavily by the Dissonance knob, if available as a parameter in the chosen sound.
-
Noise knob: Add a noise signal to the sound.
-
Pitch knob: Set the tuning of the sound in semitone steps.
-
Saturation knob: Set the saturation amount. This adds a warm distortion. This can really help bring out some sounds, but be careful not to use it too much!
-
Snap knob: Set the tone of the attack phase.
-
Tension knob: Adjust the rigidity of the core sound you set with the Material knob. The interplay between this and the Material control knob is super interesting! Have a play around to see what cool sounds you can come up with.
-
Tone knob: Set the overall tonal colour of the sound.
-
Volume knob: Set the output level of the sound.
This is a really great part of Drum Synth. In Ableton, I'm used to trawling through my sample collection and then using Live's Drum Buss plug in to shape my sounds, so this is a great tool that Logic has introduced to be able to sculpt some unique sounds!
Drum Synth: Hats and Cymbals
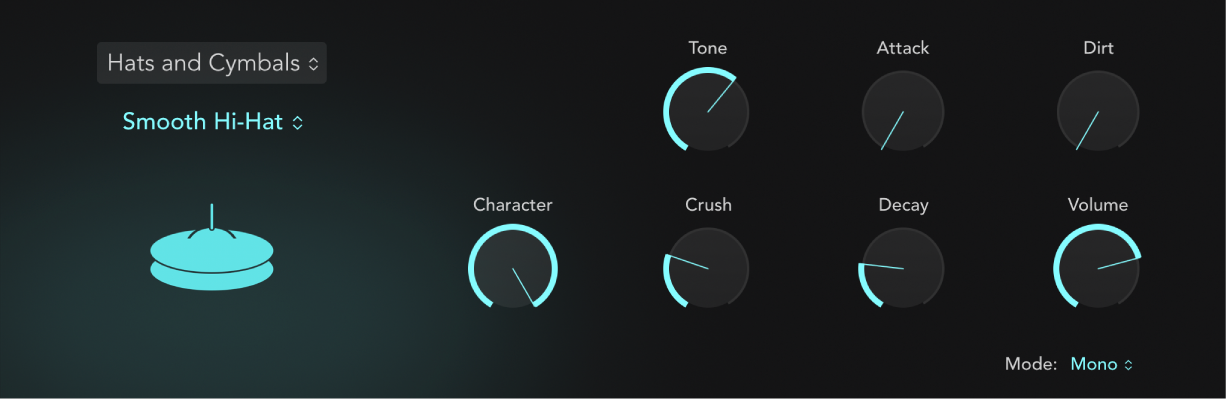
Oooooh, what a beautiful calming blue colour!
This is the last section of Drum Synth, the Hats and Cymbals instrument group, and it's where you can create your shakers, hi hats, ride and crash cymbal sounds. Again, some parameters are specific to certain types of sound, so they won't all be available for every one. But let's have a look at what the parameters are, and what they do!
At this point, we've covered most of them so I won't need to explain them all in detail.
-
Attack knob: Alter the attack phase of the sound.
-
Bell knob: Introduce bell-like harmonics into the sound. Cymbals are a metallic surface in real life, and adding these bell-like harmonics in can give a lovely sonic quality to them.
-
Body knob: Alter the depth of the sound, making it fuller and richer.
-
Character knob: Add a metallic edge to the sound with higher values. Really bring out the metallic qualities with this one. Make sure to listen for how the results then interact with other parameter changes!
-
Crush knob: Add a lo-fi digital distortion to the sound. Sounds great on cymbals.
-
Decay knob: Set the length of the decay phase of the sound.
-
Dirt knob: Add grit and fizz to the sound. A cymbal put through this and the Crush control can sound really distinctive!
-
Dissonance knob: Alter tones by introducing inharmonic content.
-
Metallic knob: Alter tones by introducing harmonic content.
-
Noise knob: Add a noise signal to the sound.
-
Pitch knob: Set the tuning of the sound in semitone steps.
-
Tone knob: Set the overall tonal colour of the sound.
-
Volume knob: Set the output level of the sound.
Drum Synth: Final Thoughts
So, we've gone into the various modes and instrument groups you can use with Drum Synth. There's a lot of really great potential hiding under the relatively simple interface, so it's a great idea to sit and play around with these controls.
Some of the potential uses for Drum Synth for when you've created your own sounds are really interesting.
Drum Doubling is one example. If you've recorded a live drummer, or if you have the recording of one and the parts are separated into their constituent stems (this isn't always necessary but it can help to have the sound you want to replace isolated), you can use Drum Synth to layer a new sound on top of one of the existing ones. Perhaps you think the kick is lacking a certain punch to it. Then you can simply create the sound you need and double it.
You can also use it within Ultrabeat, Logic's synth that is designed to create percussive sounds and polyphonic rhythms. Ultrabeat has a built in step sequencer, and a 4-pad drum assignment. You can directly load Drum Synth settings into Ultrabeat and access additional synthesis and processing parameters, as well as taking advantage of the step-sequencer to create some patterns with the drum sounds you've made!
These are just some of the applications for Drum Synth in your music production. Doubtless there are many many more! It's becoming something of a catch phrase but, experiment! Get in there are try things out. It's where all the best results come from.
As always, thanks for checking in with us here at Logicxx.com, and be sure to check out the rest of our blog for a ton of Music Production related guides and tutorials, as well as our project template deals. You can download these and see how a professional track is put together, it's a really great learning resource!